Configure Azure Active Directory Domain Services for Citrix Cloud Workspaces with the lowest Total-Cost-of-Ownership in Azure Infrastructure-as-a-Service


The Digital Transformation can have different approaches. The most important reasons to follow this road – phasing out on-premises resources to a simplified – and eventually easy manageable environment with the lowest TCO (Total-Cost-of-Ownership) as low as possible, would be one of the main goals to reach.
Lifting and shifting your on-premise environment to the Azure IaaS (Infrastructure-As-a-Service) is one of those approaches that doesn’t make fully use of the benefits of the Azure Cloud as it supposed build to for. My personal opinion, you’d need to replace as much as on-premises Windows Server Roles and Features to Azure Services to make it simplicity and lower in costs at the same time, and (of course) to take advantage of maintenance benefits too.
One of those examples for this is Active Directory. Normally you would install the Active Directory Domain Services role in Azure IaaS or place it on-premise with a Hybrid connection, such as IPsec or ExpressRoute and join your server to that domain. When doing this in Azure IaaS, it consumes a lot of resources costs rather than using it as a AADS Azure service for example. With Azure Active Directory Domain Services, you can buy an Active Directory (As-a-Service) from inside Azure Resource Manager without the need to have a full-blown (Do-it-yourself) Active Directory server running in Azure IaaS.
How cool would it be to authenticate to StoreFront and NetScaler Gateway Service with your Azure AD Credentials and safe money on Azure IaaS at the same time?
With AADDS you can replace the need for a full-blown Active Directory Server in IaaS, for example. And I hear you thinking, what about servers that are required to be joined to a domain? I can be easy on that one, that’s also supported. And of course, there are some limitations on AADS compare to normal Active Directory environments, which you’ll find in the comparison sheet below.
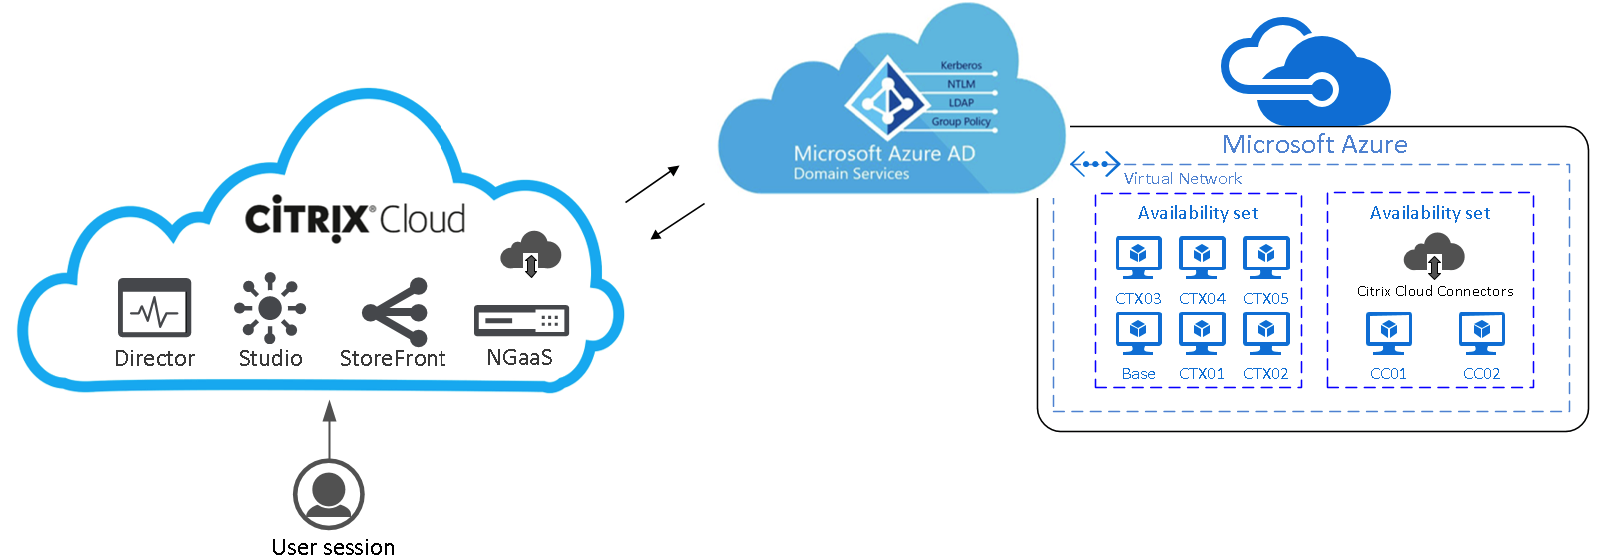
The drawing below is based on Azure AD Connect which replicates object from on-premise AD to Azure Active Directory. This article can be used for this scenario; therefore, it can also be used for Azure AD authentication without Azure AD Connect. It’s not required to have an AD sync active for this setup. Another approach is to do the initial Users and Groups Azure AD Connect sync with on-premises to the Cloud and decommission the on-premises environment afterwards to eventually go Full on Cloud!
Note: This solution can also be used to replace other services and is not only related to Citrix Workspaces. You also can use it for Microsoft Remote Desktop Services for example.
I’ll describe the following scenario’s in this article, you’ll get everything to know how you can replace your current Active Directory environment by Azure AD Domain Services.
Table of Contents
Click on the title to get forwarded in the article:
- Validate the (external) domain in Azure Active Directory
- Configuration of Azure AD Domain Services in Azure ARM
- Change the Azure Virtual Network Settings
- Join a server to the Azure AD Domain
- Create Group Policy Management Objects
- Setup of Citrix Cloud XenApp Essentials Domain Configuration
- What about other Workspace Solutions in the Cloud? Can I use Azure AD Domain Services (AADS) too?
This blog is part of a blog series about the different Citrix Cloud Digital Workspaces. Previous articles that I wrote around the Citrix Cloud, that you might found interesting as well:
- How to configure the Citrix Cloud XenApp and XenDesktop Service using Azure Managed Disks and Citrix Optimizer
- How to configure Citrix XenApp Essentials in Microsoft Azure, including Azure Active Directory authentication to Citrix Cloud
- How to use Citrix Smart Tools – Smart Scale to reduce your XenApp and XenDesktop on Azure Cloud resource costs
- How to configure a Bring-your-Own NetScaler VPX in Azure for XenDesktop Essentials and XenApp and XenDesktop Service from the Citrix Cloud
Did you know…
- The Azure Active Directory Domain Services is now production ready for the Azure Resource Manager platform. It’s not required to use ASM anymore to make a vNet-to-vNet connection to the AADS service in the Service Management (Classic) platform!
- You can connect the Azure virtual network to your on-premises network using a VPN/ExpressRoute or NetScaler SD-WAN connection.
- You can join virtual machines to the managed domain similar to how you join computers to an AD domain in AADS. Even when they are activate in your on-premise environment, therefore you’d need an hybrid connection to provide this.
- Azure AD Domain Services domains are managed by Microsoft. You do not have to worry about patching, updates, monitoring, backups, and ensuring availability of your domain.
- You can create domains with custom names (for example, “christiaanbrinkhoff.com”) using Azure AD Domain Services. You can also create a domain with the built-in domain suffix (that is, ‘*.onmicrosoft.com’) offered by your Azure AD directory.
- Members of the ‘AAD DC Administrators’ group can create custom OUs within the managed domain. Users who create custom OUs are granted full administrative privileges over the OU.
- Azure AD Domain Services offers high availability for your domain. This feature offers the guarantee of higher service uptime and resilience to failures.
- An Azure AD Domain Services managed domain includes managed DNS services.
- The managed domain supports LDAP read workloads. Therefore, you can deploy applications that perform LDAP read operations against the managed domain.
- You can configure Azure AD Domain Services to provide secure LDAP access to your managed domain, including over the internet.
- There is a built-in Group Policy Management functionality for each for the “AADDC Computers” and “AADDC Users” containers. You can customize these built-in GPOs to configure group policy. Members of the ‘AAD DC Administrators’ group can also create custom GPOs and link them to existing OUs (including custom OUs).
- You cannot extend the base schema of an Azure AD Domain Services managed domain. Therefore, applications that rely on extensions to AD schema (for example, new attributes under the user object) cannot be lifted and shifted to AAD-DS domains.
Please read this article for all the other in-dept. information around AADDS
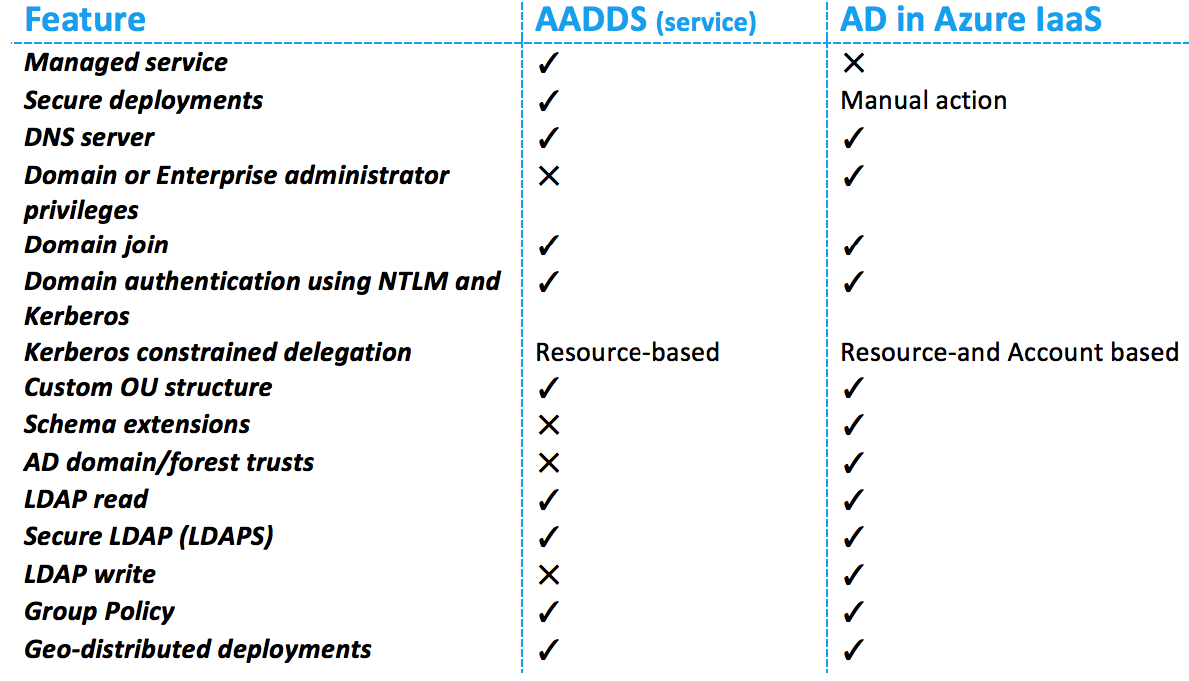
Compare Azure AD Domain Services with standard AD in IaaS
In the following comparison sheet, you can see if the Azure Active Directory Domain Services aligns with your current environment on-premises and/or Active Directory Server in Azure IaaS (Infrastructure-As-a-Service).
Note: All the limitations of the Domain Service in Azure are listed in the table. You can see that Schema attributes aren’t supported, so if your environment relays on custom AD Attributes for example. If so, this solution won’t fit in your workload environment…
Azure Active Directory Support for XenApp Essentials (preview)
With this new solution, you can provide the following options to XenApp Essentials in Microsoft Azure. Just see it as “only” the authentication part of this article. With this article you cover both so you’d don’t need to configure this option in the Citrix Cloud.
- Setup the XenApp Essentials service to communicate with your Azure AD
- Configure your users’ XenApp Essentials workspace portal to enable users to authenticate against your Azure AD
Note: The virtual machines hosting your applications still need to be domain joined, either Active Directory or Azure Active Domain Services (AADDS), which I describe in this article.
Read the complete Citrix Blogs article about Azure AD Authentication here.

Verify the domain in Azure Active Directory
When you choose to configure an own domain name rather than the default onmicrosoft.com Azure Domain for authentication to your Citrix XenApp and/or XenDesktop Essentials or Service environment. You need to add the external domain to the Azure AD trusted domains by validating the domain through a TXT record in DNS.
Note: These are just the same steps that you probably are familiar when you’re already using Office 365.
Open the Azure Active Directory Service

Click on Domain names

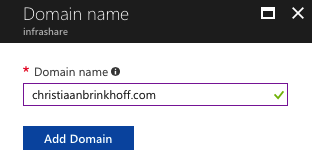
Click on Add Domain name
Add the domain
Create the requested TXT record on the external DNS portal of your ISP from the domain you want to use as authentication method.
Note: When u use the default onmicrosoft.com domain, you don’t need to perform these steps. These steps are only when u use a custom DNS name!
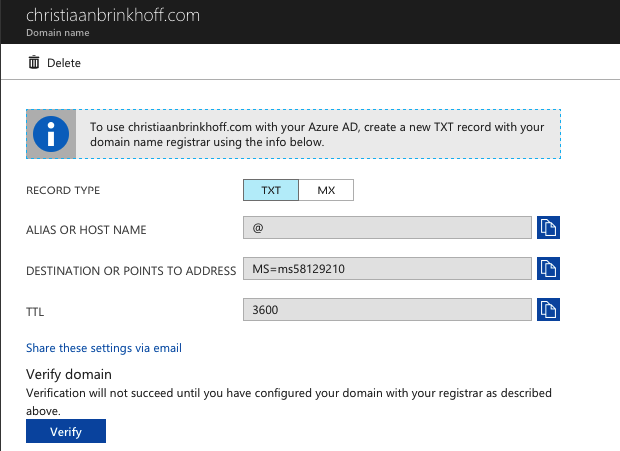
The external DNS record must be something like the picture below…
![]()
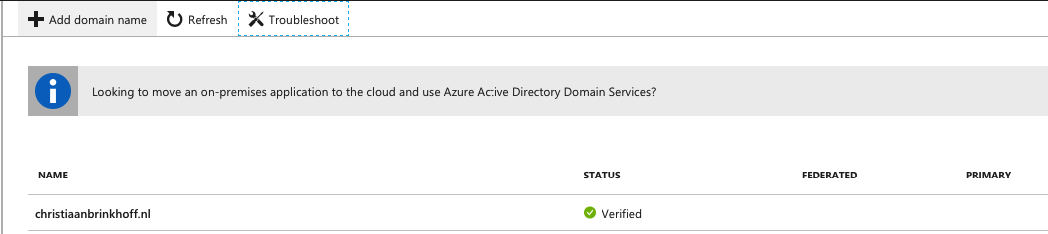
Click on Verify domain

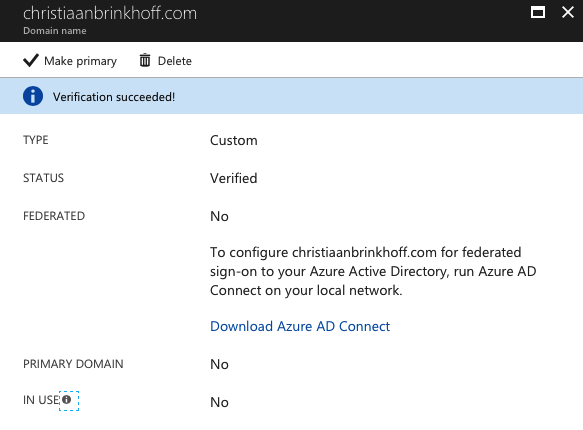
When all the steps are successfully completed, you receive the following confirmation screen below
The next step is to change the Azure Active Directory Accounts – primary domain. Do this in the All Users menu option. Click on an existing user or on + New user

Enter in the credentials / change the URL to the new domain

Configure Azure AD Domain Services through the Marketplace
Open the Azure Portal through portal.azure.com

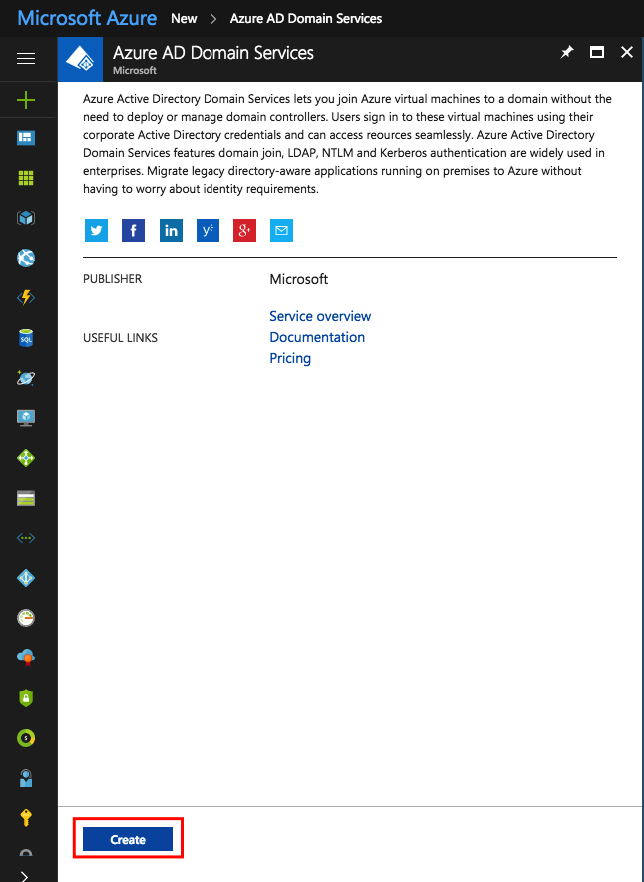
Go to the Marketplace and purchase Azure Active Directory Domain Services

Click on Create
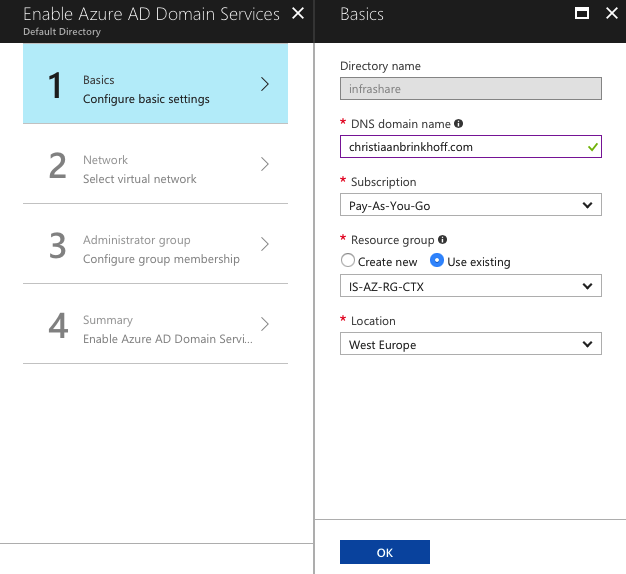
Enter in the DNS domain name, subscription, resource group and datacenter location. Click Ok to proceed to step 2
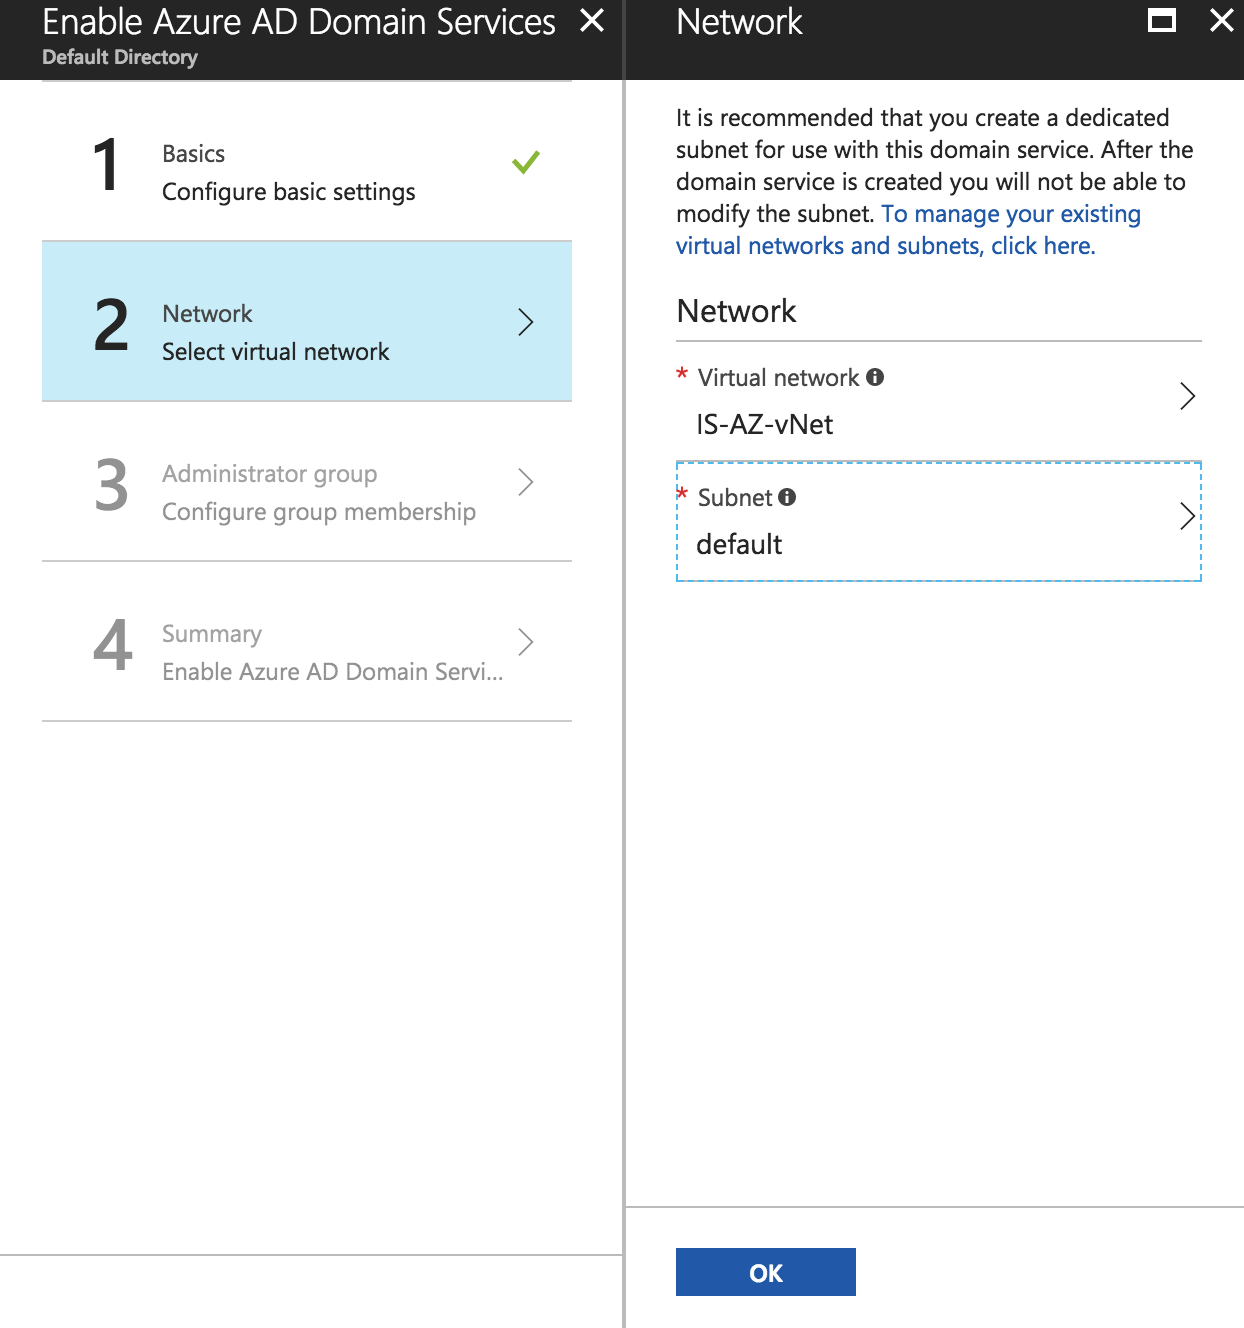
Select the Azure Virtual Network and Subnet that you’d want to use for the Azure AD Domain Service. Click Ok
Now we need to select a Group, which we need to use as Administrator Group to give extra privileges to users. Click on Manage group membership

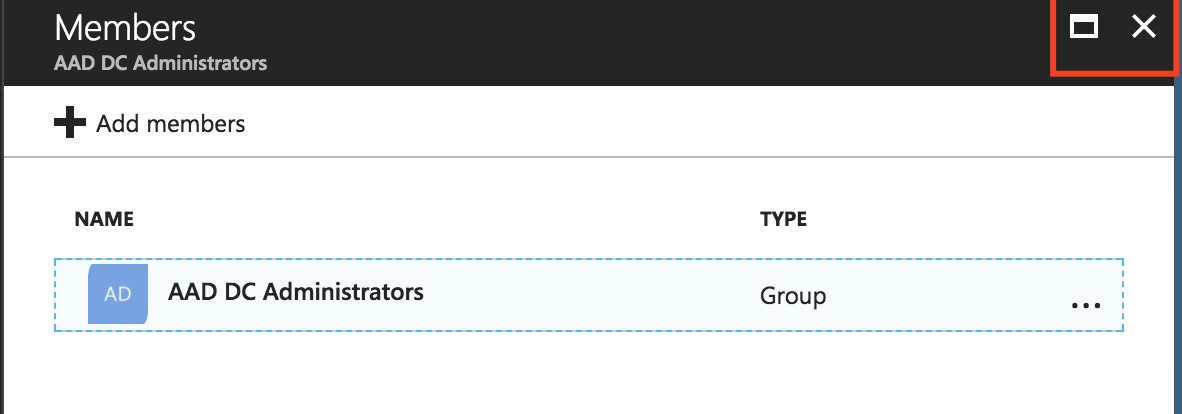
Select a Group, I’ll use the default AAD DC Administrators Group. Click Select.

Make sure that the Group is listed in the Members screen, click on the red cross to get back to the previous screen.
Click on Ok
Check all the settings in the summary screen. Click on Ok to start the deployment

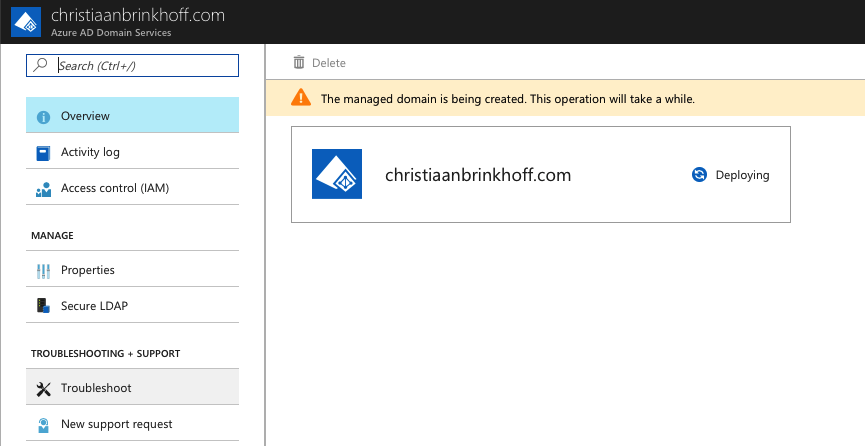
Deployment is initializing…
Note: These steps can take a while

After almost 1 hour, the provisioning of the AADDS environment is done. The following Overview Dashboard can be used to see all important information.
We need the DNS server settings for the next steps.
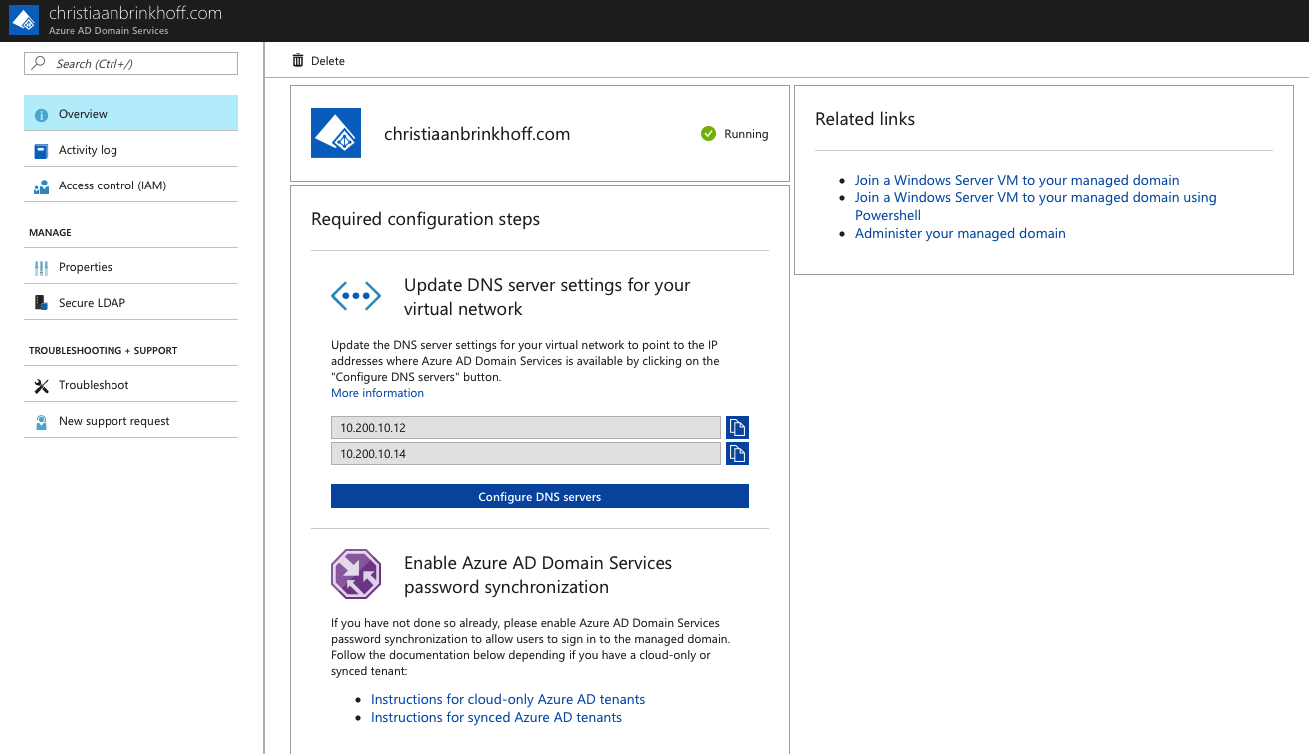
Setup the DNS servers of the Virtual Network
Open the Virtual Network Settings in the Azure Portal

Go to the DNS Servers setting and enter in the primary and secondary DNS entry from the AADDS Dashboard portal. Click on Save
Note: When u have a Hybrid IPsec, ExpressRoute or NetScaler SD-WAN connection to your Azure vNet and also want to join on-premise machine to the Azure AD Domain? Then make sure to update the primary and secondary DNS values of your on-premises DHCP server.

Join a server to the Azure AD Domain
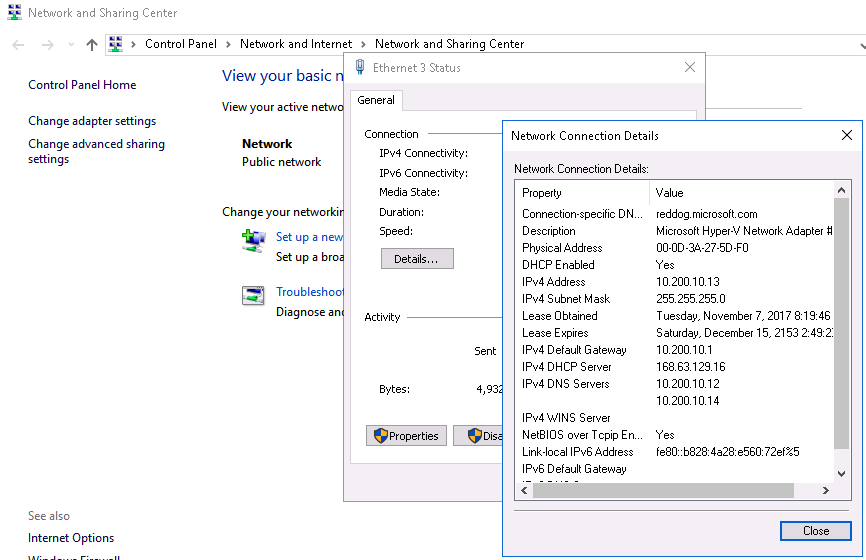
Reboot the XenApp or XenDesktop Base image and make sure that the Virtual Machine received the right Primary and Secondary DNS values.
Note: For XenApp Essentials, you’d wouldn’t have to add the Base image in the domain, this is all included in the Automation process. Please use another machine to proceed the next steps!
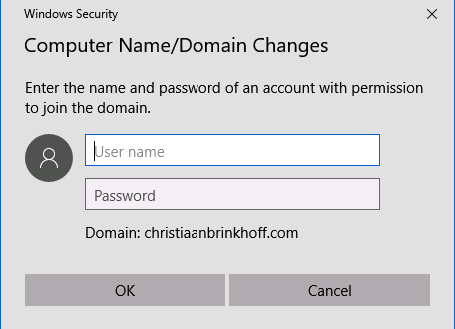
Open System and join the AzureAD domain
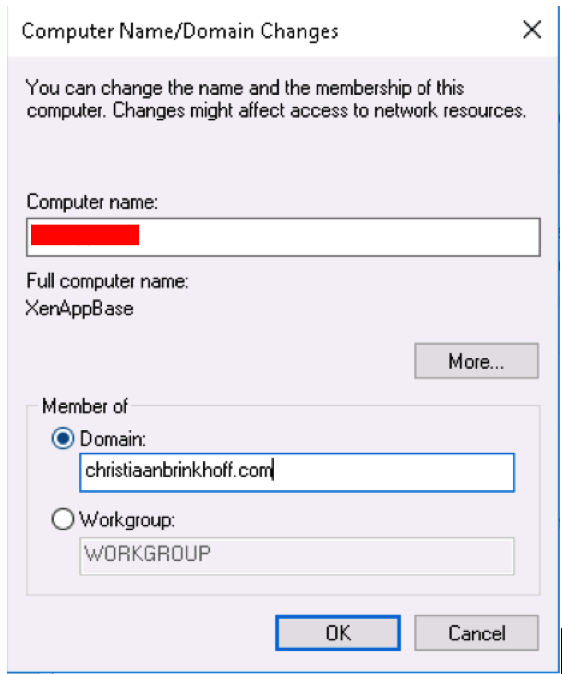
Enter in a username that is a member of the AAD DC Administrators Group
The Virtual Machine is now successfully joined to the Azure AD Domain.
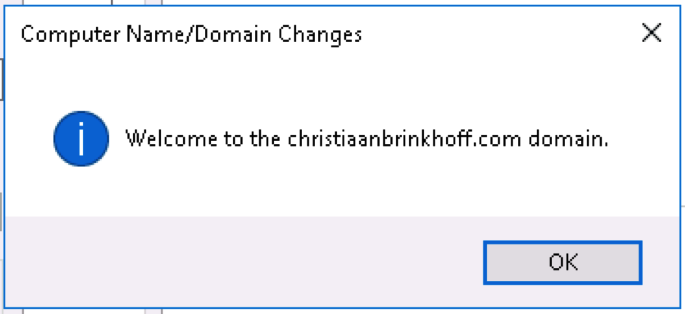
Reboot the machine to get to the next step.
(Repeat the same steps for all the other machines in your environment)
Having problems with the RDP Connection after the reboot? Please, Join the AAD DC Administrators group and/or the Administrator to the Local Administrators of the servers to make sure the Remote Desktop connection works properly.
Reboot the machine afterwards to activate the permissions.

(Repeat the same steps for all the other machines in your environment)
Create Group Policy Management Objects
When the Windows Server is joined to the Azure AD Domain Services domain, you could use the group Policy Management Role from a domain-joined server to create Group Policy Object, just as on-premise Active Directory.
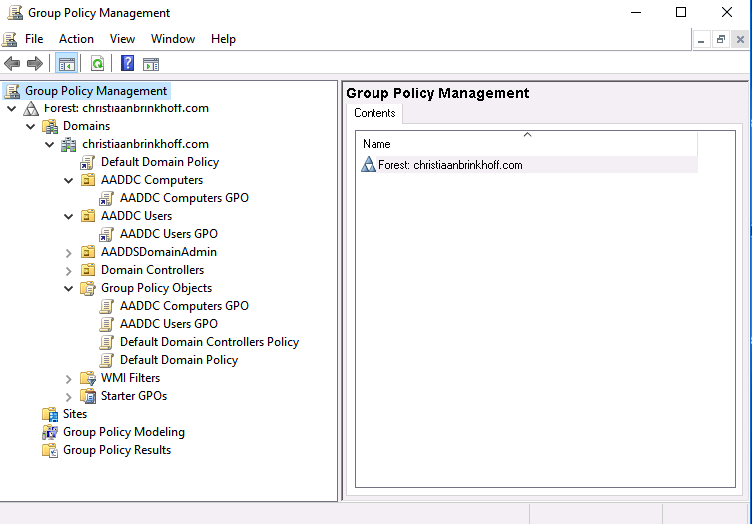
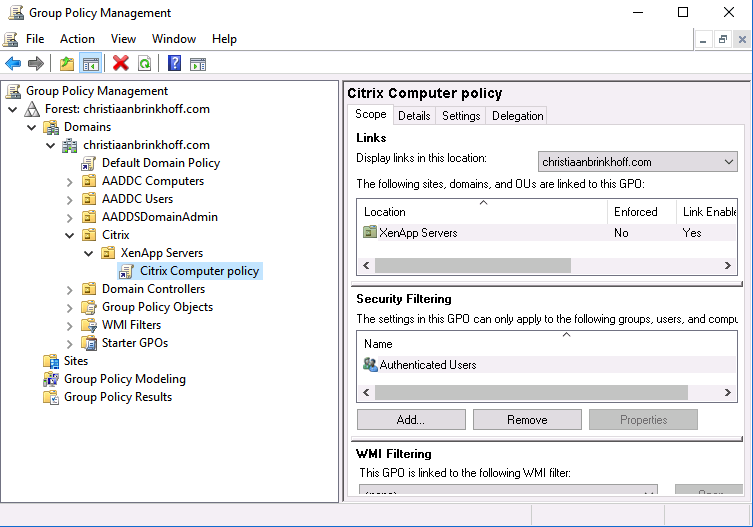
Open the Group Policy Management Console

As you can see, there are already some object created by default starting with the name AADC.
Computer Object are added by default in the AADC Computers OU
Create OU as your own business needs and configure GPO
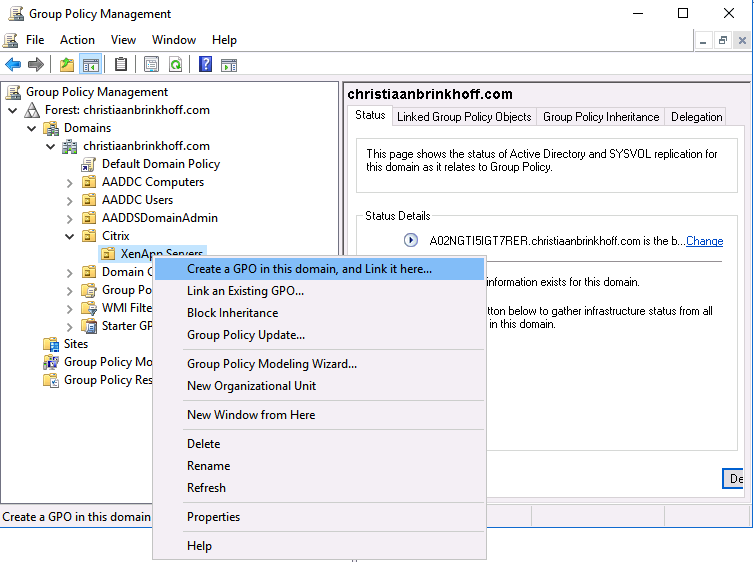
Continue all the steps for all the policy’s you want to create.

And edit them just the same as you are familiar with as in the on-premise version!
Configure XenApp Essentials Domain Configuration for AADS
(I assume that you already installed the latest VDA agent on the Virtual Machine.) I’m also don’t go through all the XenApp Essentials steps. Please see one of my other articles for all the configuration steps – How to configure Citrix XenApp Essentials in Microsoft Azure, including Azure Active Directory authentication to Citrix Cloud
First, we need to search for the distinguish name of the domain, which is required to enter in the Automation process. You can do this by opening Active Directory Users and Computers on a domain joined Virtual Machine. Activate the – Advanced features – and open the properties of the Root domain.
The following OU Object must be listed by default after the initial setup of Azure AD Domain Services.
Note: You can see that your connected to an Active Directory server created by Azure named; V3HZYK0KOIERXNH
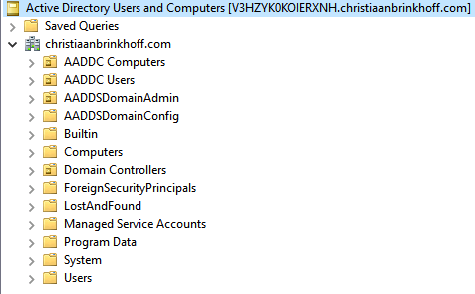
Activate the Advanced Features

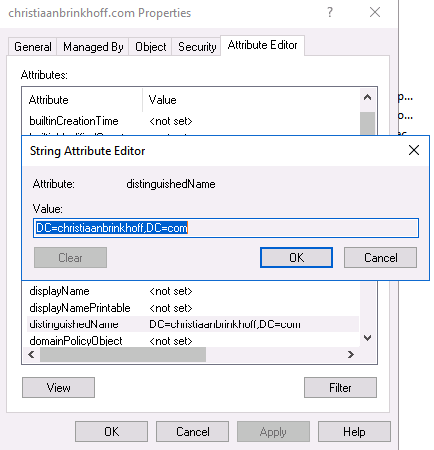
Open the Properties of the domain and search for the DN Name. For me that will be DC=christiaanbrinkhoff,DC=com
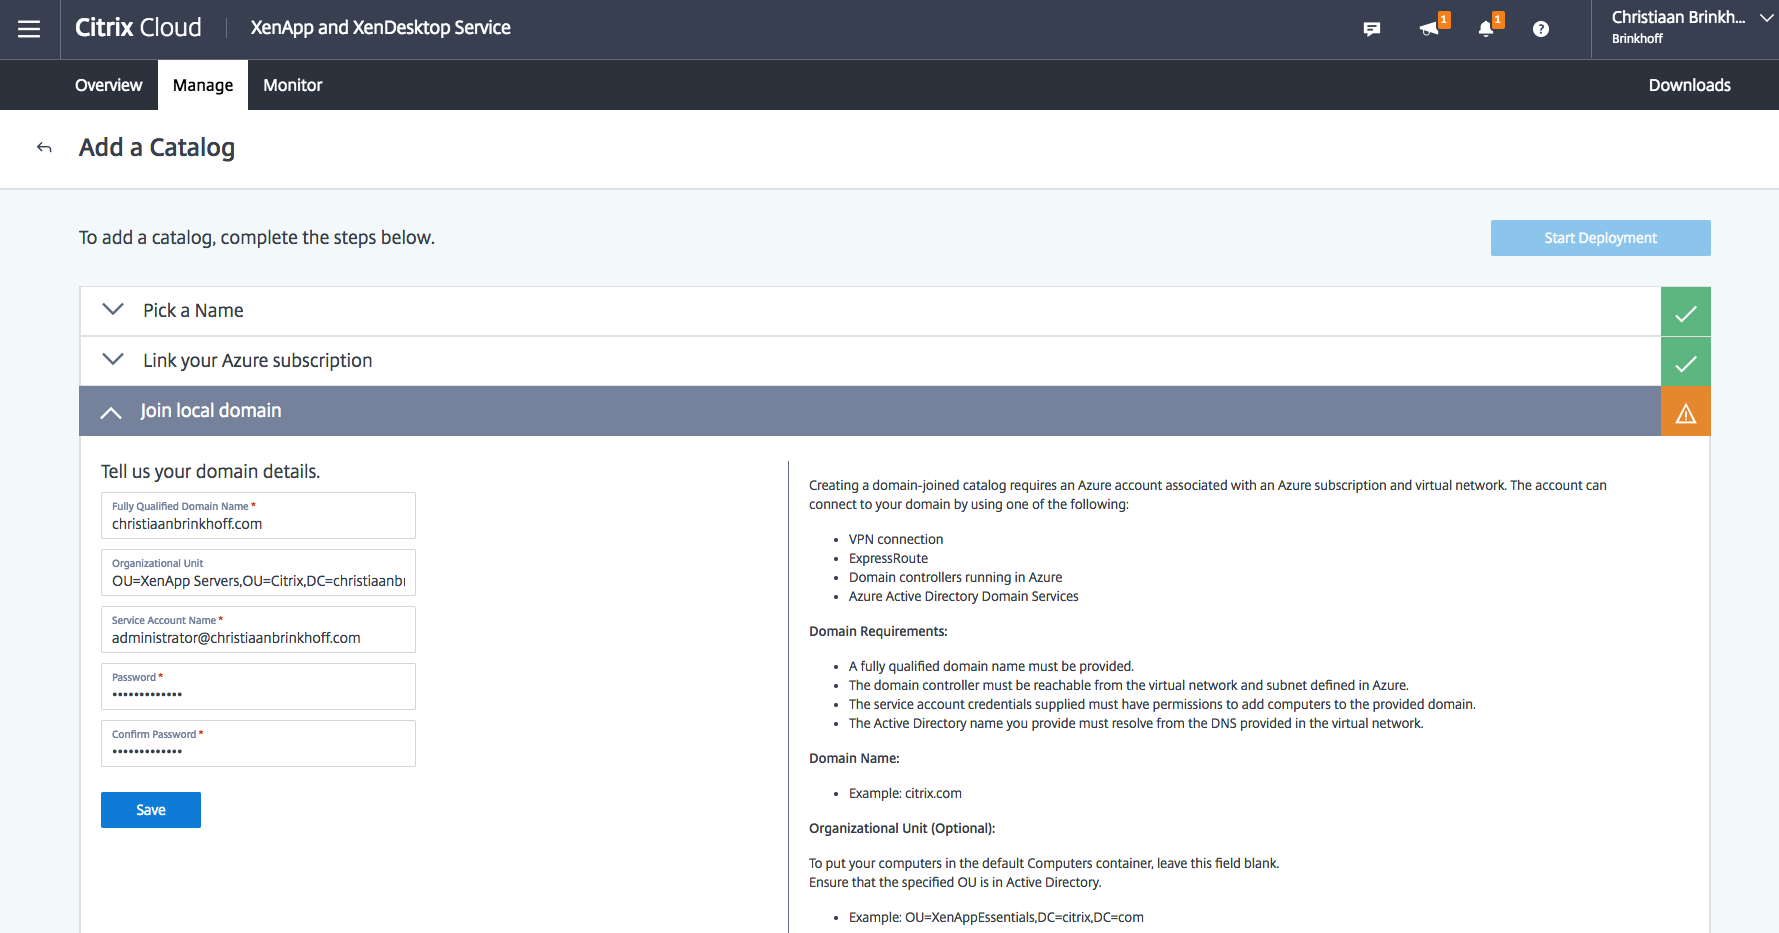
Start the initial XenApp Essentials Catalog Configuration. Go through the Join local domain configuration and enter in the Azure AD domain services information.
Enter the FQDN of the Azure AD Domain
Example:
Christiaanbrinkhoff.com
Enter in the DN name of the Azure AD Domain environment.
(Make sure to enter a OU=Name before the domain DN.)
Example:
OU=XenApp Servers,OU=Citrix,DC=christiaanbrinkhoff,DC=com
Enter in a Service account.
(Note: This account needs to be a member of the AADC AD Administrators Group and needs to have Global / Full Administrator rights in Microsoft Azure to create the resources!)
Example:
administrator@christiaanbrinkhoff.com
Go through the rest of the configuration parts of XenApp Essentials and your good to go!
Now you can logon to XenApp Essentials with Azure AD Accounts!
What about XenDesktop Essentials and the XenApp and XenDesktop Service in Azure?
Azure AD Domain Services is also supported for XenDesktop Essentials and the XenApp and XenDesktop Service.
You only need to join the servers in the Azure AD Domain and (of course) all the servers need to point to the AADS primary and secondary DNS before you perform this domain join activity!
Also make sure to setup the Citrix Cloud Connectors, otherwise you can’t interact between the Citrix Cloud and the Azure AD Domain Services environment in Microsoft Azure.
That’s it for now, hope this will bring you one step closer to the Digital Transformation.
Cheers,
Christiaan Brinkhoff