Lift-and-Shift On-Premises VMware workloads to the Microsoft Azure Cloud with the new Azure Migrate Service


Lift-and-shift on-premises workloads to Microsoft Azure just made a lot easier with Azure Migrate Service, which Microsoft released in preview during Microsoft Ignite event back in September this year. Azure Migrate gives you the advice and confidence that your workloads could be migrated to Azure IaaS with minimal impact to the business!
“One feature that make our life as Cloud Consultants and Architects a lot easier to do!” – Christiaan Brinkhoff
Before this feature came out, I’d personally always used Azure Site Recovery (ASR) as migration method to the Microsoft Azure Cloud. ASR is officially built as Disaster Recovery solution to replicate on-premises servers, wherever it’s Hyper-V, VMware or physical servers, to Azure IaaS (Infrastructure-As-a-Service). Therefore, now instead of using it for Disaster outage / scenarios, you also could use it to perform an actual failover to Azure IaaS and then afterwards stay in Azure without performing a failback back to on-premises!
Take away the small complexities makes migrations to the Cloud just as easy as 1-2-3 without any downtime for the business (if you perform the right steps) … With Azure Site Recovery as migration method, you also have the possibility to test your workload first before going live in a test Virtual Network completely separate from production.
Furthermore, Microsoft also created a cost calculator and dependencies feature integrated in the Migration Service in the form of an assessment. Where you can see what the costs will be in Azure and which sequence is the best approach to follow, think about startup sequences for example. Although I’m not advise you to migrate your complete workload to IaaS for the long time. Azure has a lot more Cloud Services which can replace Windows Server features, to eventually save a lot of monthly costs, with services such as Azure AD Domain Servers, Azure Storage Spaces Direct and Azure SQL Databases instead of a “Do-it-Yourself” SQL in IaaS.
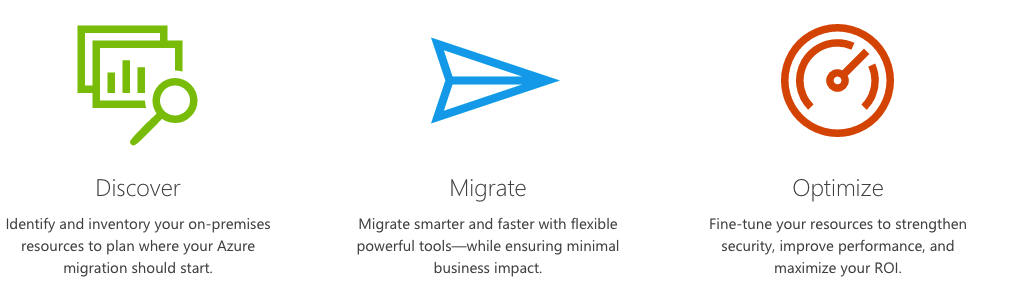
In this article, I’ll walk you through all the installation and configuration steps of the new Azure Migrate Service to eventually perform a lift-and-shift for on-premises VMware workloads to Microsoft Azure.
Note: As mentioned in the above section, the Azure Service is currently in PREVIEW mode and since this week also publicly available through the Azure Marketplace! No need to get approved anymore.
Table of Contents
Click on the title to get forwarded in the article:
- Add the Migrate Service from the Azure Marketplace
- Deploy the Collector Appliance in vCenter
- Azure IaaS Cost Calculation and migration advisory diagrams
- Perform the Migration with Azure Site Recovery
Did you know?
- Azure Migrate is available at no additional charge. However, during public preview, additional charges will apply for use of dependency visualization capabilities. These charges will be incurred as part of the Insight and Analytics offering. Note: When the service becomes generally available, there will be no charge for use of dependency visualization capabilities.
- It provides a Built-in Cost Calculation program, which makes it easy to create and Total-Costs-of-Ownership of running your machines in Azure Infrastructure-As-a-Service (IaaS)?
- The power behind the Migrate service are the Azure Site Recovery and Database Migration Service, therefore now only with the goal to migrate to the Azure Cloud instead of Site-to-Site replication for Disaster Recovery Scenario’s?
- You can easily Discovery and create assessments to migrate to Azure for on-premises virtual machines, wherever it is Hyper-V, VMware or Physical?
- Is supports built dependency mappings for high-confidence discovery of multi-tier applications, such as Exchange and Microsoft SQL.
- It provides an intelligent rightsizing to Azure virtual machines, which gives advices on the SKU / machine sizing in Azure, compare to the on-premises resource configuration.
- The Migrate Service has a built-in compatibility reporting with guidelines for remediating potential issues, which can save you a lot of work before you start migrating?
- Integration with Azure Database Management Service for database discovery and migration
- Azure doesn’t support unified boot or also known as PXE. If you’re on-premise machine boots through a network streaming configuration for example, then it couldn’t be migrated to Microsoft Azure.
How does it work?
- Start your free Azure account, or log in to your existing Azure Business account
- First add the Migrate Service from the Azure Marketplace
- Import the appliance in VMware vCenter Server to create the collector virtual machine.
- Discover and assess your on-premises environment using Azure Migrate
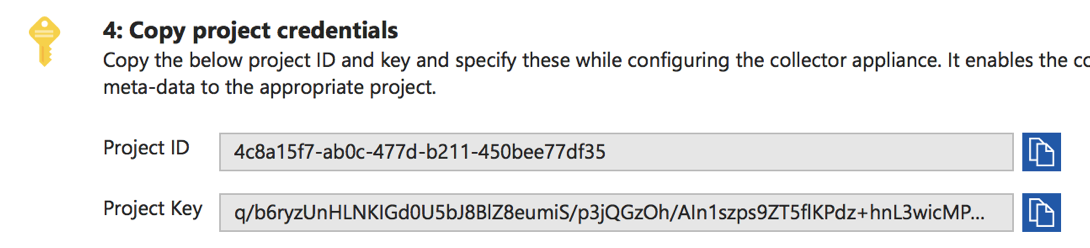
- Copy project credentials and place them in the Collector Appliance
- Migrate you’re on-premises workloads using services like Azure Site Recovery and Azure Database Migration Service
- Running in Azure!
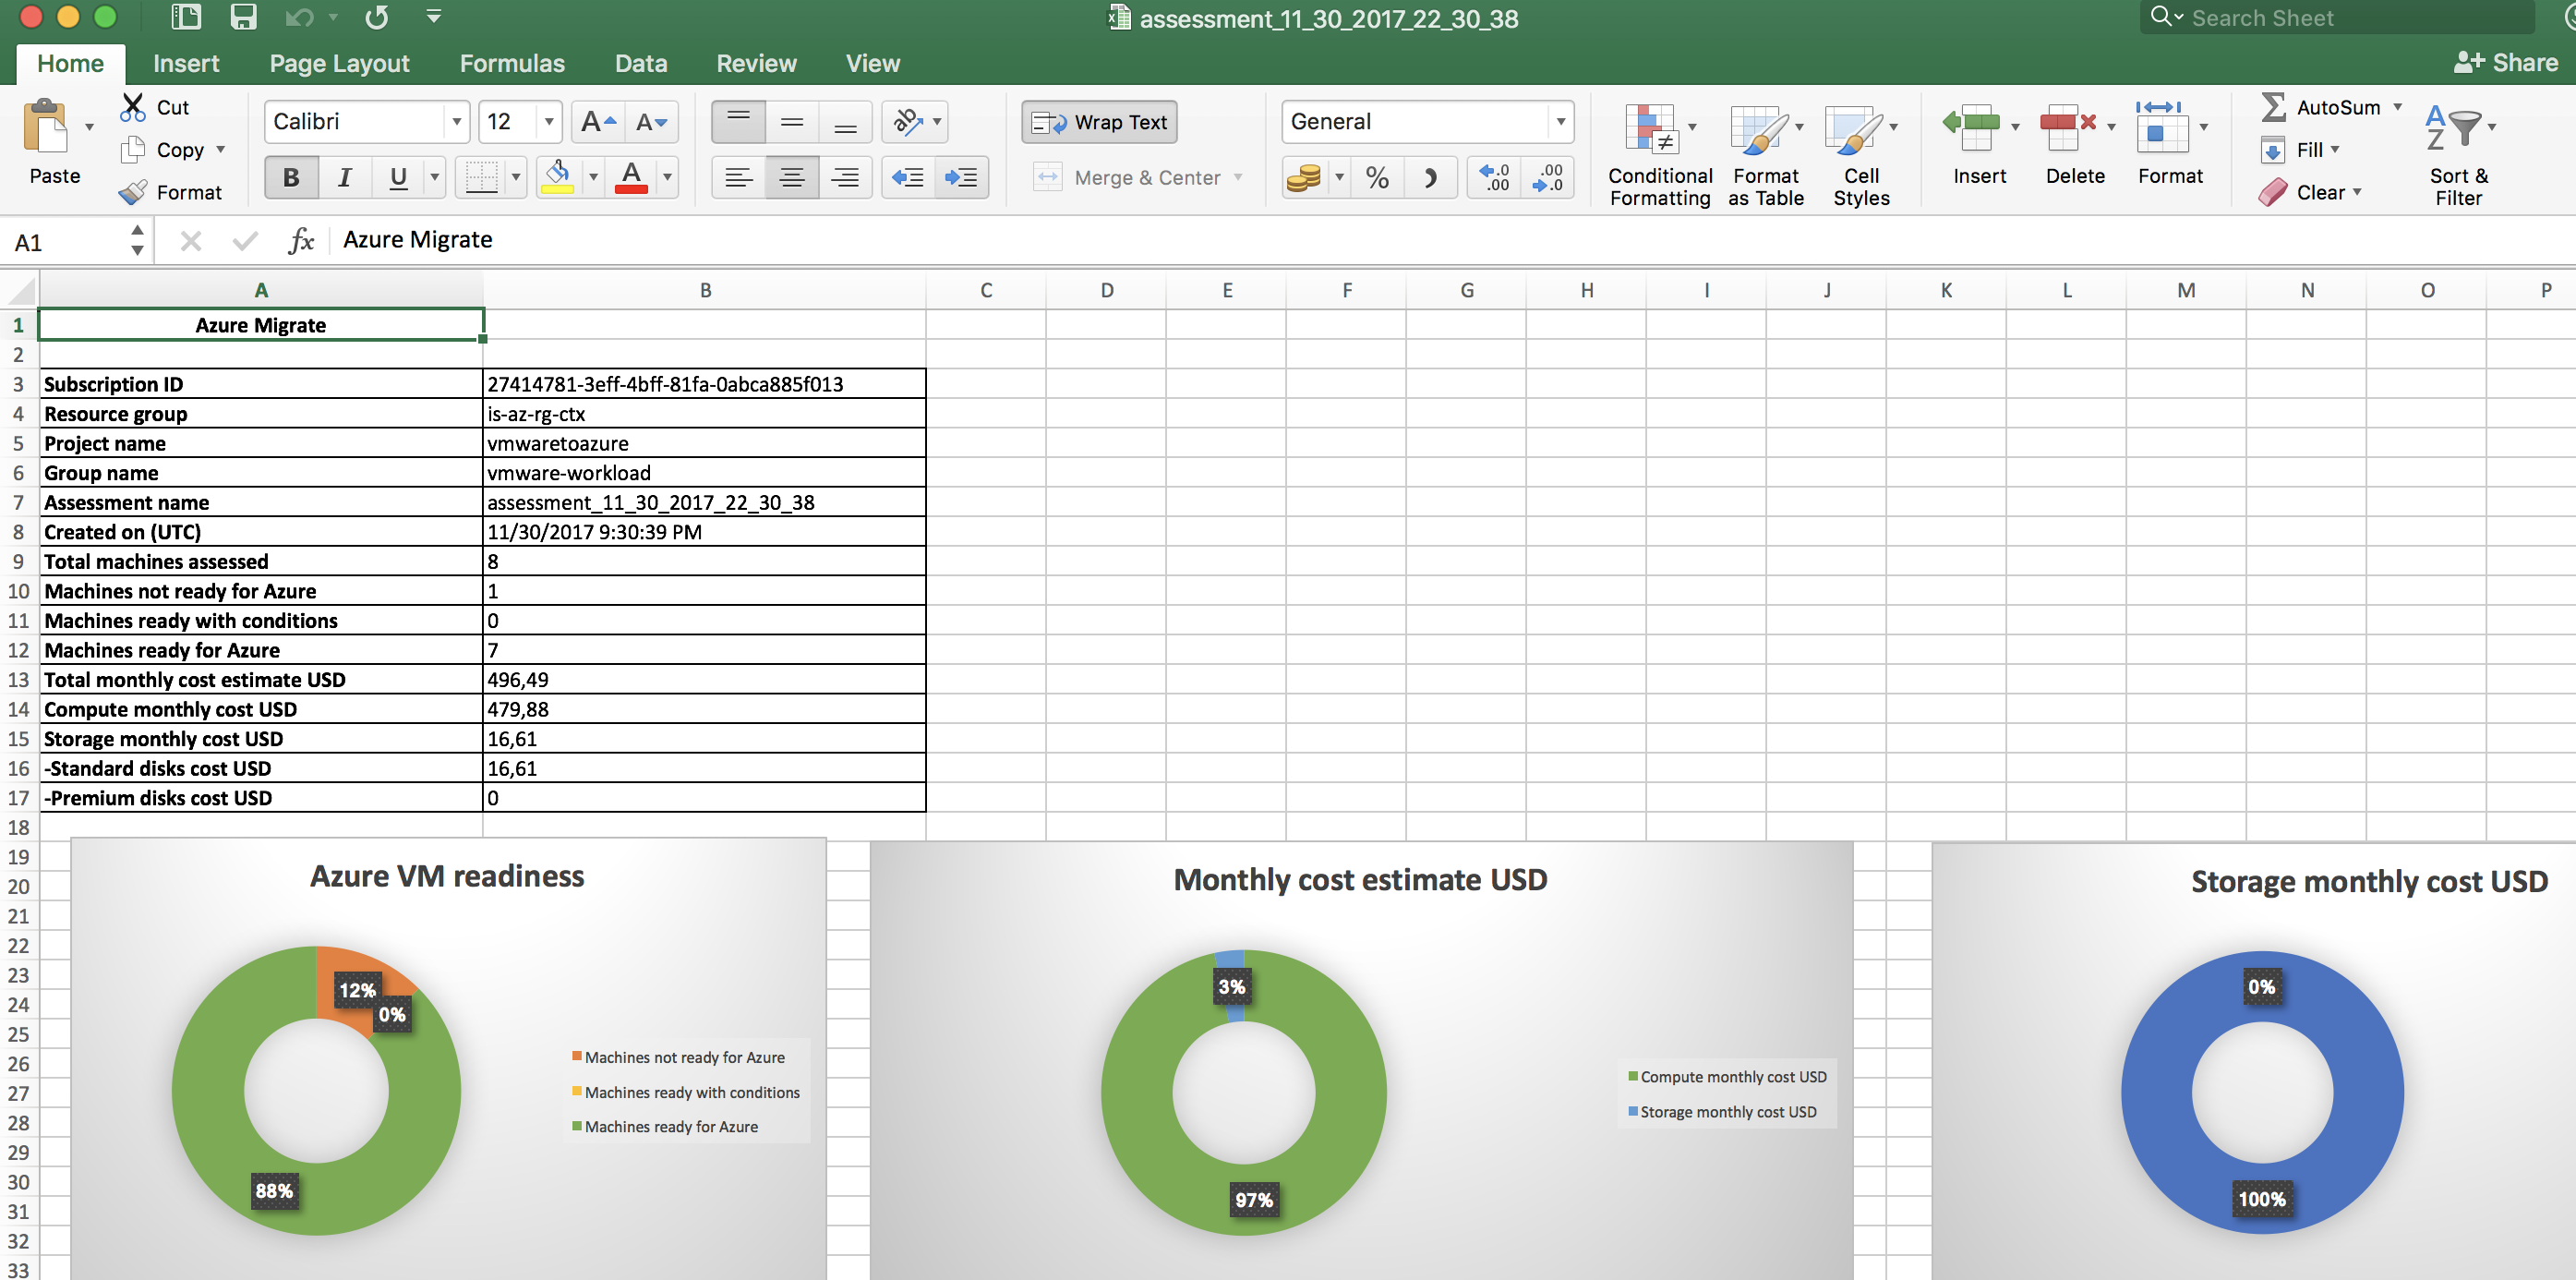
Cost Calculation Assessment Dashboards
The Migration service has some great out-of-the-box tools available to perform a costs inventory of running your on-premise workload in Microsoft Azure. This rapport is easy to use as proof for your IT Manager that the Azure Cloud is affordable enough for a production environment.
It also gives advice on which machine is now ready for Azure or not!
Azure Migrate provides also the possibility to export the information to an Excel Sheet, which eventually looks like the picture below.
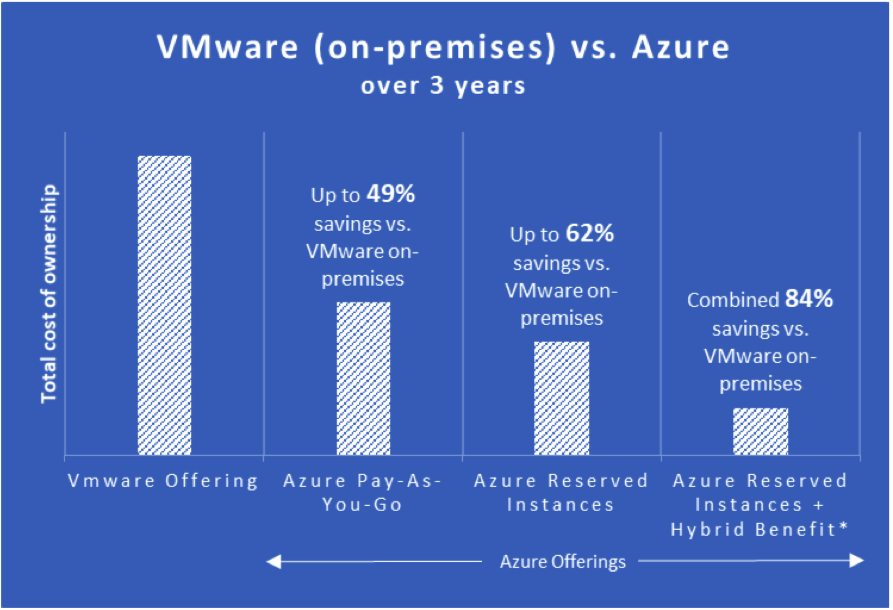
VMware to Azure migration: TCO guidance
Microsoft Azure provides a frictionless / seamless approach for moving VMware to Azure with the lowest Total Costs of Ownership possible.
From the Azure docs website “Gain from economies of scale, use tools to optimize resource utilization, and take advantage of flexible compute options in Azure. Save even more with offers like Azure Reserved VM Instances and Azure Hybrid Benefit (for Windows Server workloads), all while taking advantage of first-class, first-party support for your Microsoft workloads.”
Note: See all the advantages of running on-premise VMware workloads in Azure in the article below:
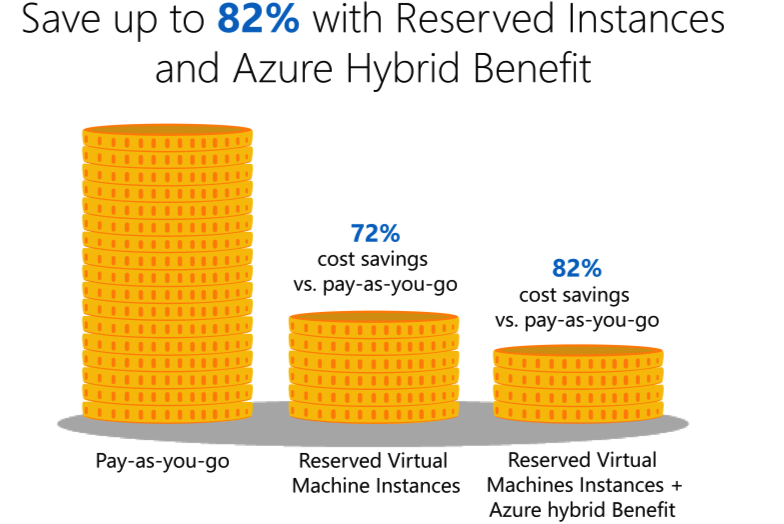
Azure Hybrid Use Benefit
The Azure Hybrid Use Benefit program lets Enterprise Agreement customers, who are already owning Windows Server Licenses with Software Assurance, make use of their own licenses in Microsoft Azure Infrastructure-As-a-Service (IaaS). Normally, the license costs are included in the IaaS resource costs. When activating Azure HUB, you’re resource costs will be downsized to 82 % on monthly annual basis.
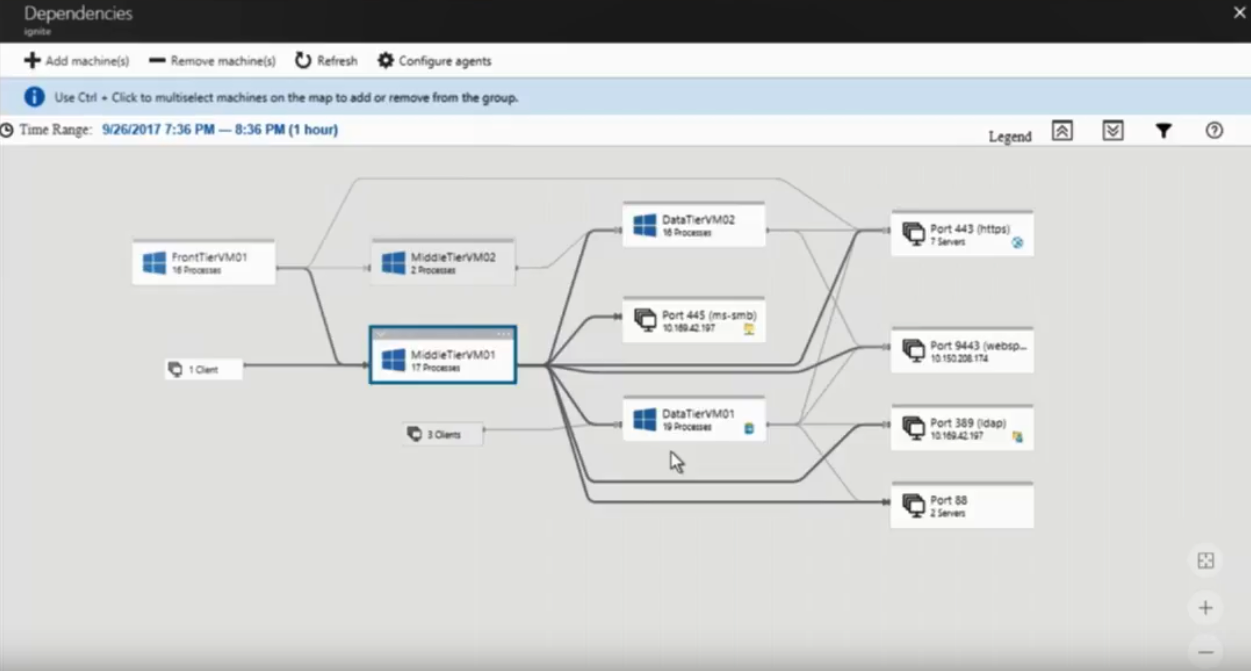
Dependencies
Within the Azure Migrate Console it is also possible to create dependencies to provide the best approach to Azure. Just when Virtual Machines are relaying on other systems in your workload, there is now a possibility to create a collection of machines to make sure the right sequence of migration will apply before migrating to Microsoft Azure IaaS.
Note: For the Dependencies feature, it is required to install a Microsoft Monitoring Agent (MMA) on each machine. The agent is available for Windows and for Linux Operating Systems.
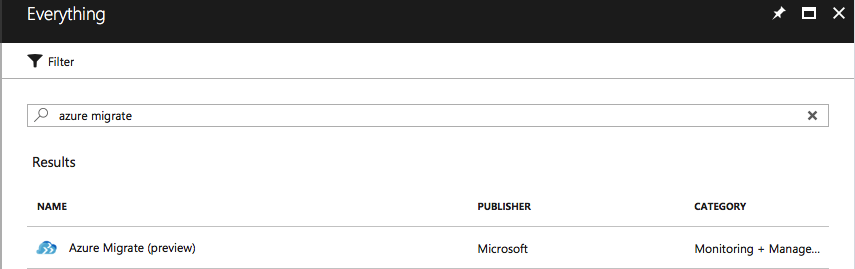
Add the Migrate Service from the Azure Marketplace
Open and login to the Azure Portal at http://portal.azure.com
Open Azure Migrate from the Marketplace
Click on Create
Note: Be aware that the service is in so called “Public Preview”, which means that it isn’t (officially) production ready. Some earlier Public Previews in the past learn that these previews are pretty stable!

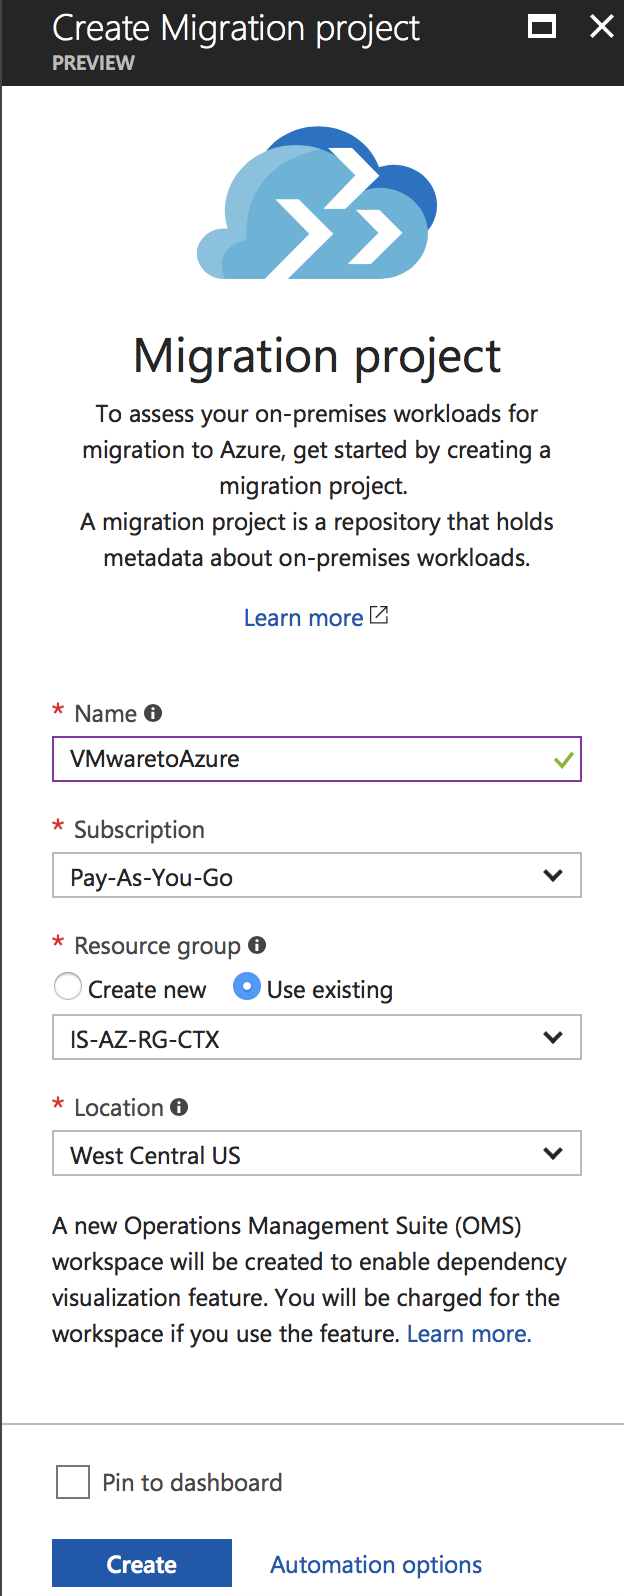
Create a Migration Project
Note: At the moment of writing, the Migrate Service is currently only available in West Central US. When the Service become final, we’ll can use it in all the other (shorter distance) datacenter location around the globe.
When the deployment is finished, you need to open Migration Projects from the Azure menu

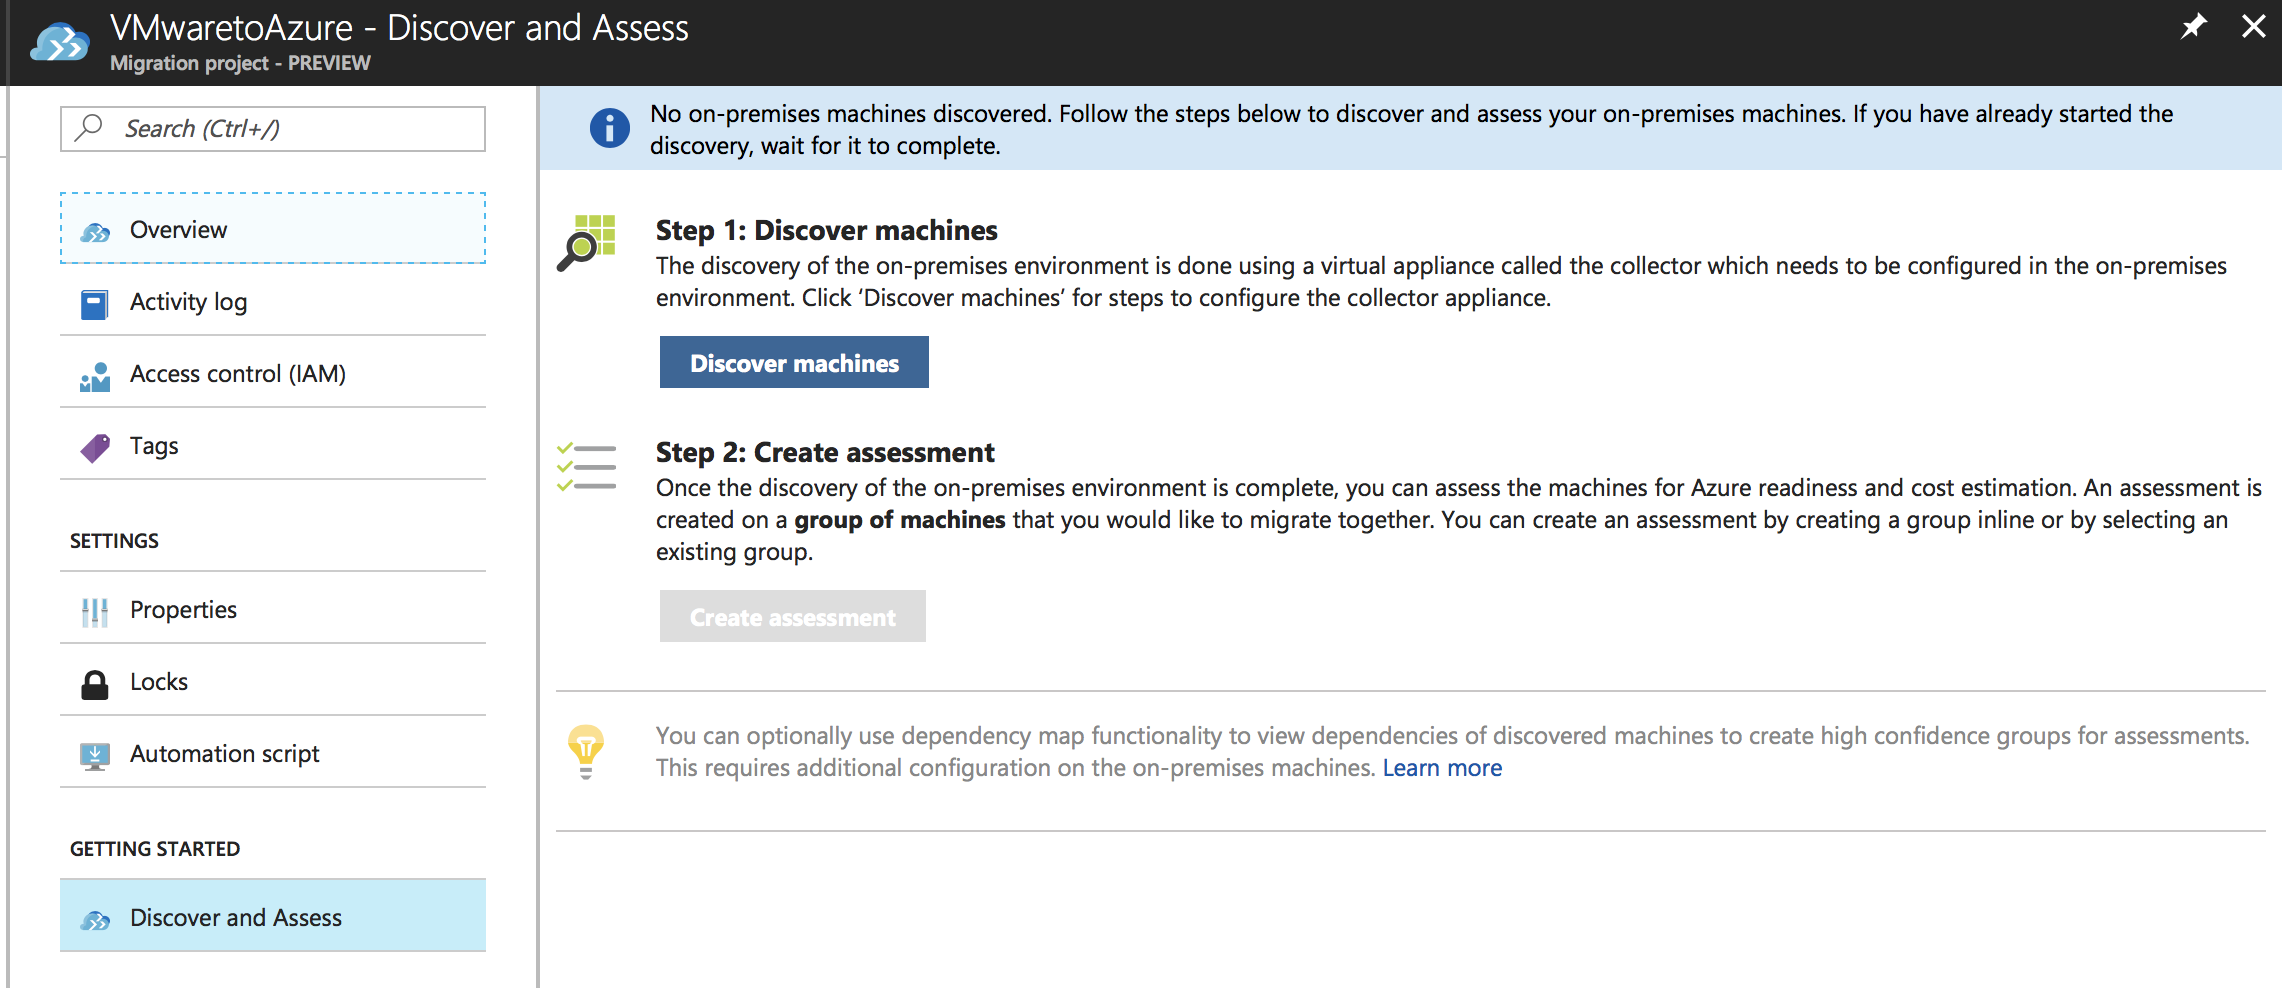
Click on the Discover & Assess button
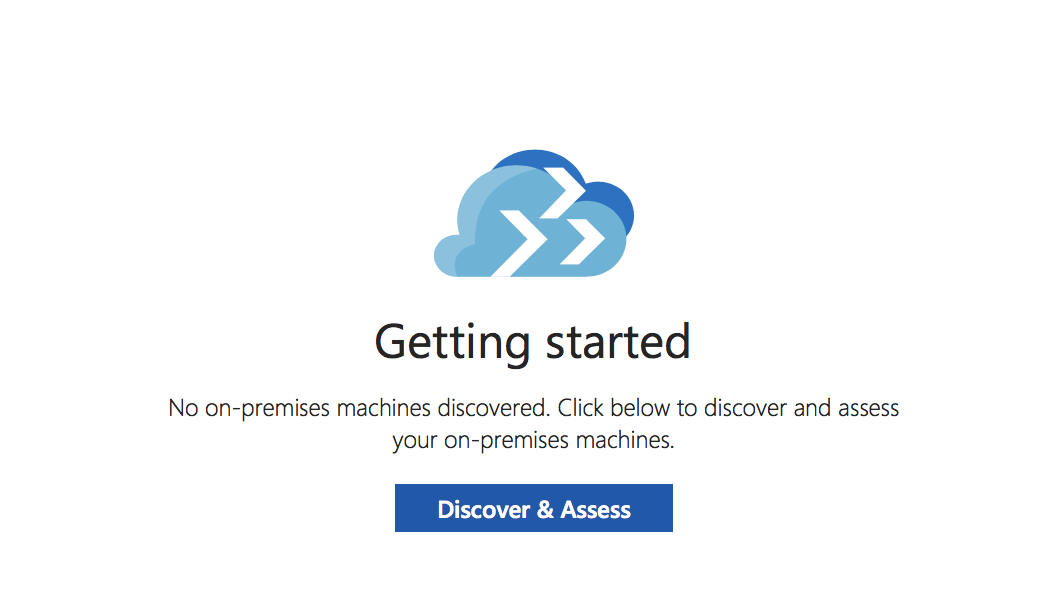
Click on Discover Machines to start the setup of the collector appliance.
Deploy the Collector Appliance in vCenter
The following Discover and Assess screen is showed to you.
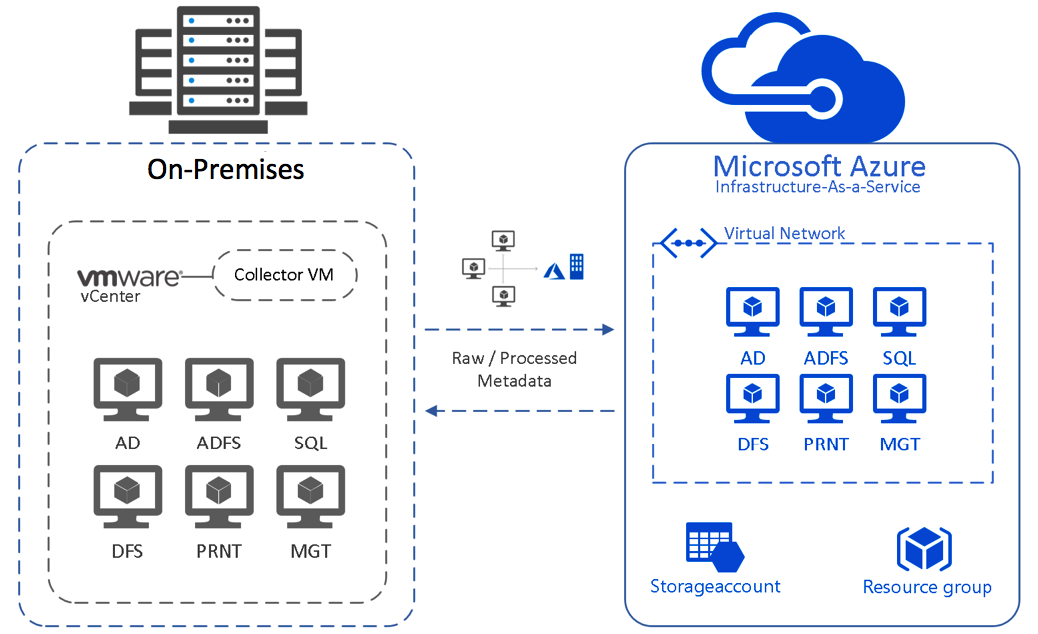
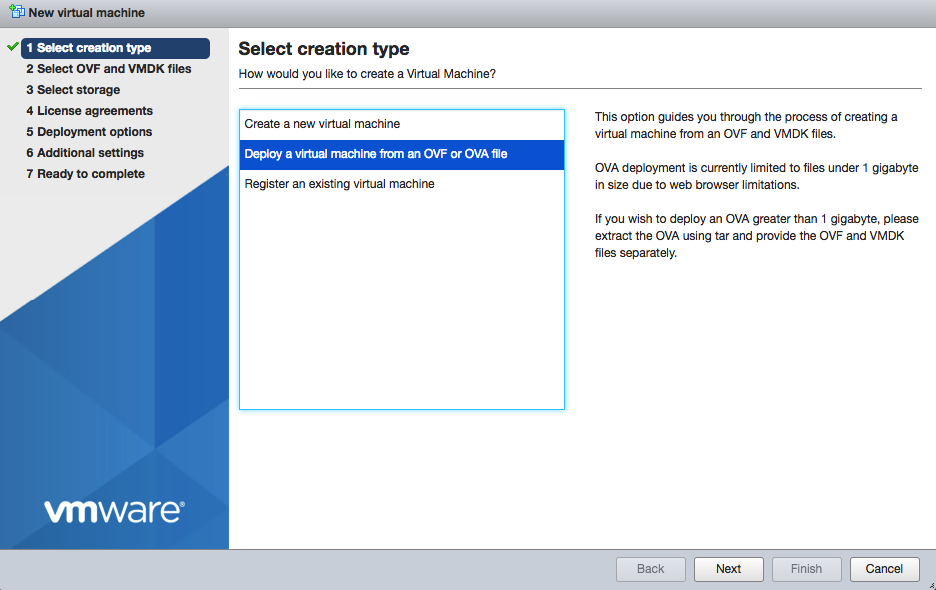
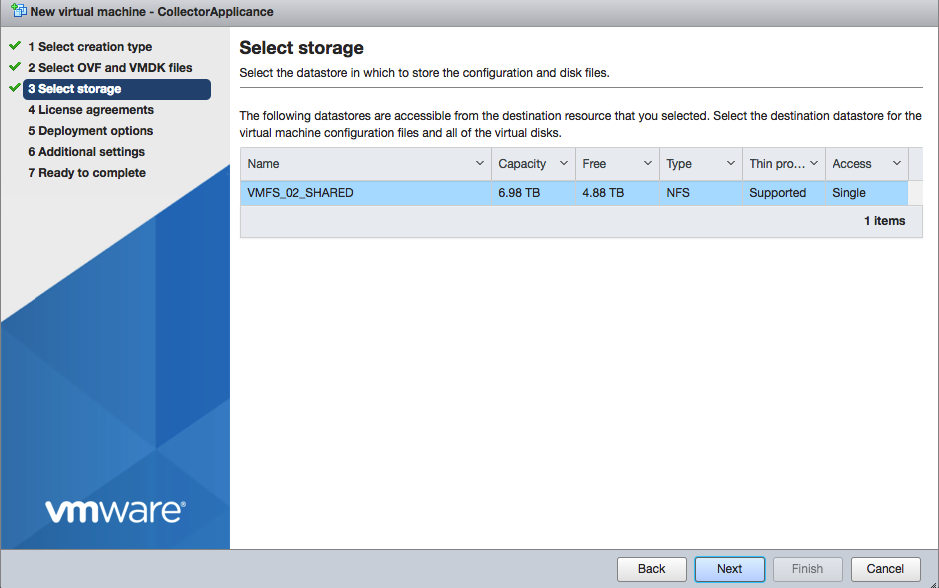
To connect the on-premise VMware environment to Microsoft Azure we’ll need to deploy the .OVA VMware template in your on-premise vCenter environment.
After the deployment, we can discover all on-premise server to eventually activate the replication / migration process.
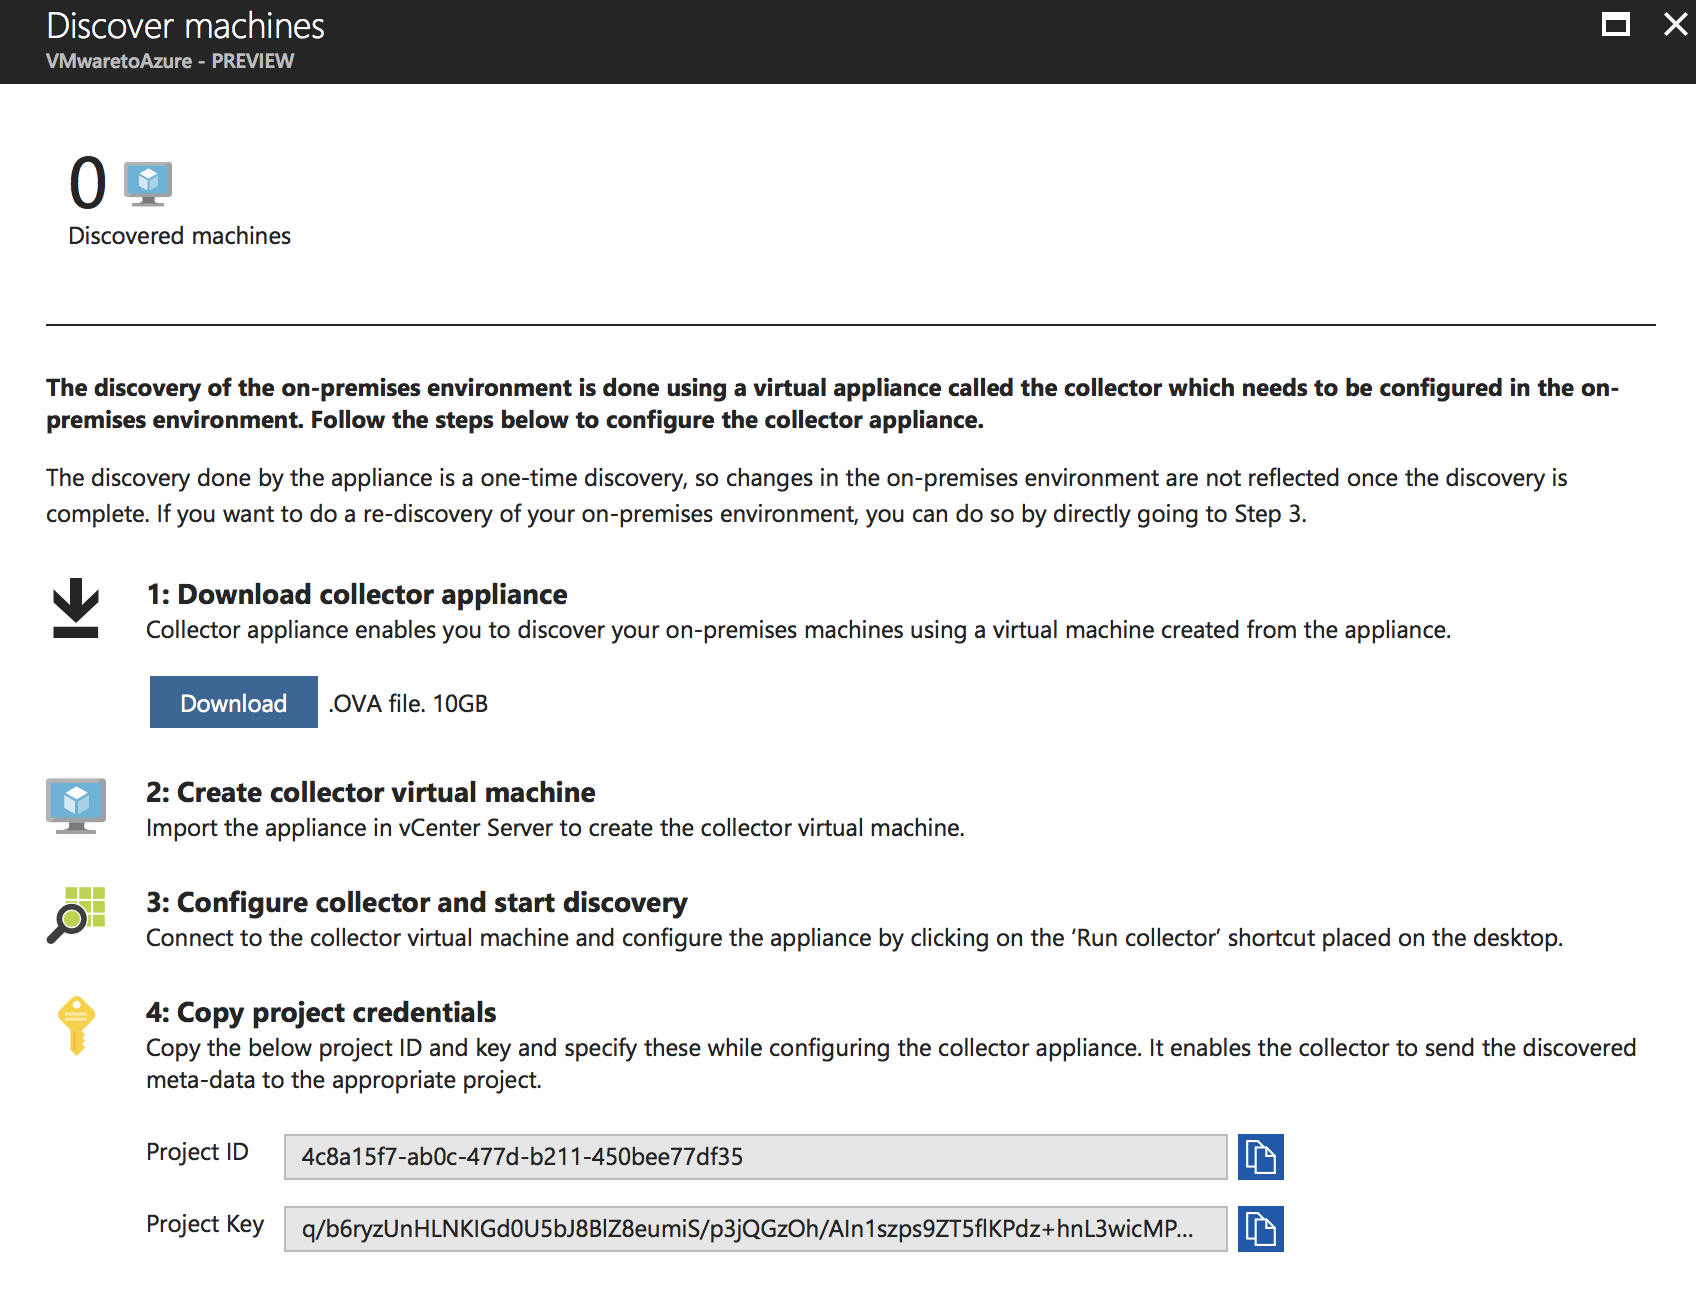
Upload the OVA VMware template to your VMware vSphere Web Console or vSphere Client.
I’d used the vSphere web client.
Note: The Appliance is a Windows Server 2012 Datacenter server. All the required tools for providing the Migrate Tool services are already integrated in the template.
Select the OVA file

Select the Storage Location
The OVA file is being uploaded and extracted, please wait…

Start the Appliance and open the Console
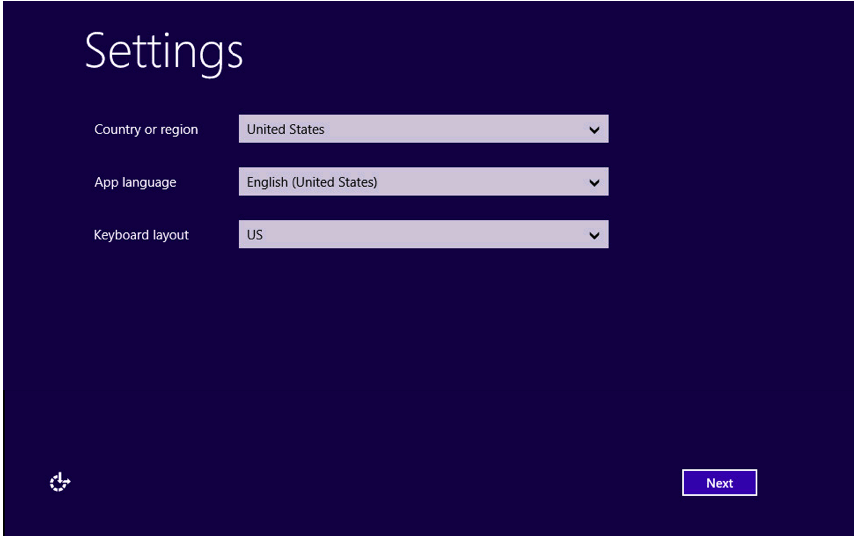
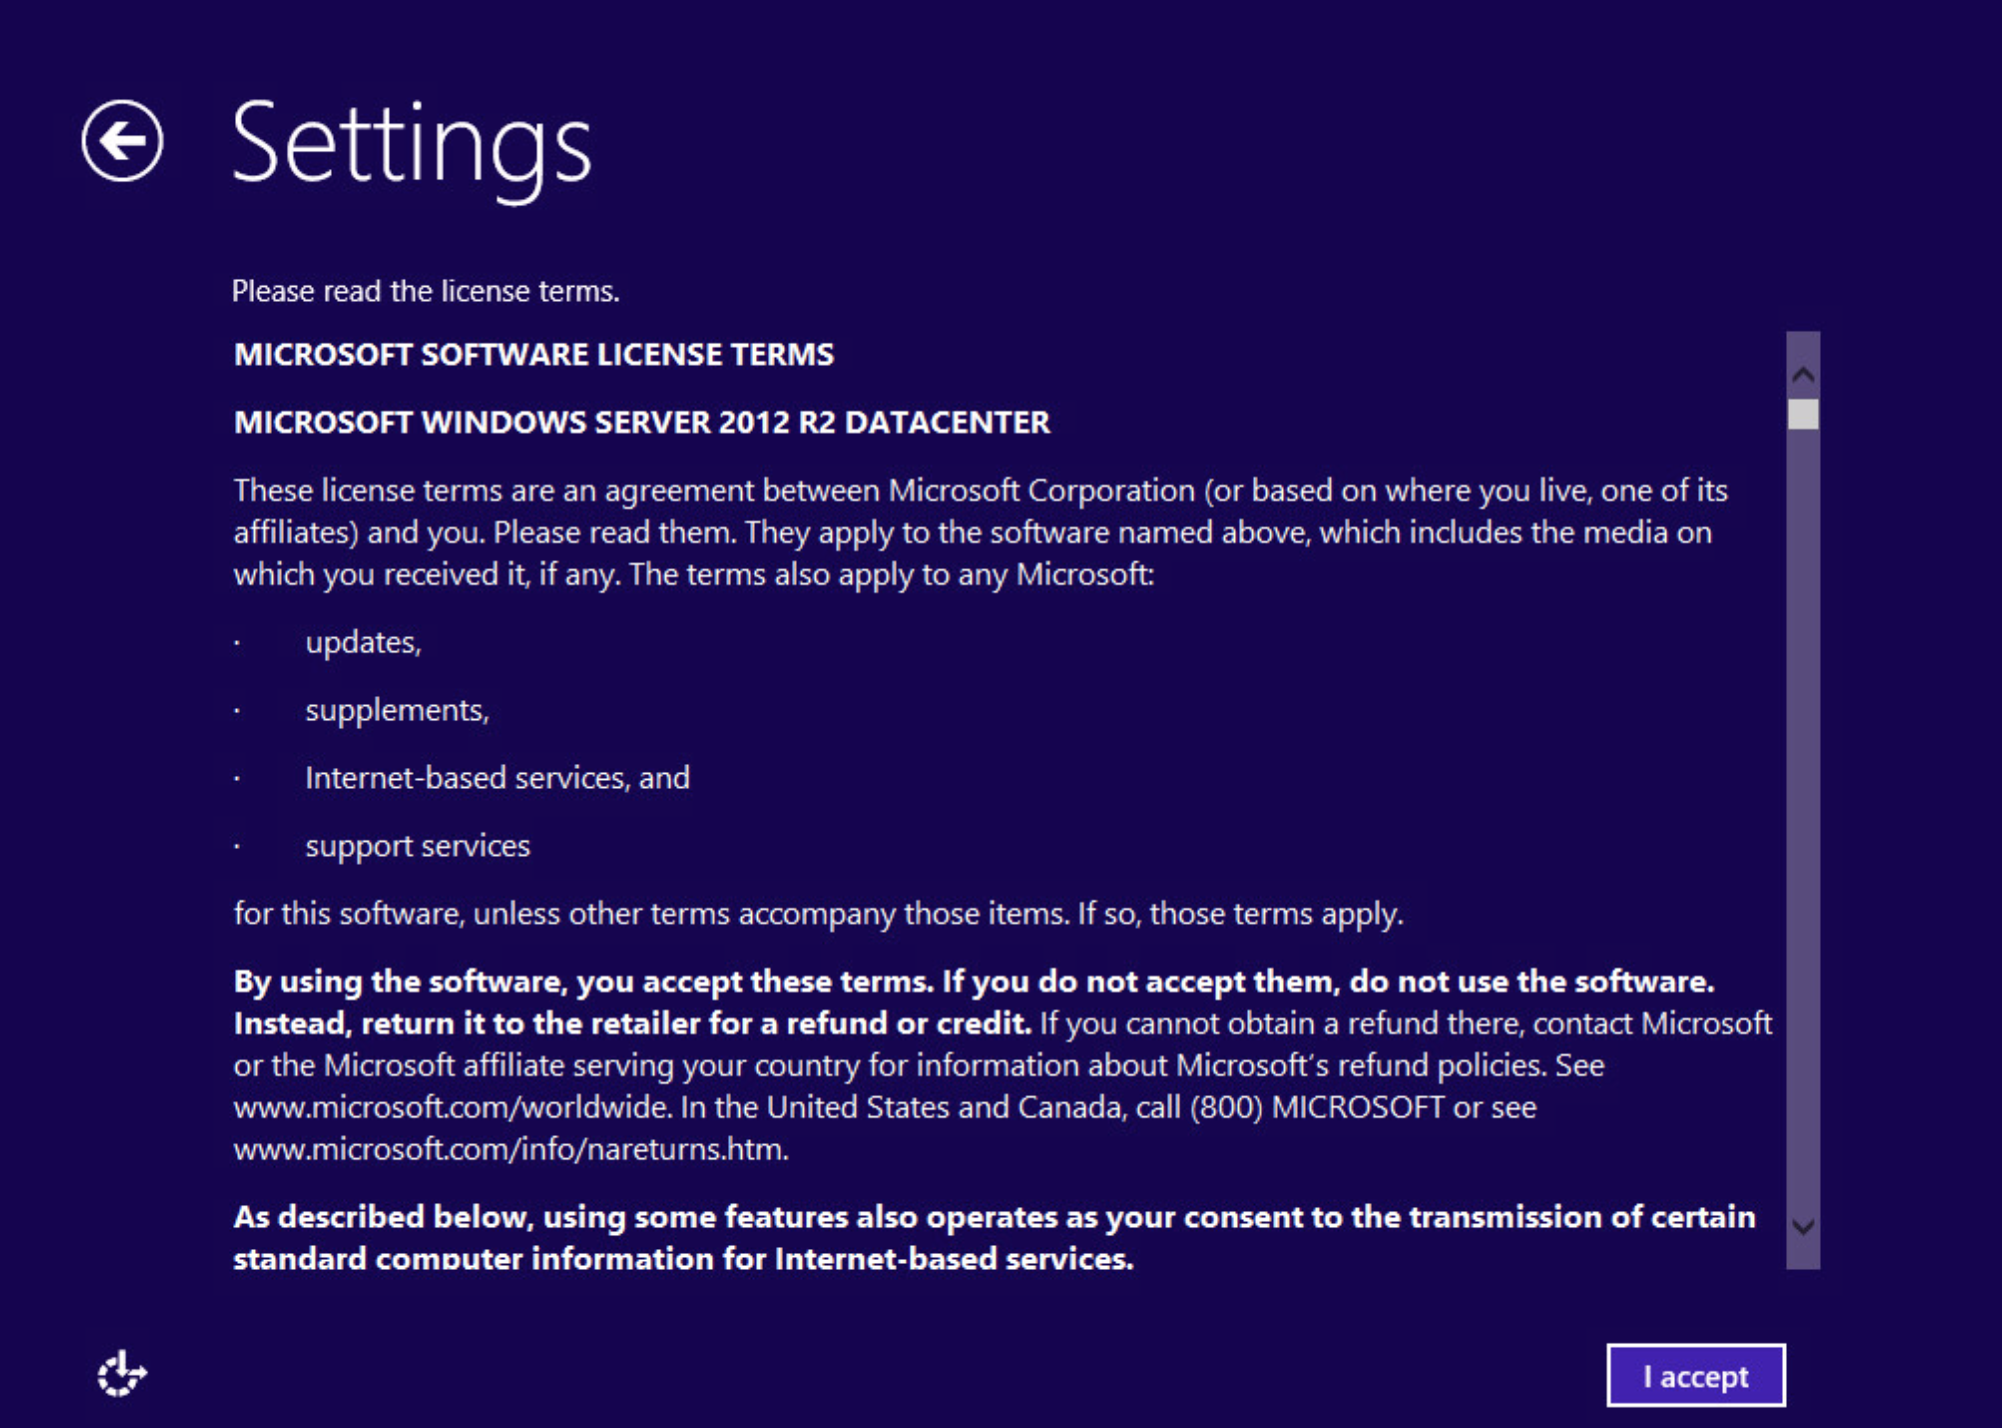
Accept the settings
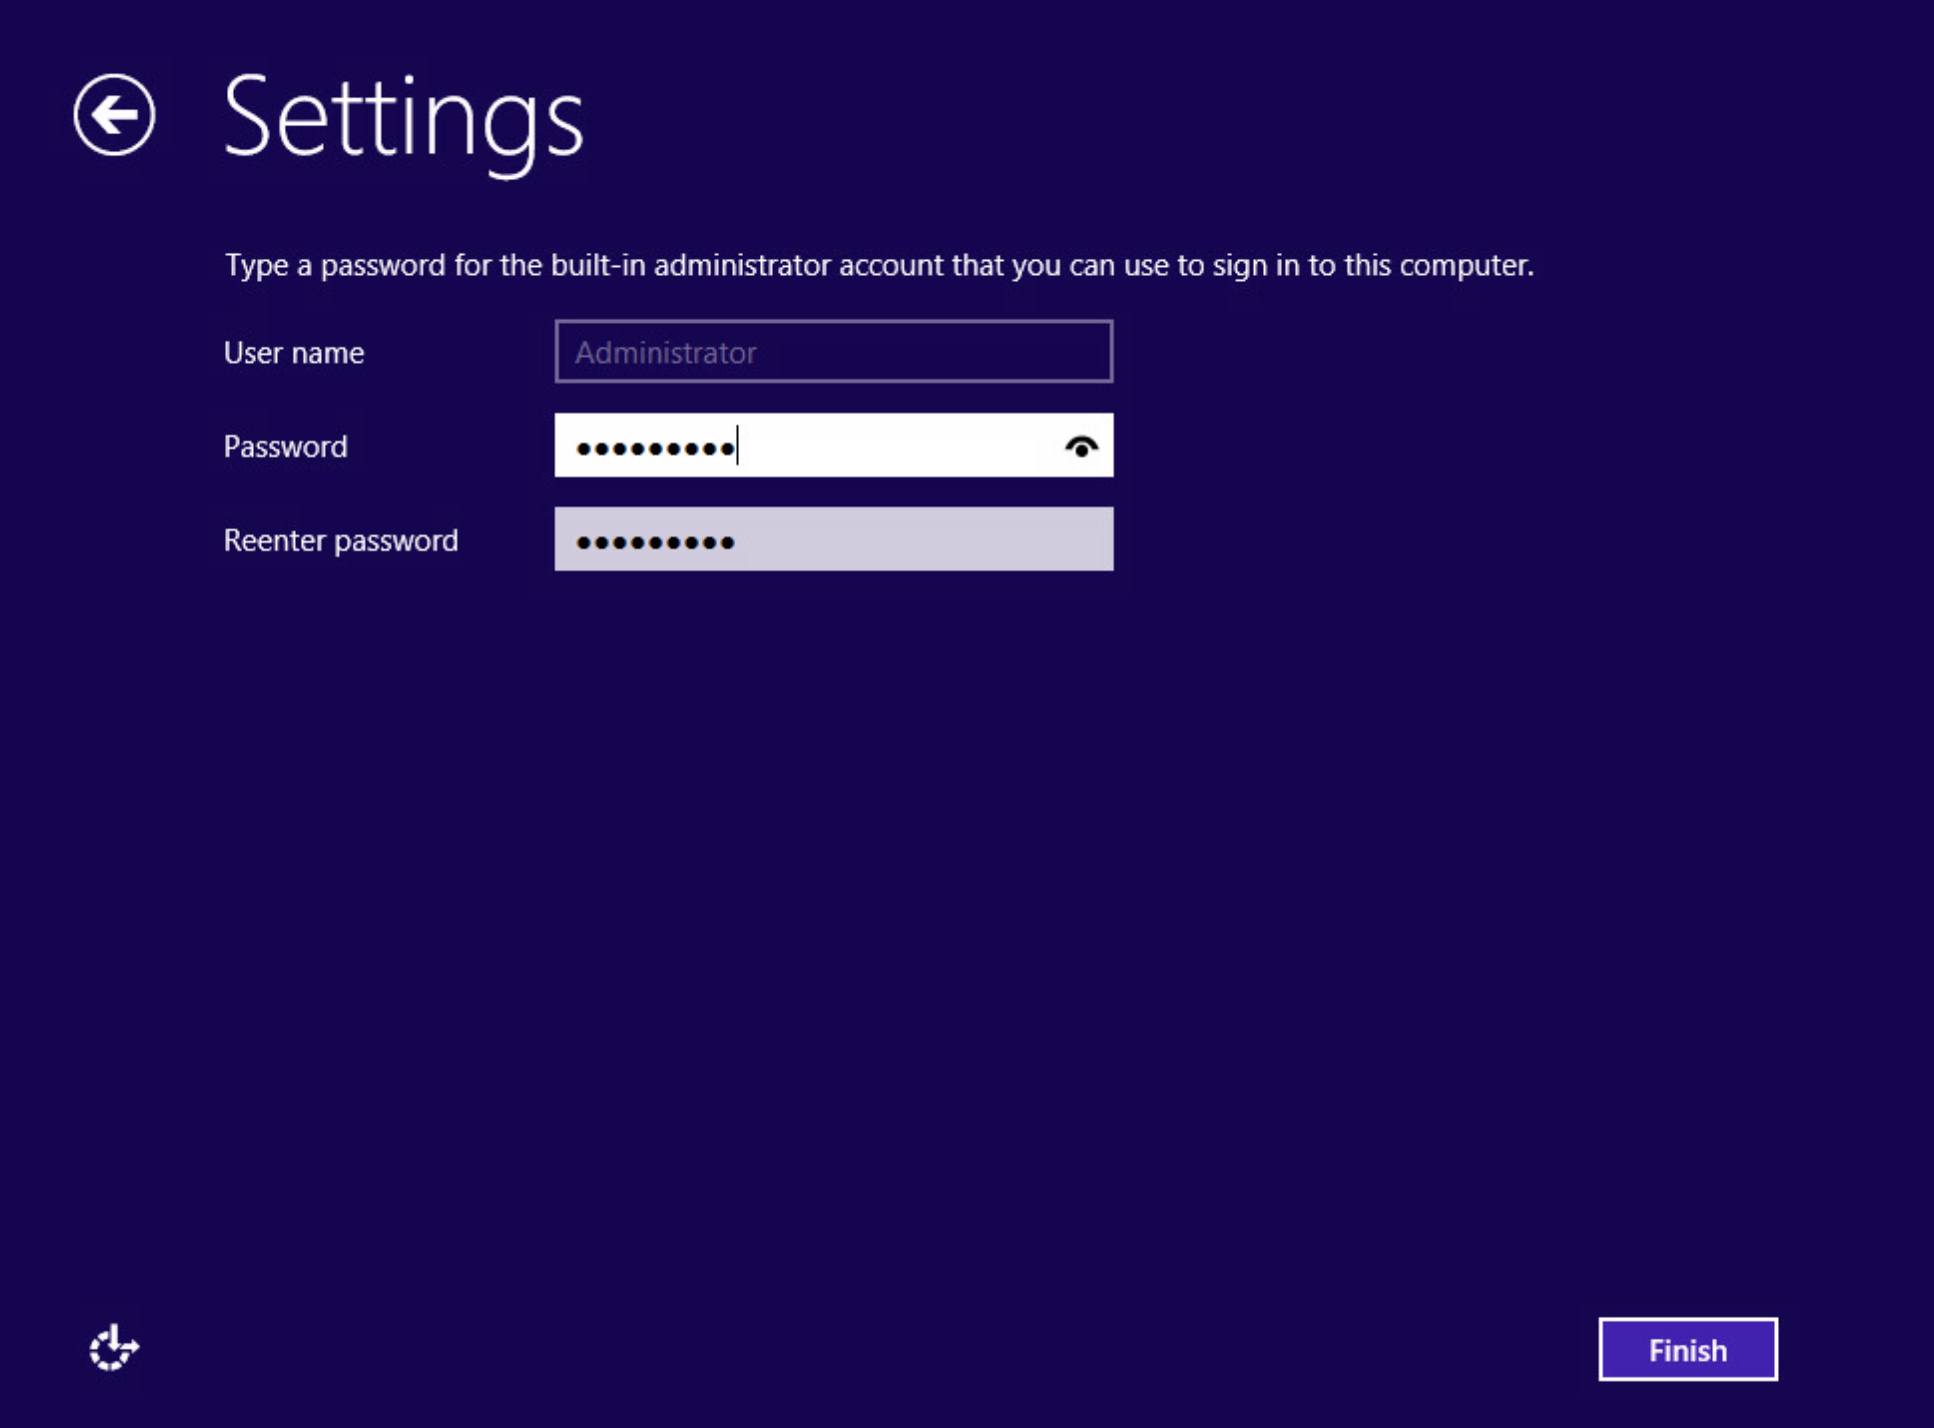
Enter in the local Administrator password
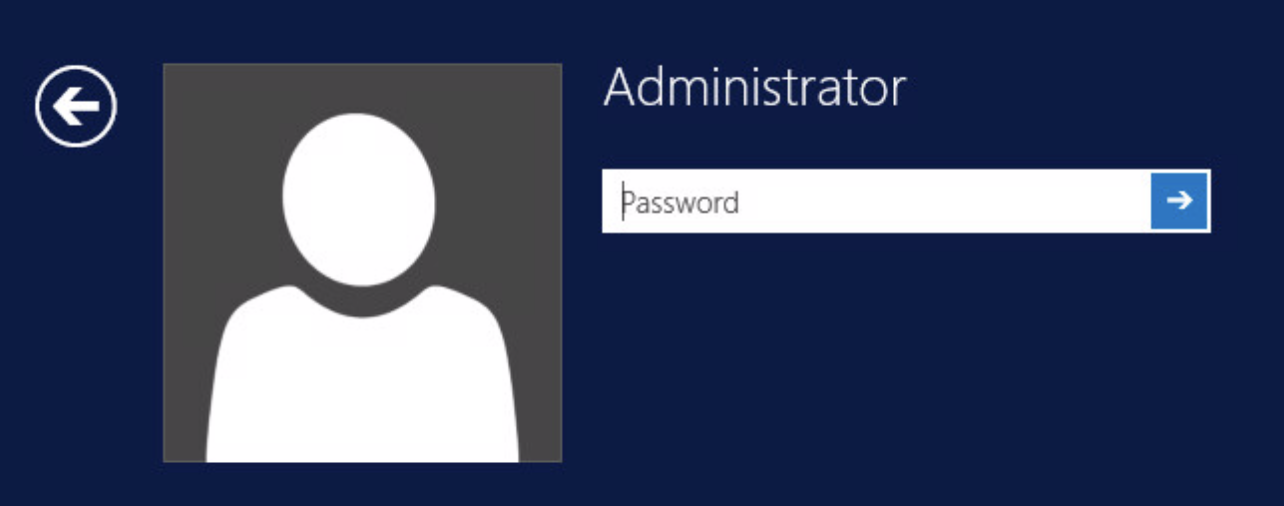
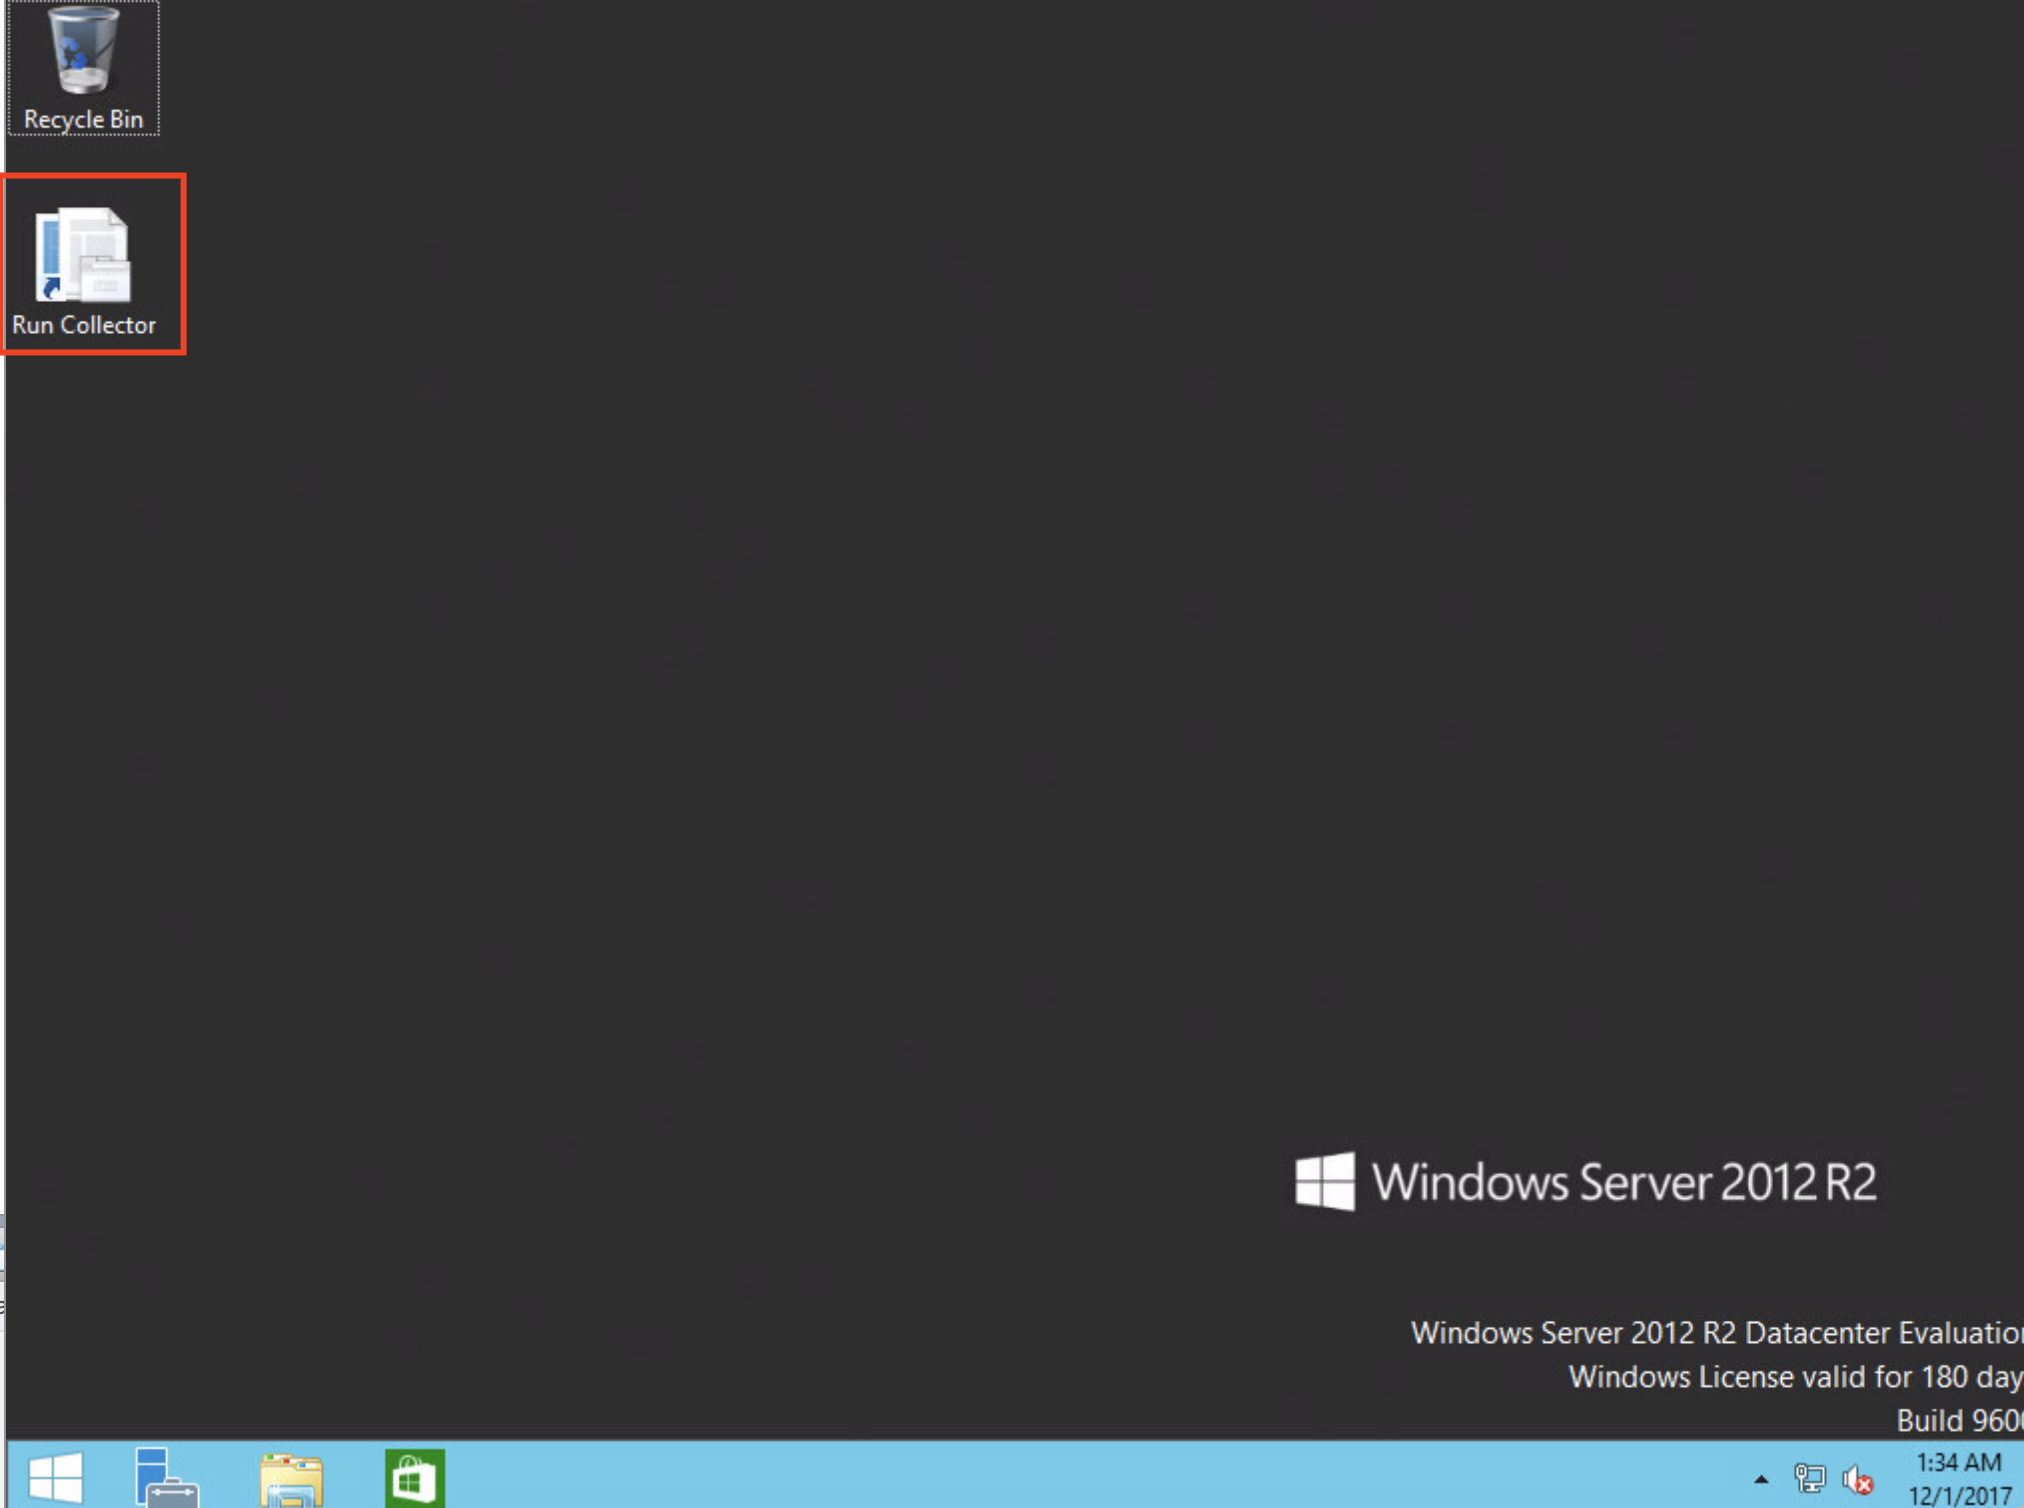
Log on to the Virtual Machine
Open the Run Collector application on the Desktop
The local setup configuration wizard is started through Internet Explorer, you’ll recognise some steps from Azure Site Recovery.
Let’s start with the setup and accept the End User License Agreement
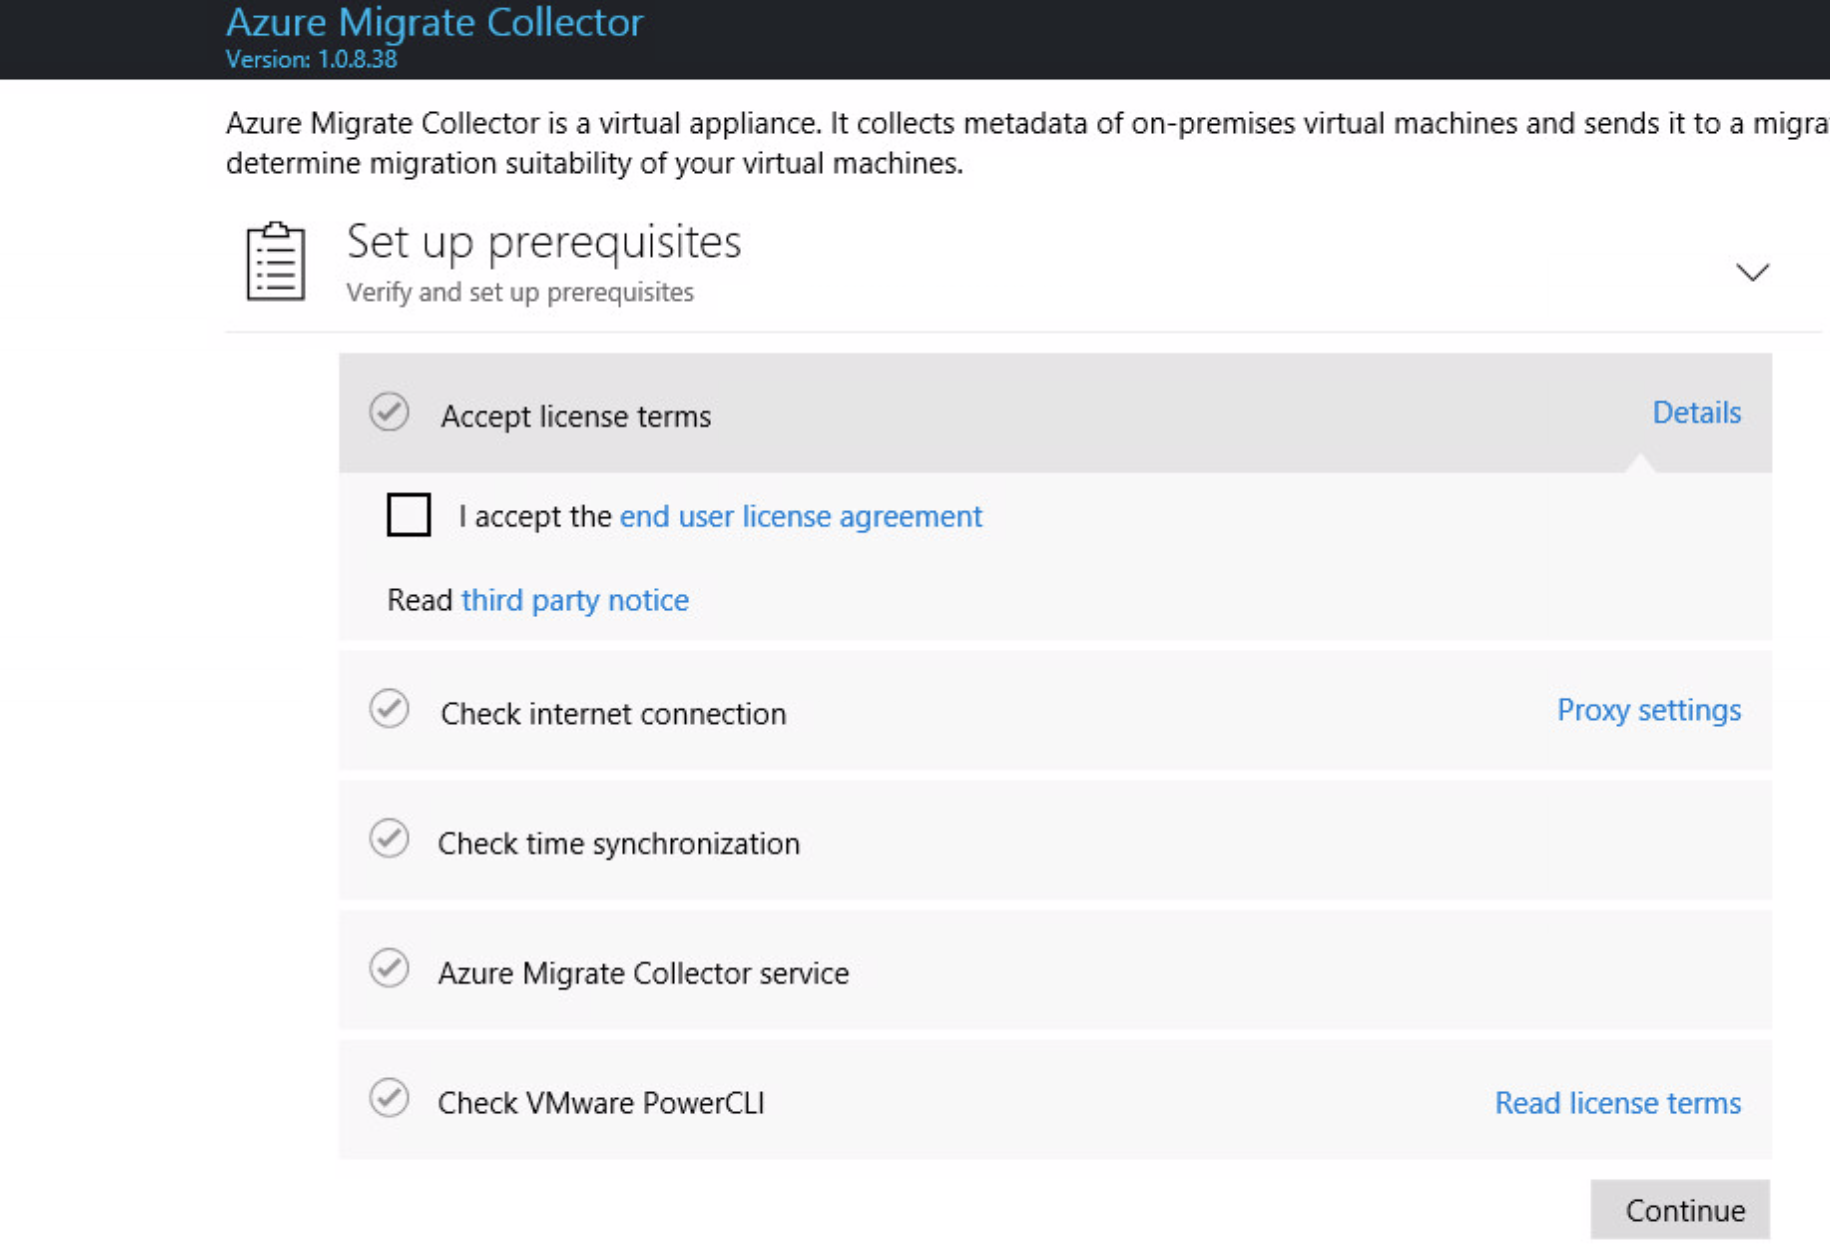
The setup will perform some pre-checks and automate the required PowerCLI installation.
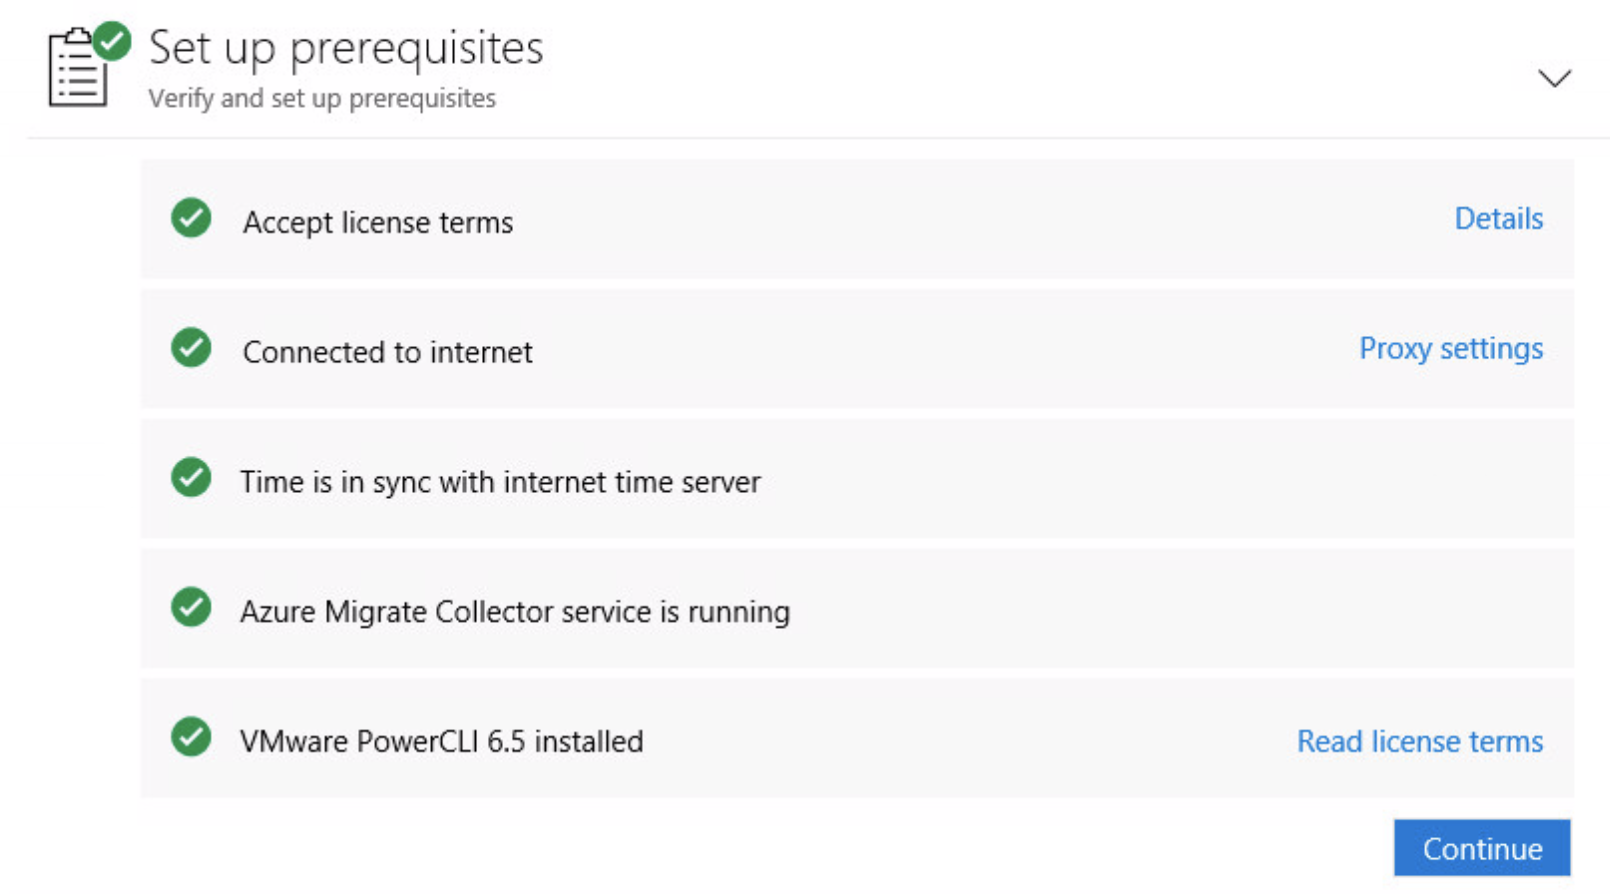
Make sure all the checkmarks are green before you proceed to the next step!
Click Continue
Note: VMware PowerCLI is needed to perform the discovery and synchronization from vCenter through Microsoft Azure.
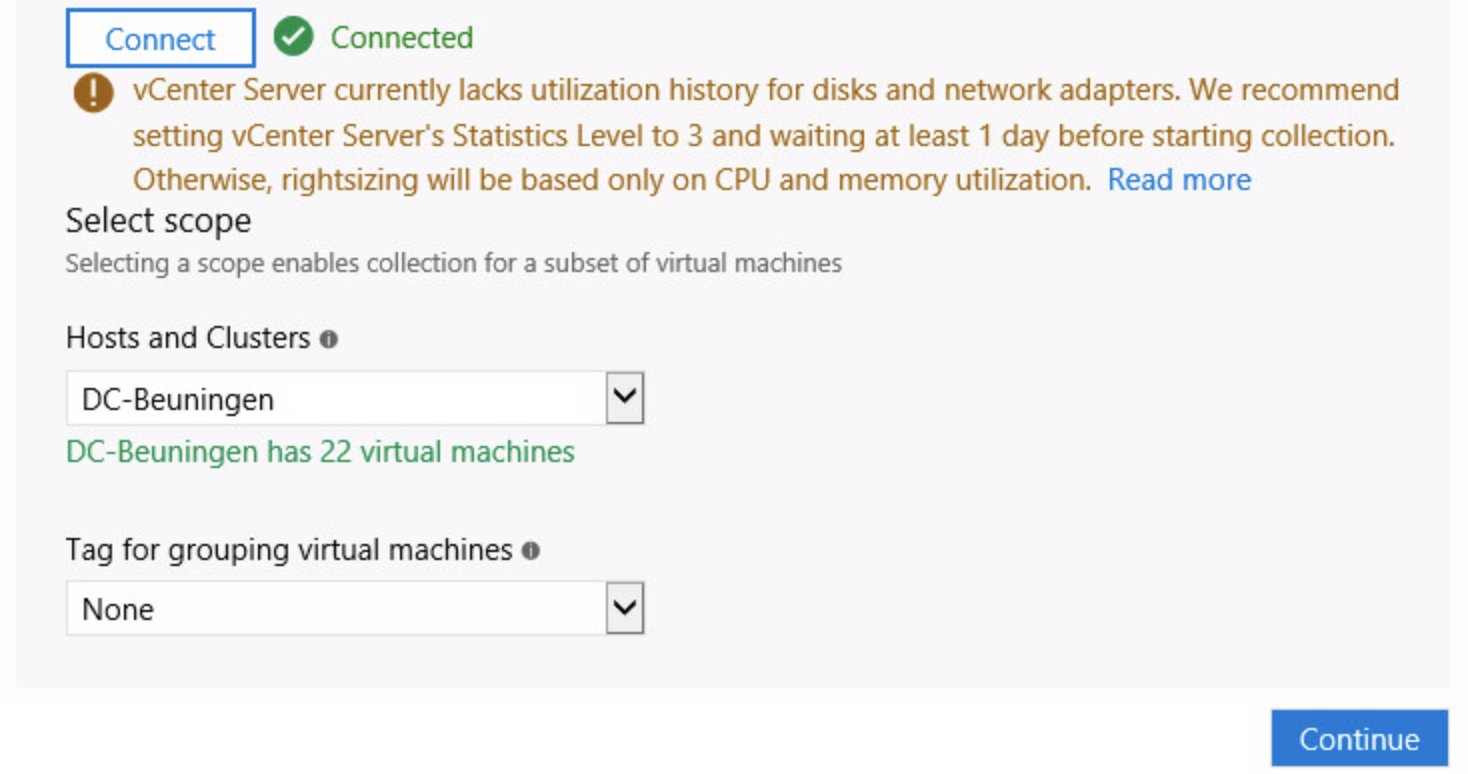
Enter in the vCenter Administrator credentials to perform the inventory in VMware vCenter
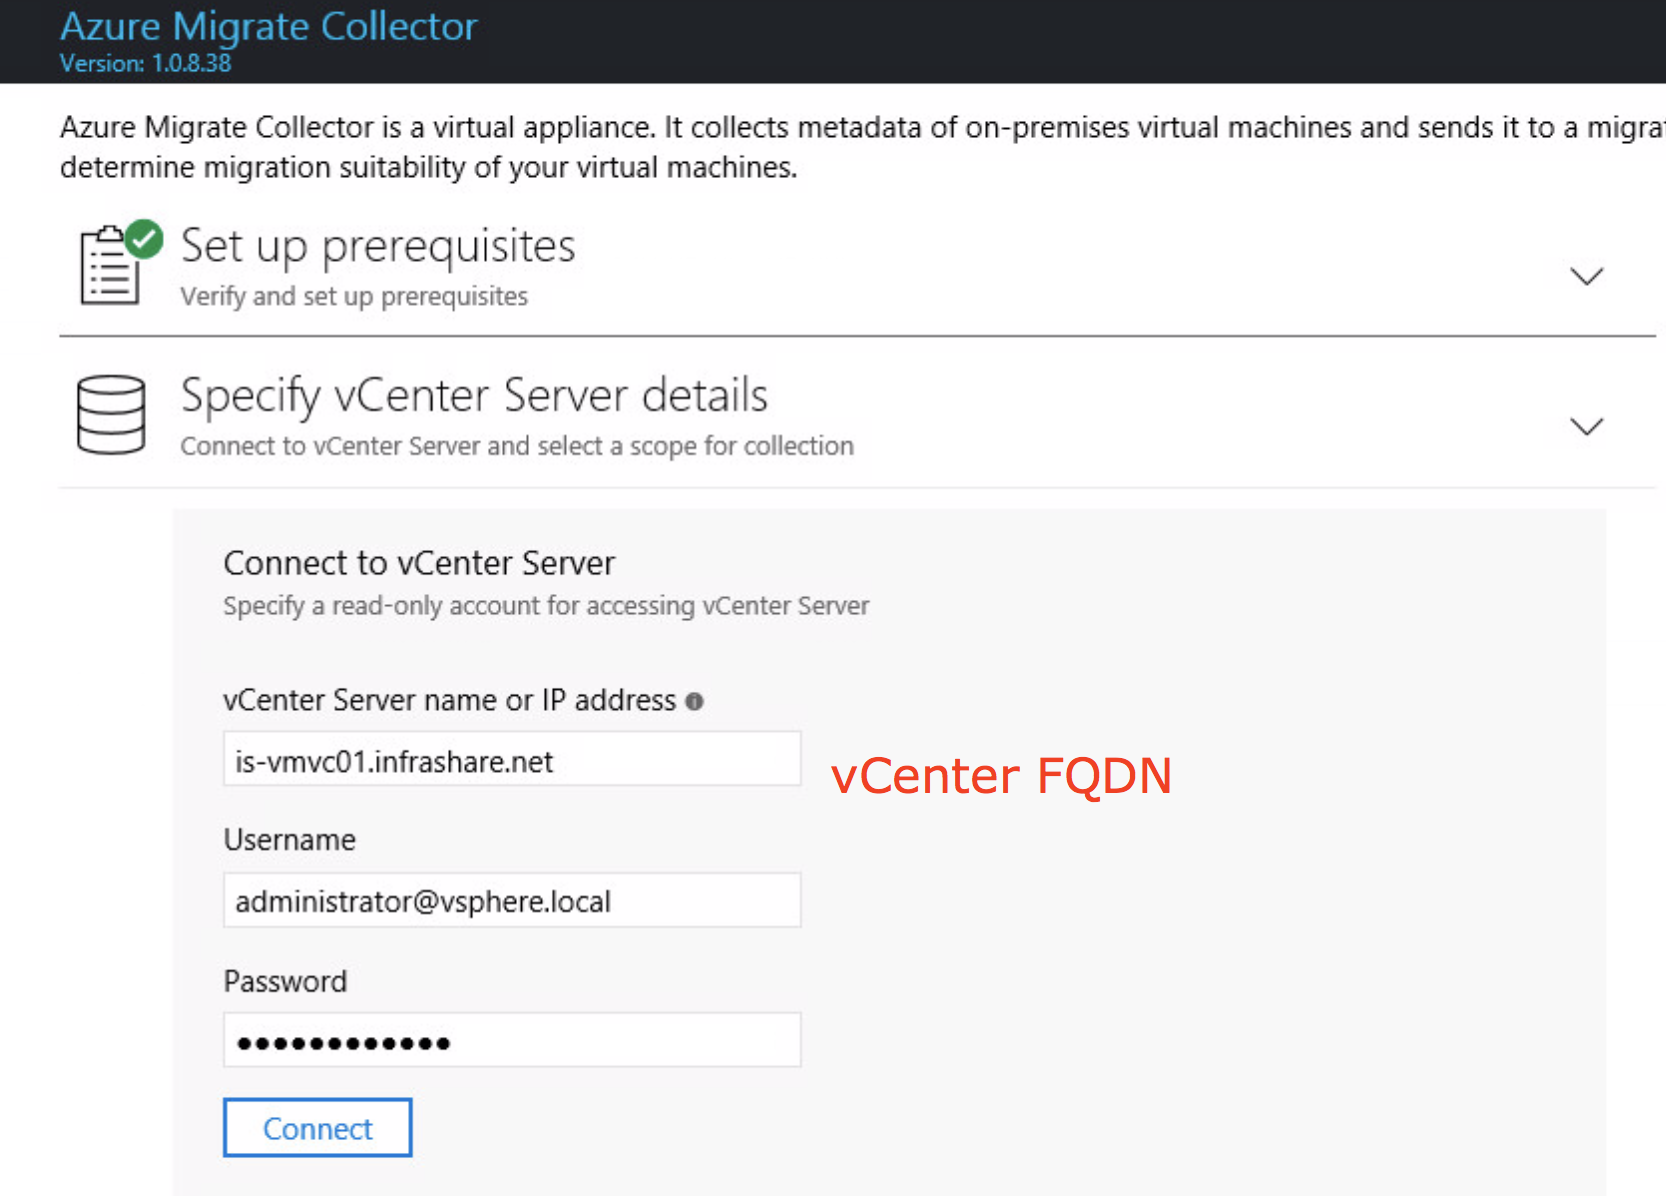
When the connection is performed correctly, you’d can see the Hosts and Clusters of you’re VMware environment.

Select the VMware Cluster we’re your Virtual Machines are in that you want to migrate to Azure. Click on Continue
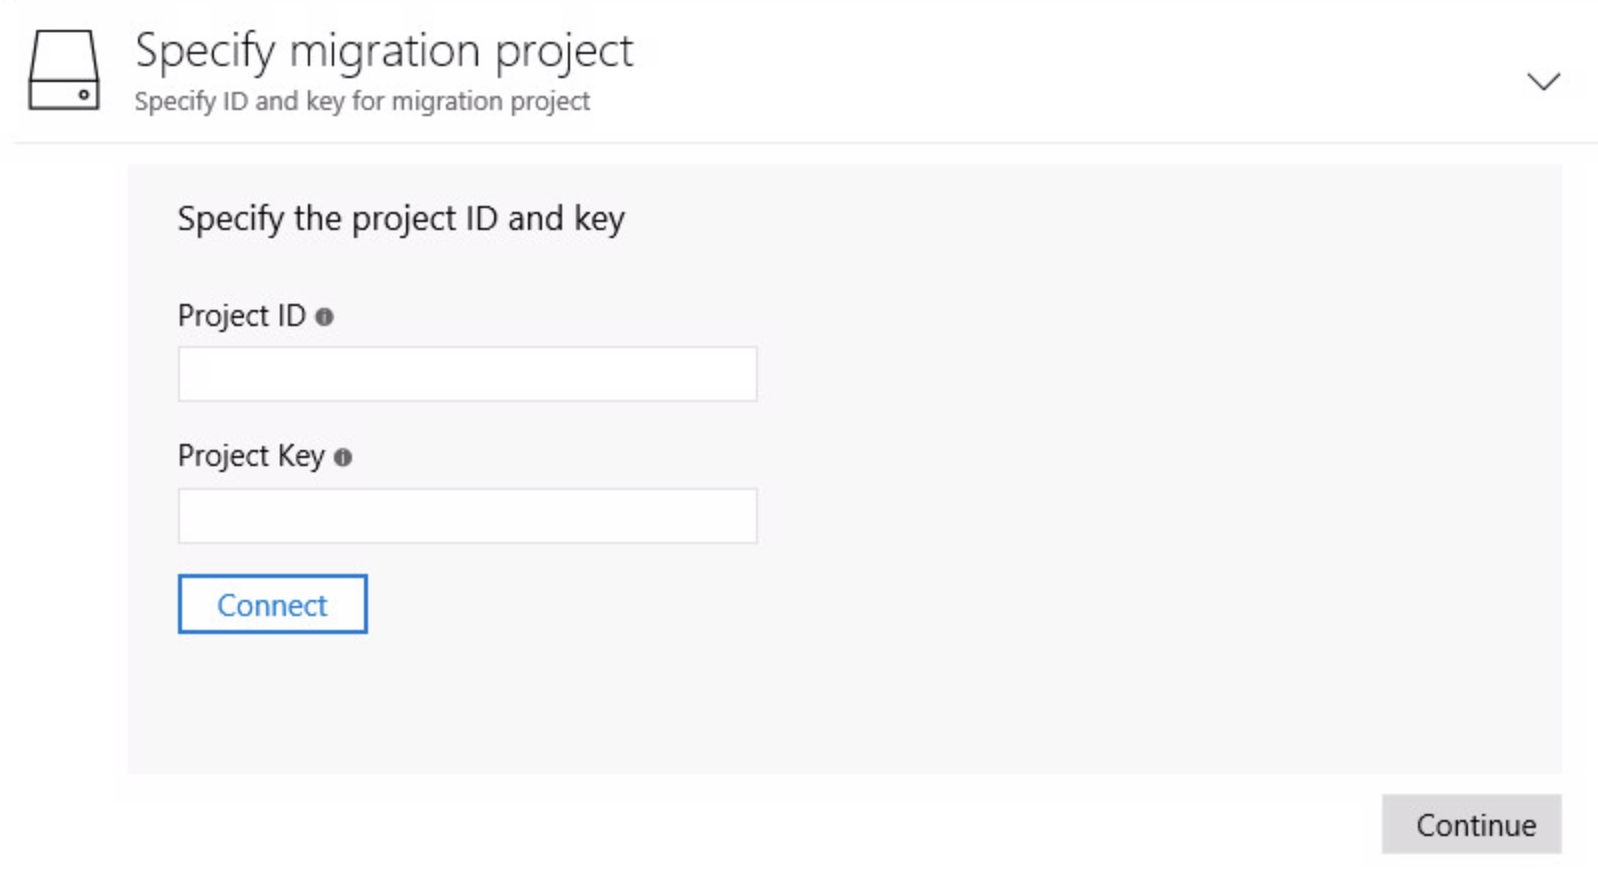
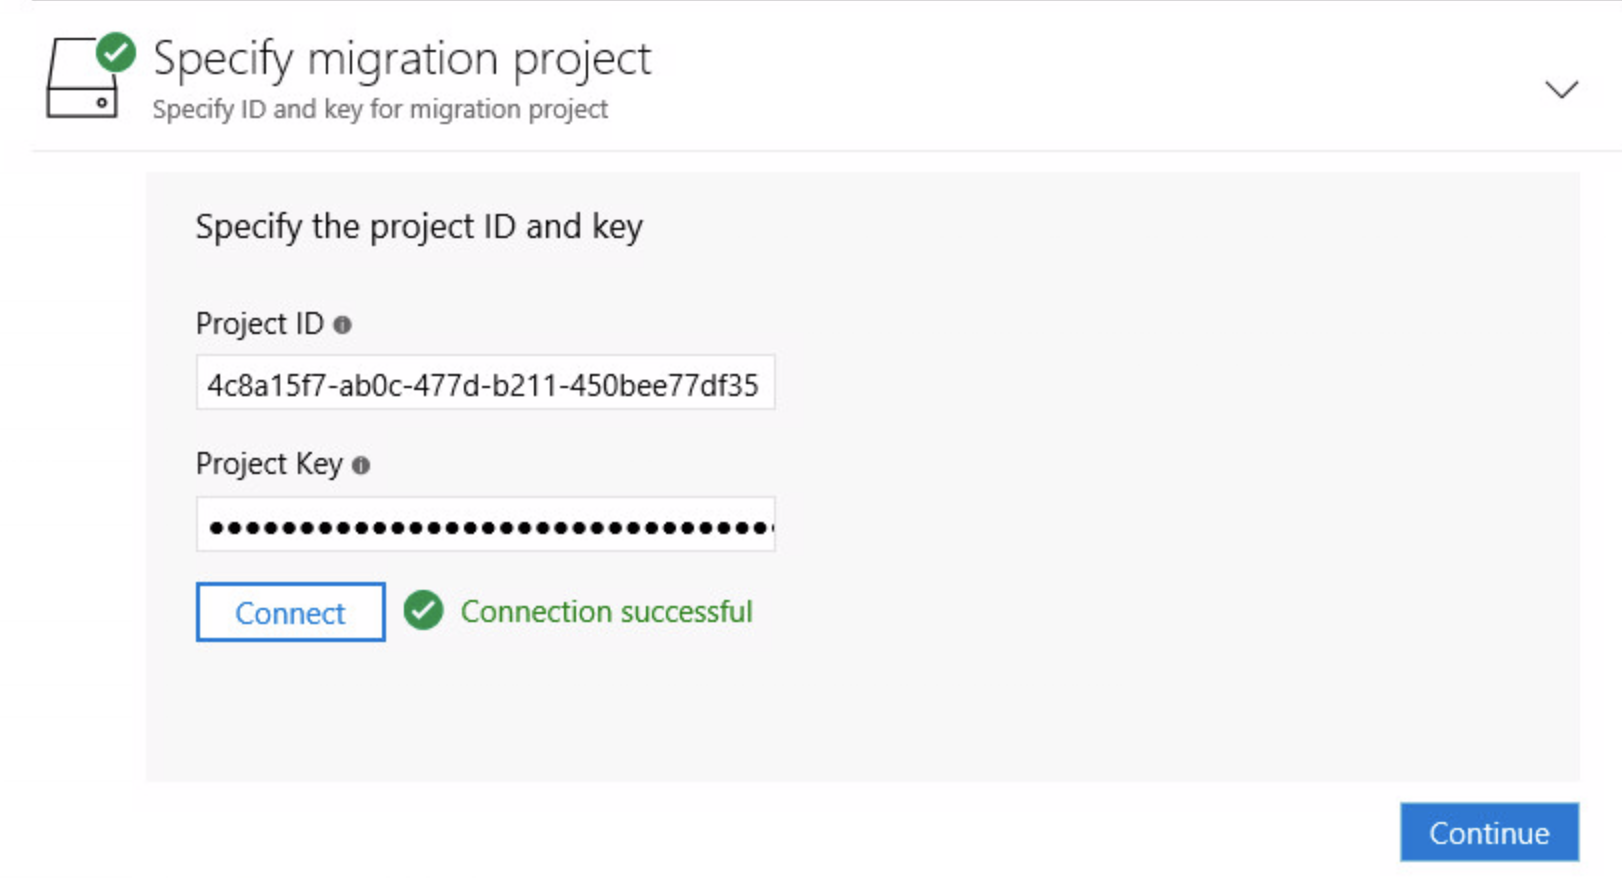
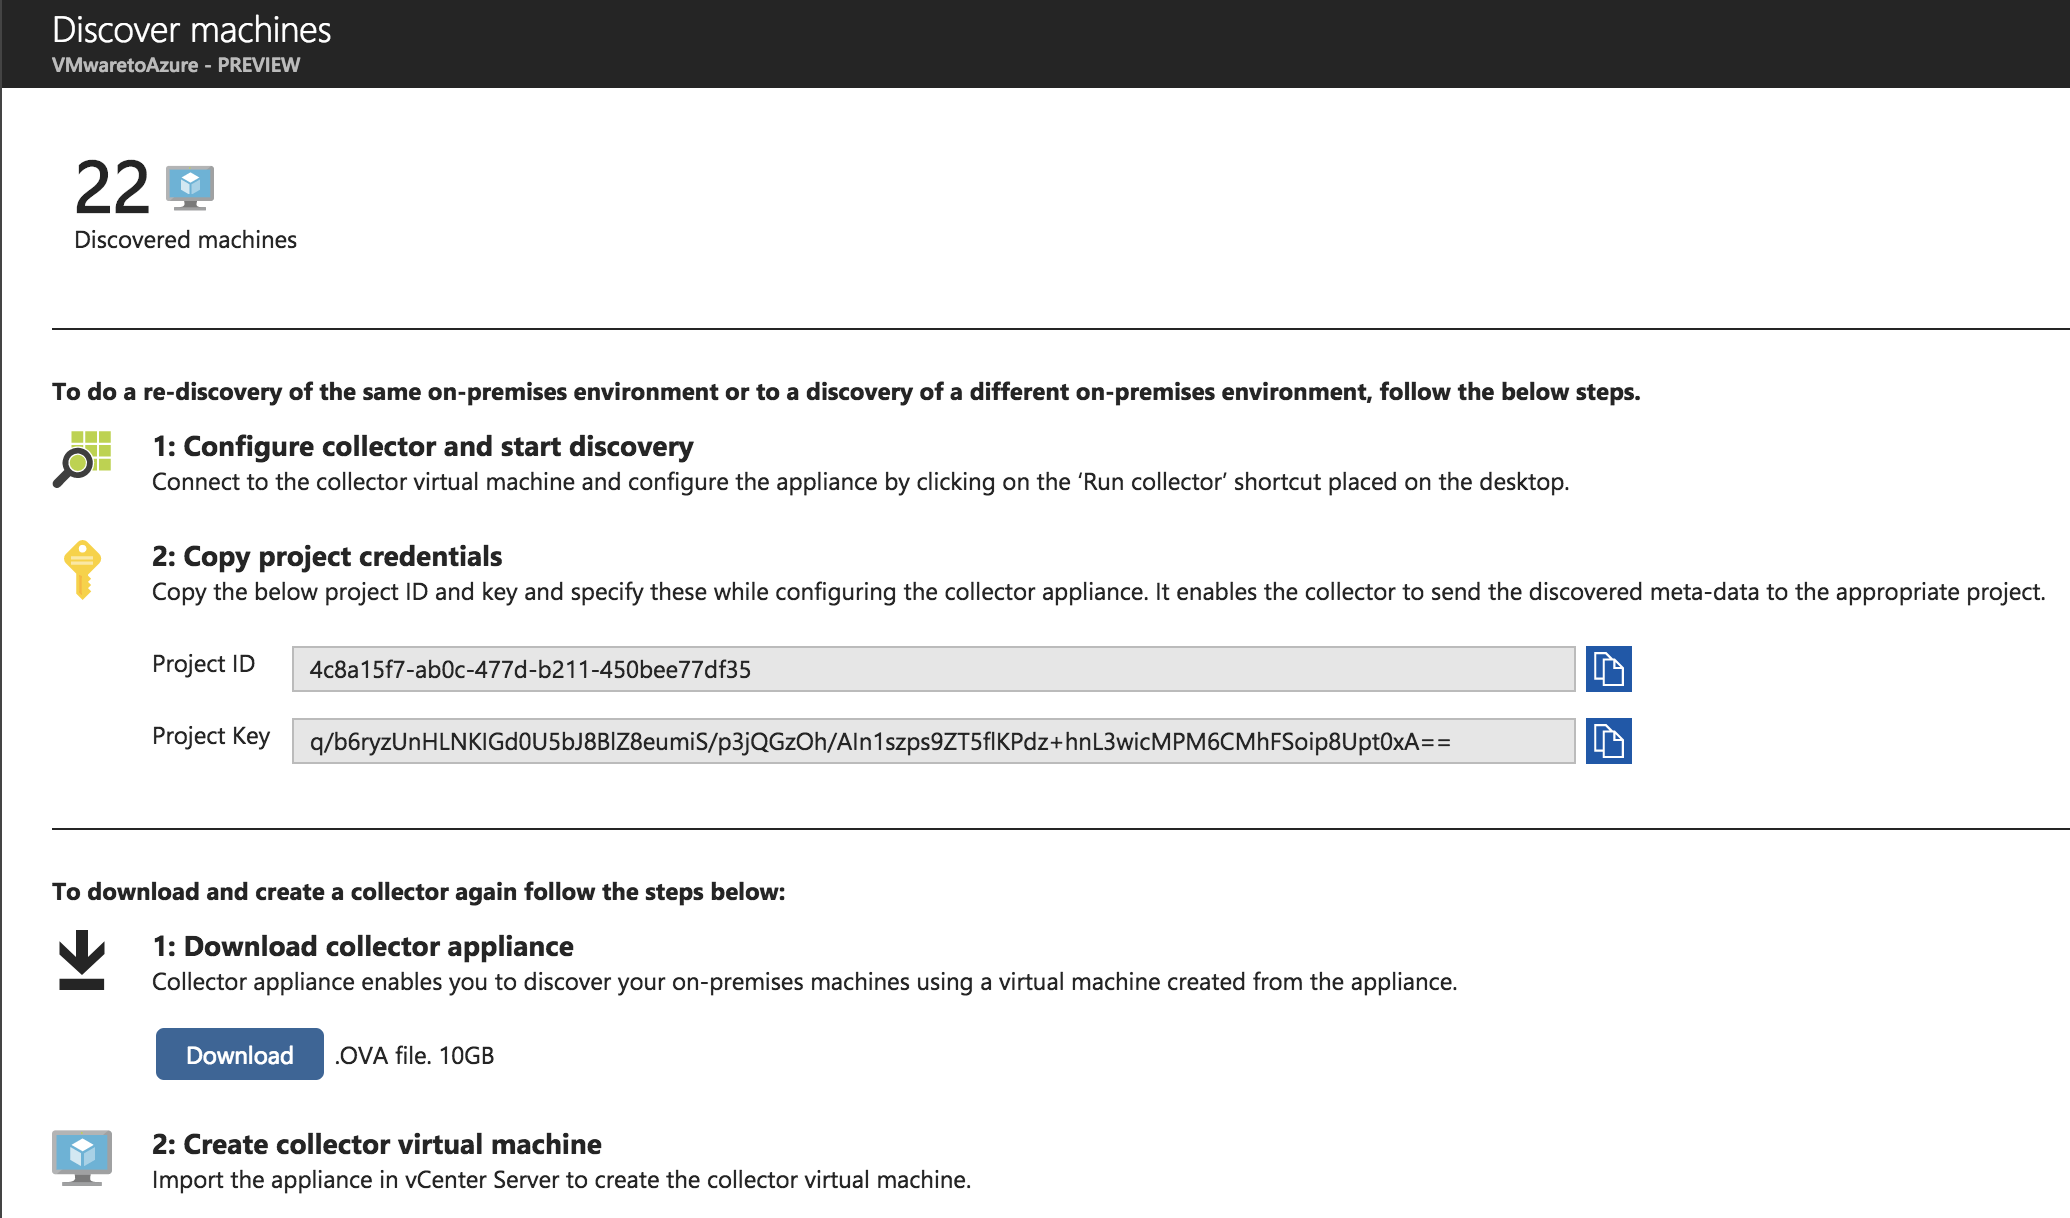
Now we need to enter in the Project ID and Key from the steps we’d performed in the Azure Portal during the Migration Service setup

Make sure the green checkmarks return, click on Continue
The final Collection Process is now proceeding. After this the machines will be visible in the Azure Migrate Service
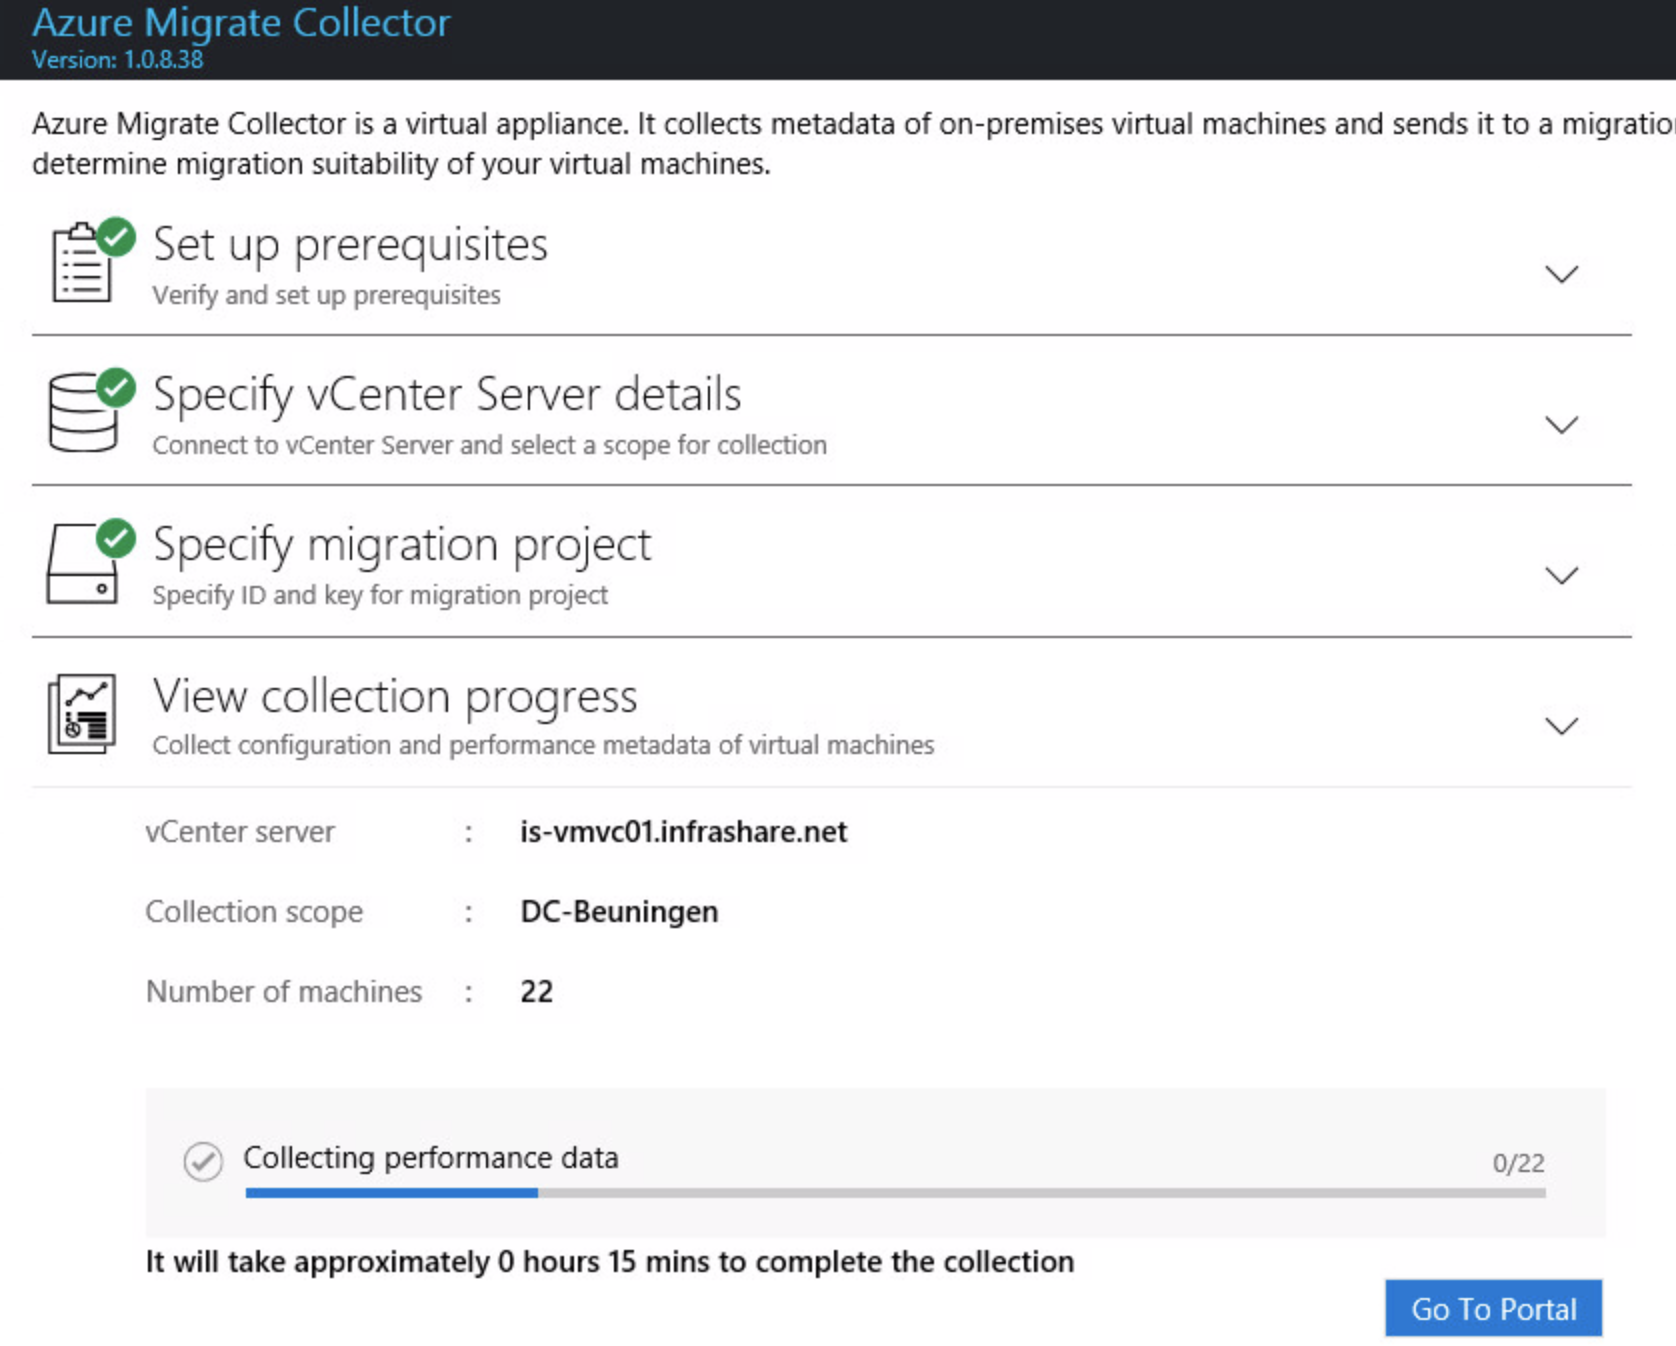
Wait to up to 1 hour to check if the resources are visible in Microsoft Azure.

Switch back to the Azure Migrate Service in Azure.
Open the Migration Project and click on Discover Machines
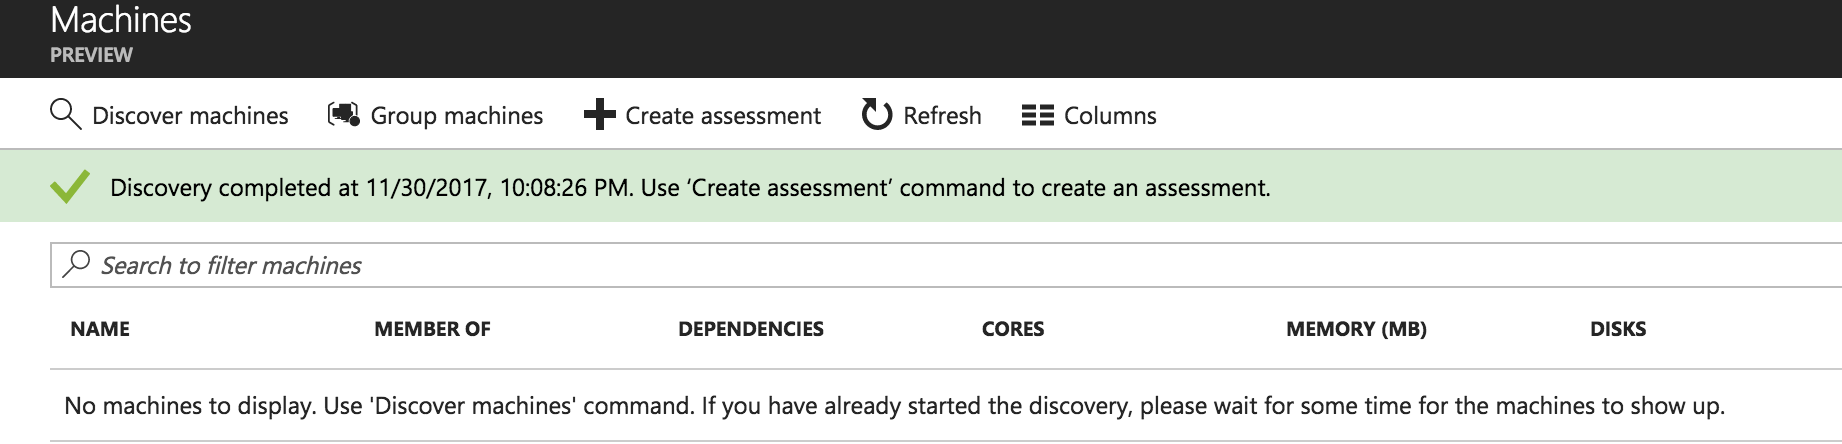
Click on Discovered Machines
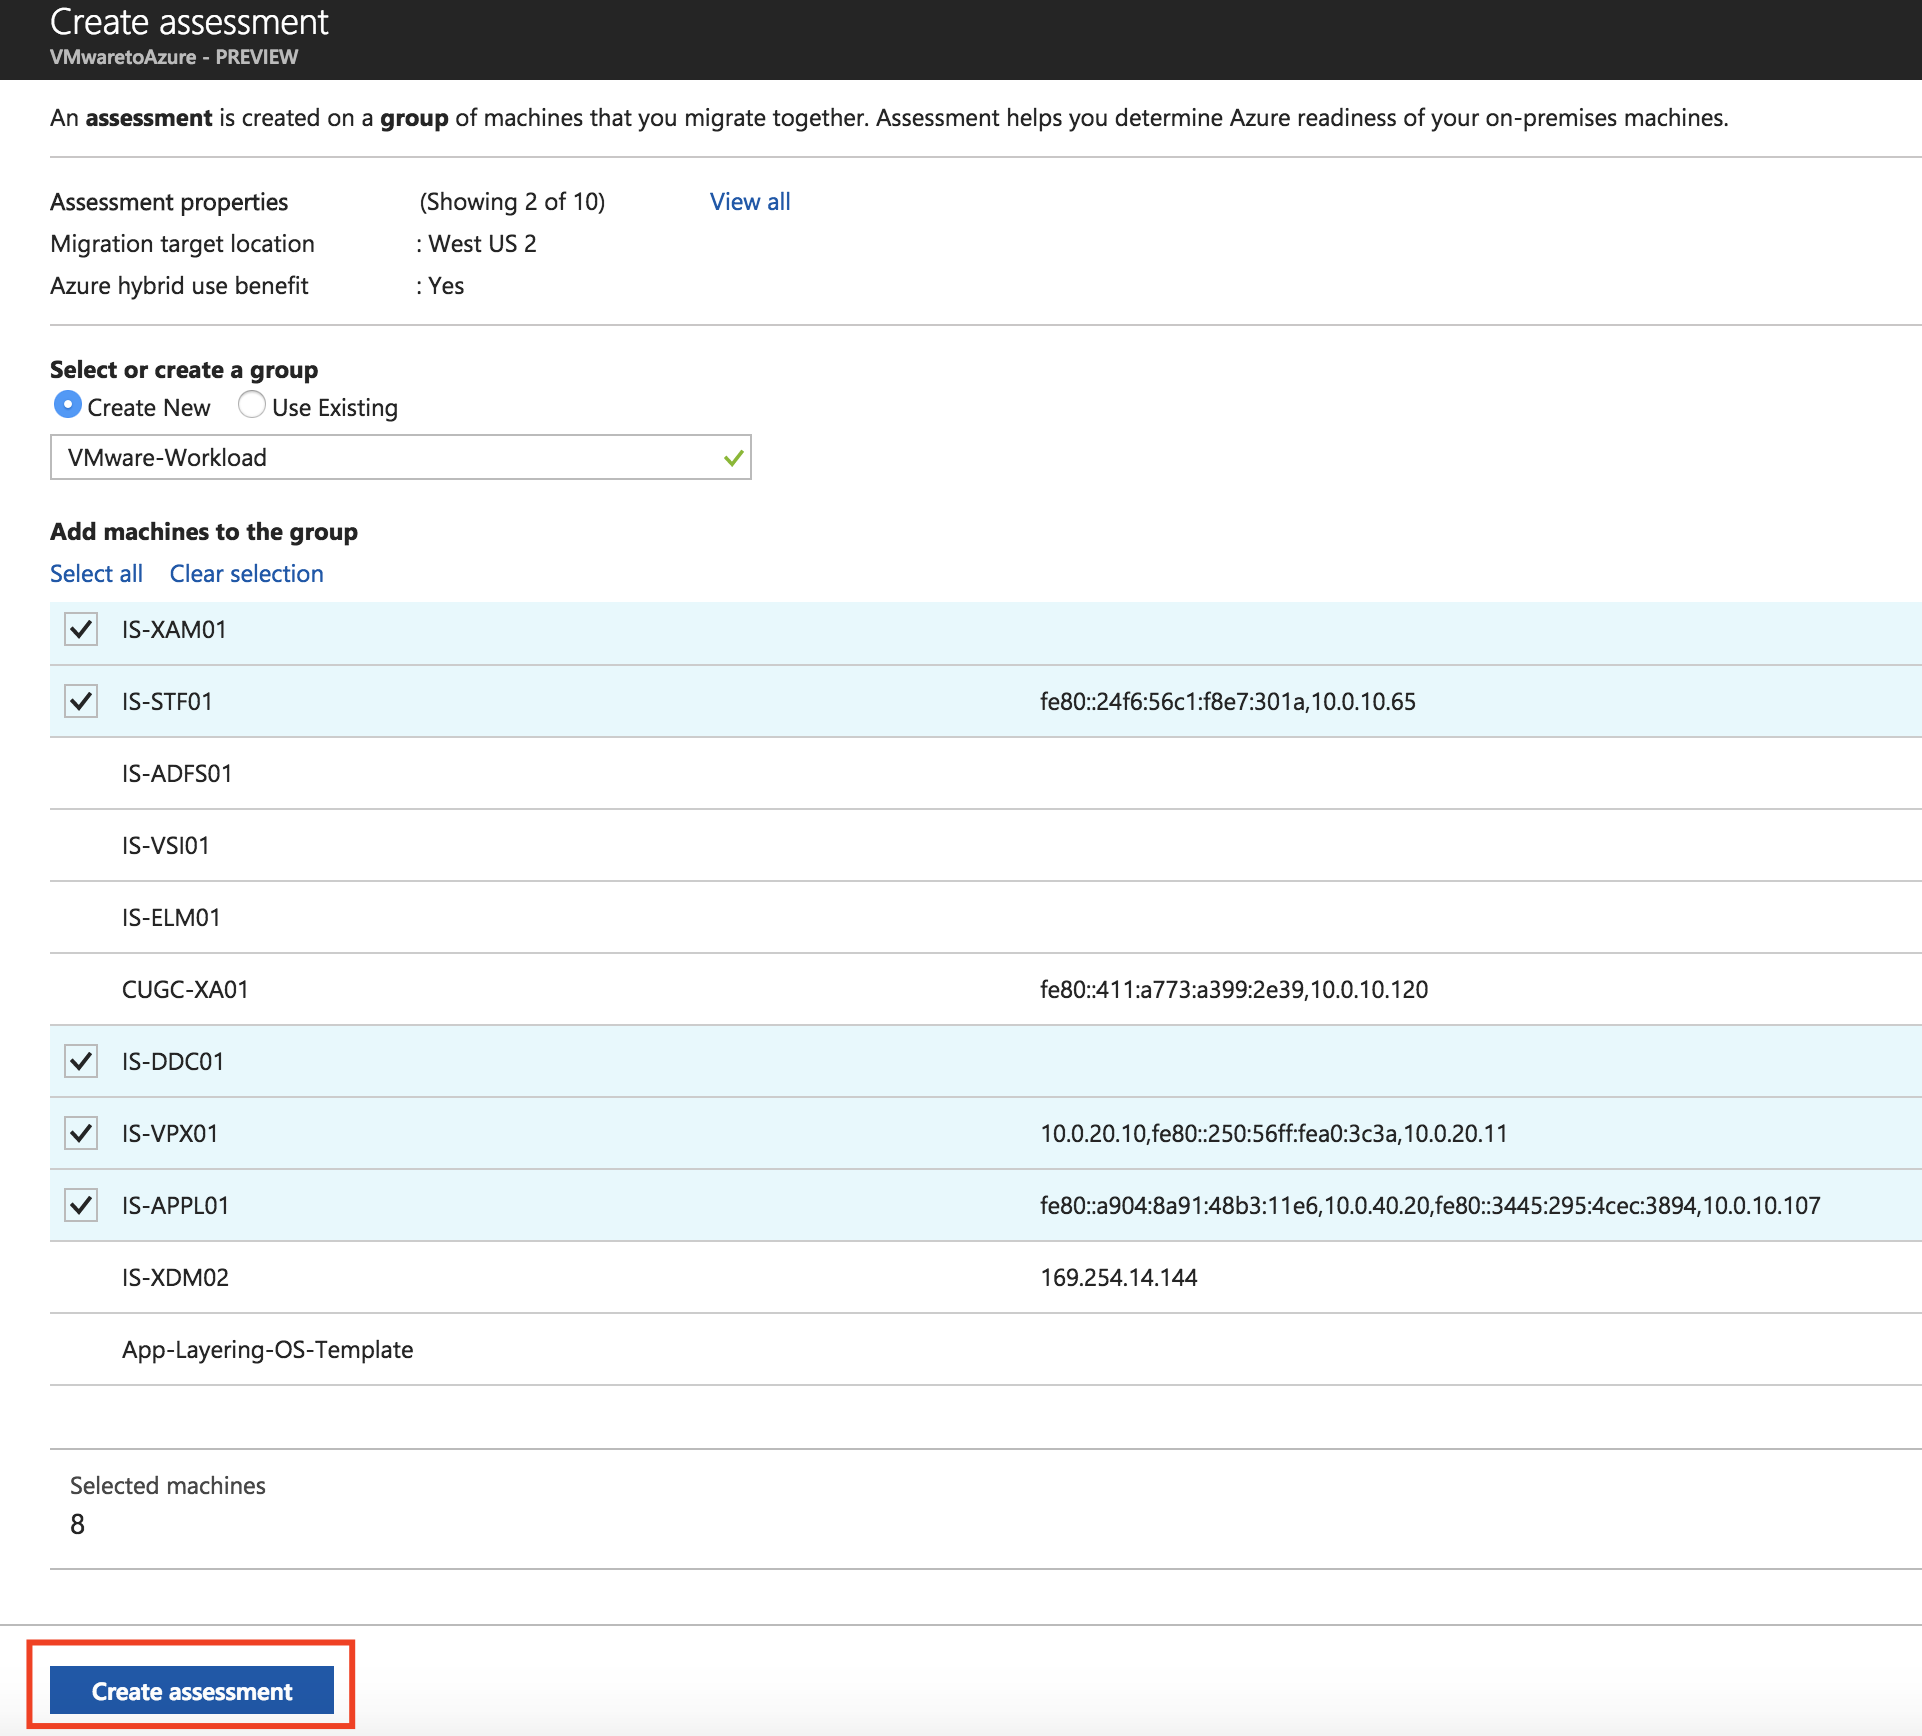
Click on Create Assessment

Enter in a Group Name and Select the Machines that you need to migrate to Azure and click on Create assessment
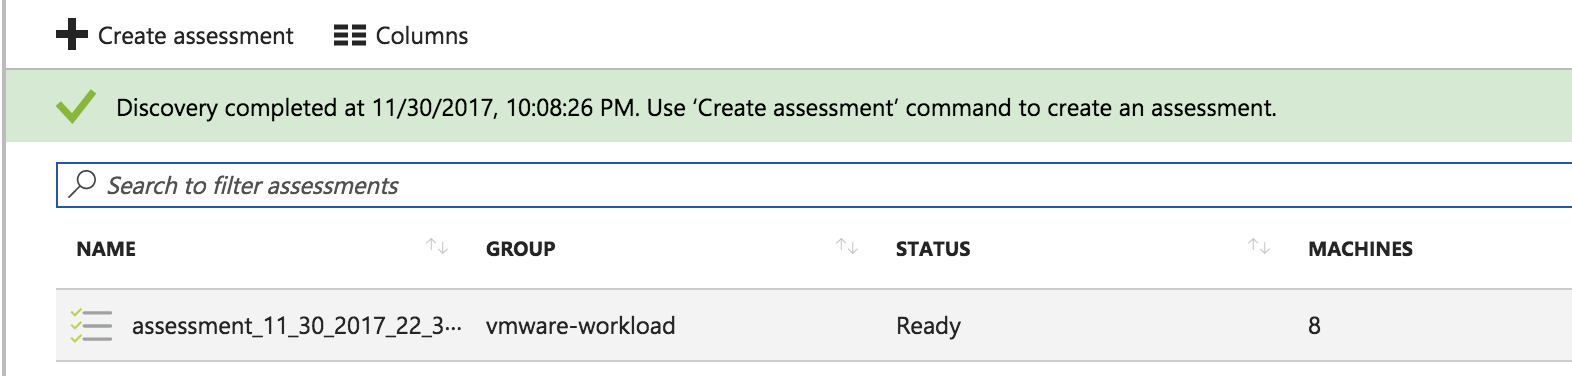
Switch back to the Migrate Service Overview dashboards and click on the Assessments option
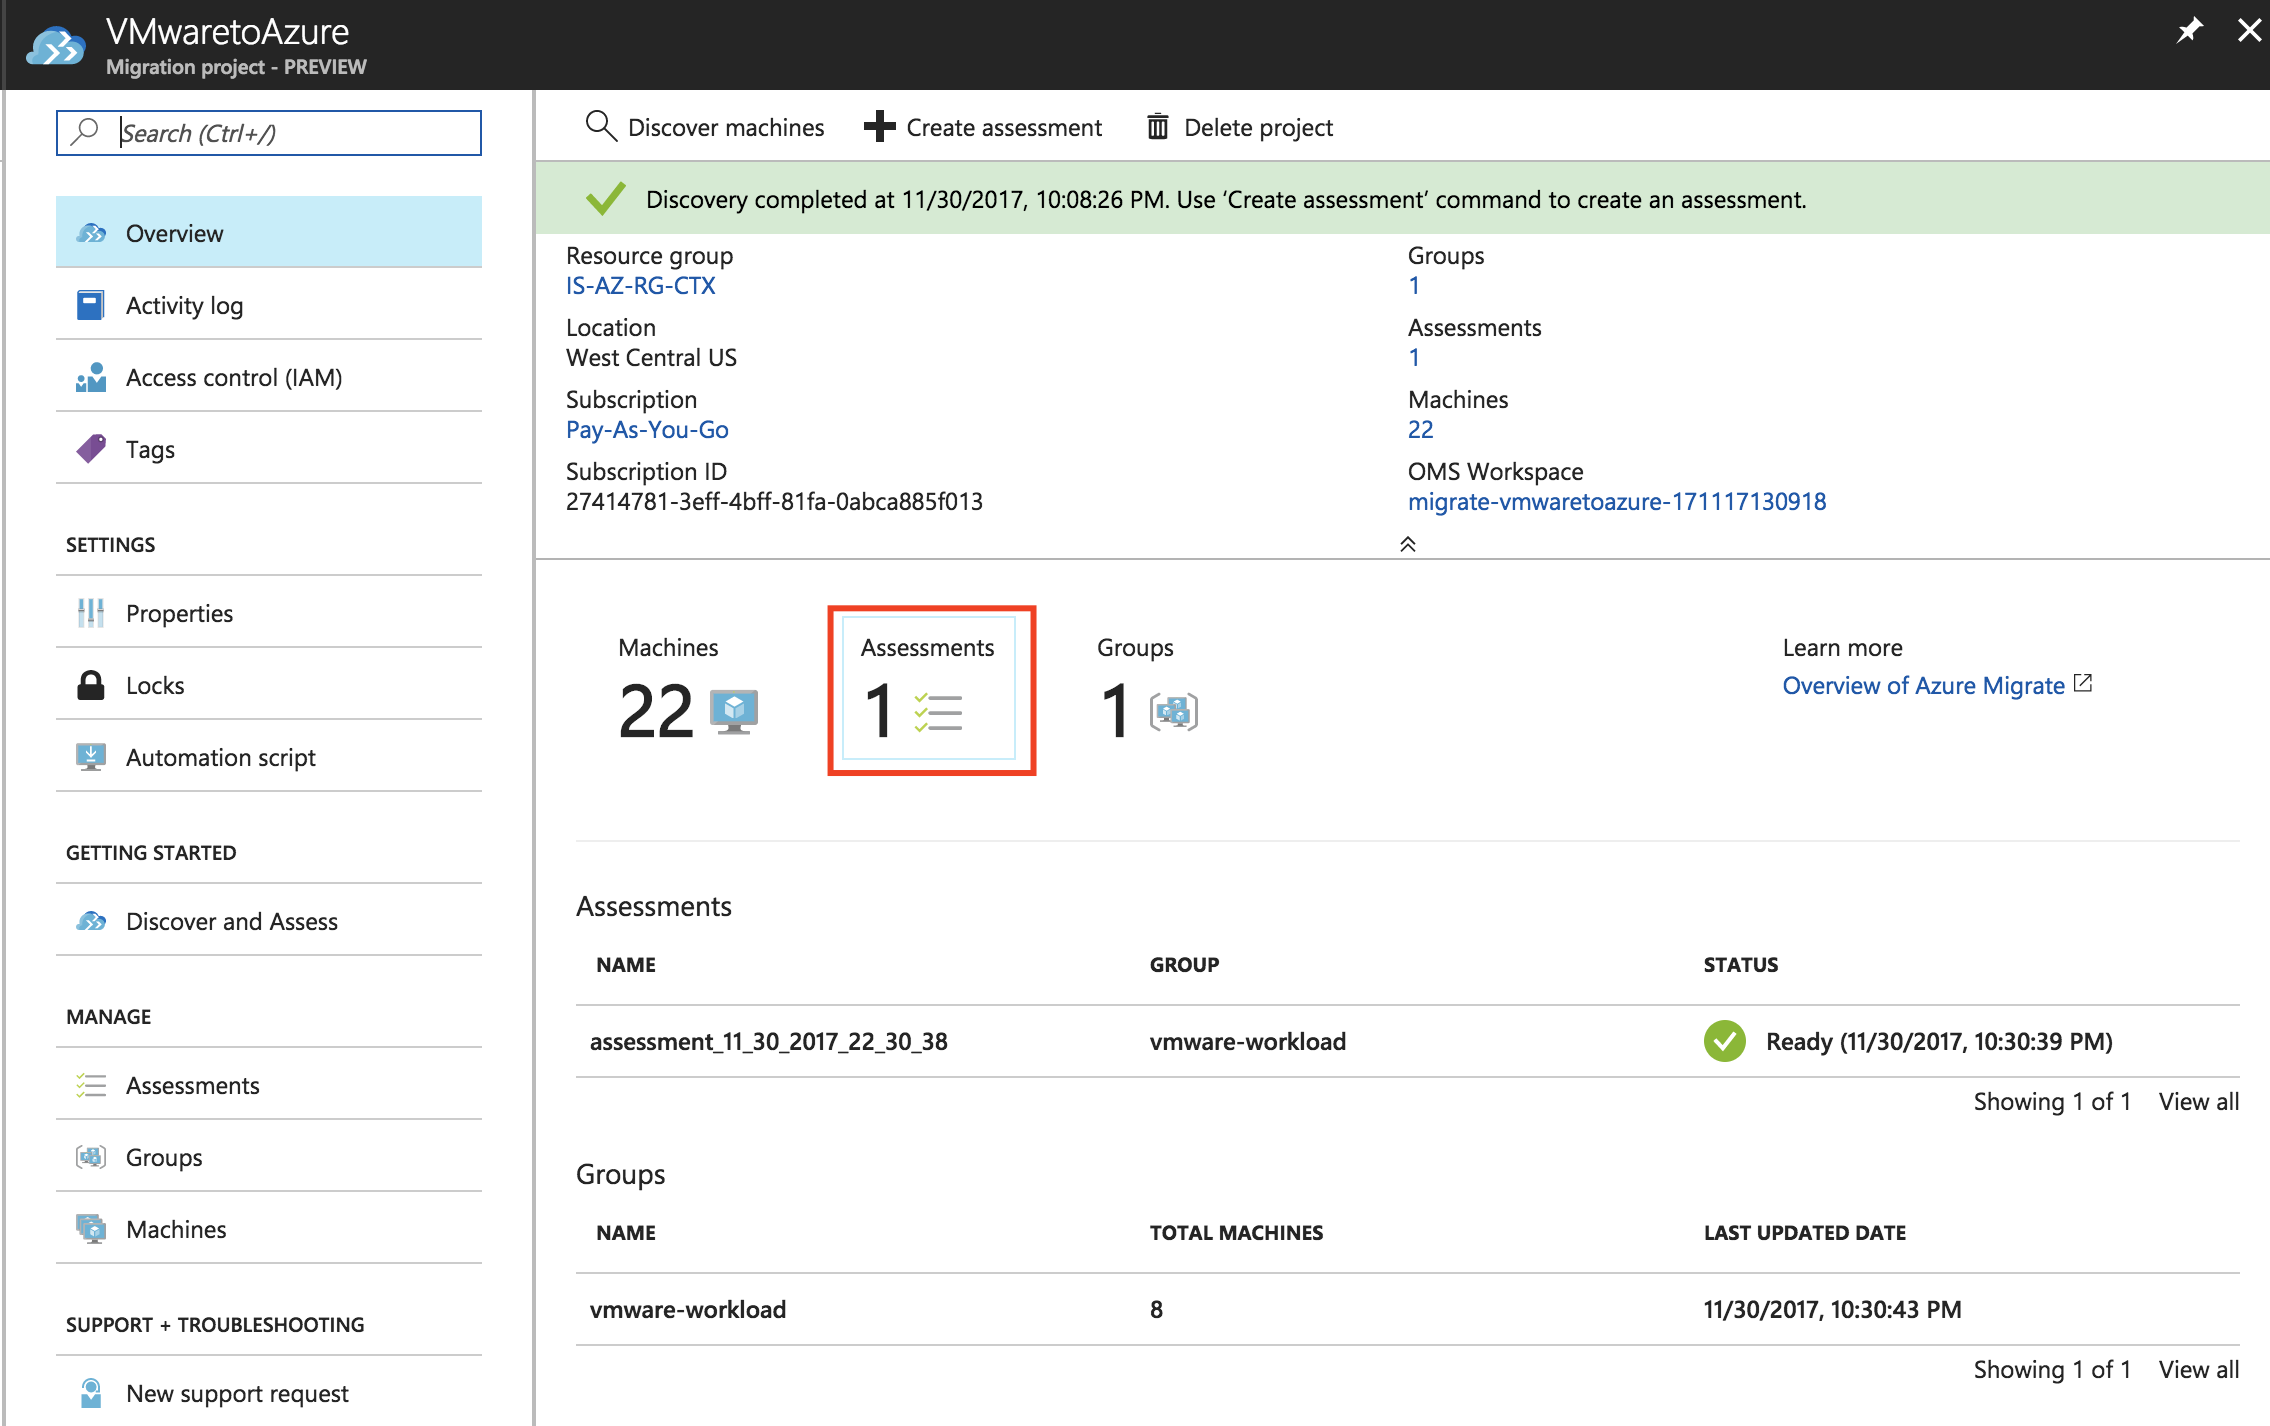
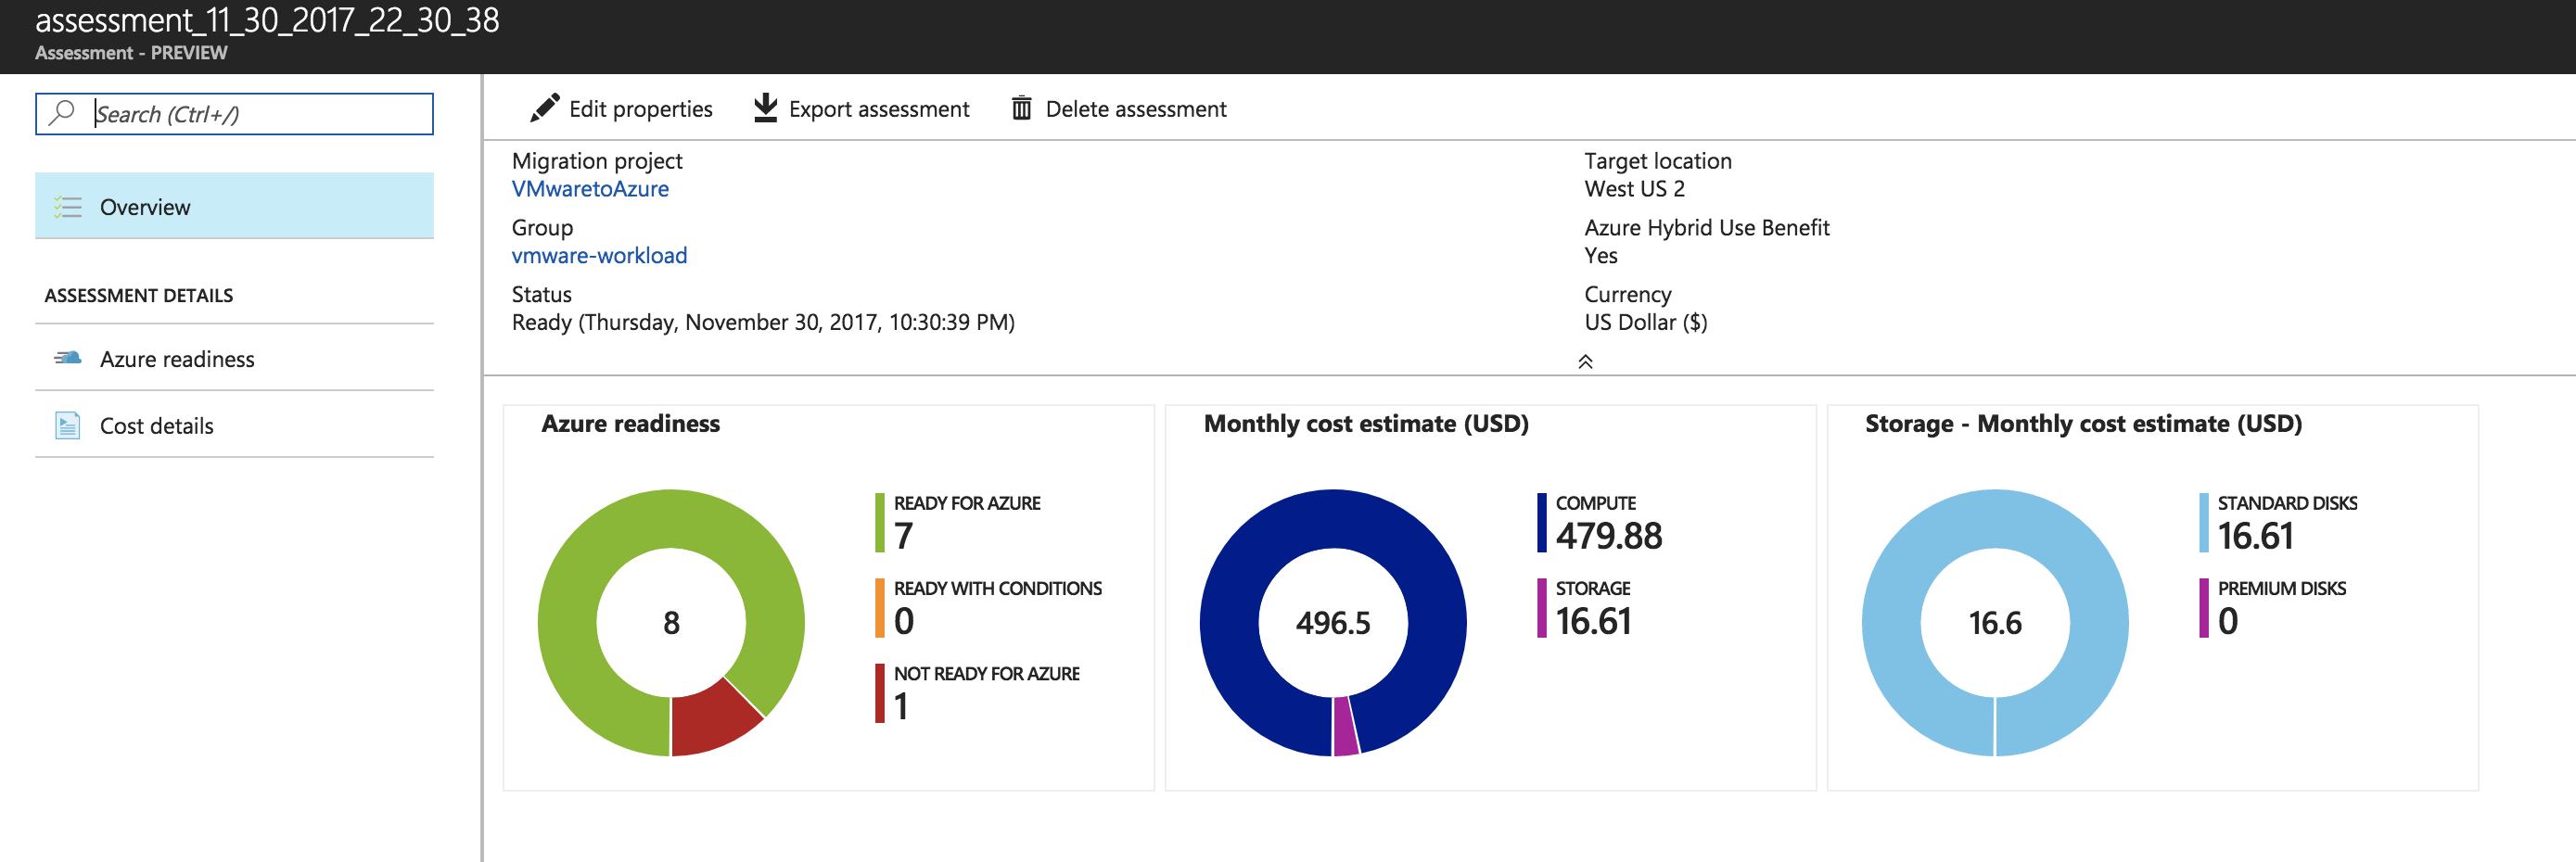
Open the Assessment
Azure IaaS Cost Calculation and migration advisory diagrams
All the machines are listed, including a cost calculation and a short migration readiness as advise to migrate to Azure.
Note: This is screen where you’ll find the estimated costs and advices for the Migration to Microsoft Azure IaaS. There is also an Excel export button to create an Excel sheet.
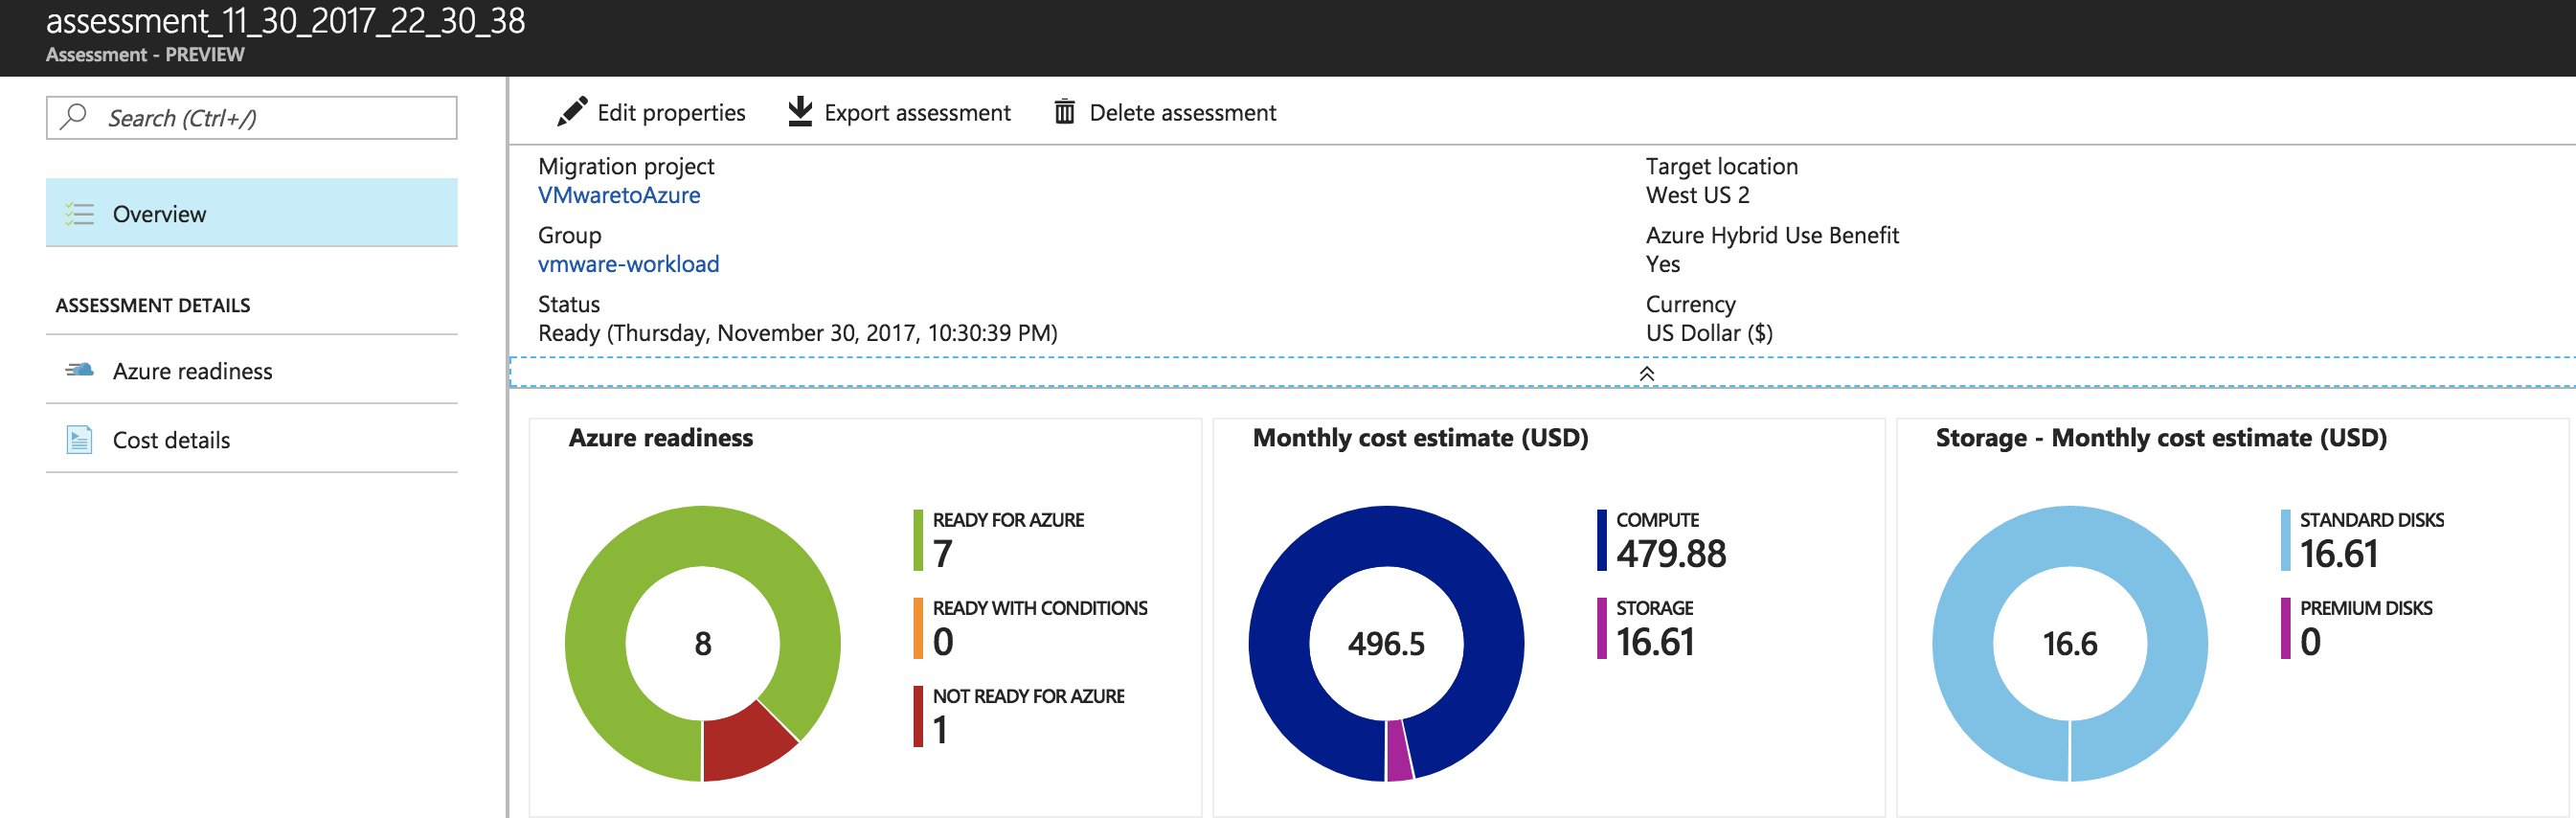
Click on Edit properties to change the requirements for Workload in Azure IaaS
Note: Please change the Azure HUB settings if you have an EA Agreement and SA on Windows Server!

Click on the Assesment

Click on the Azure readiness
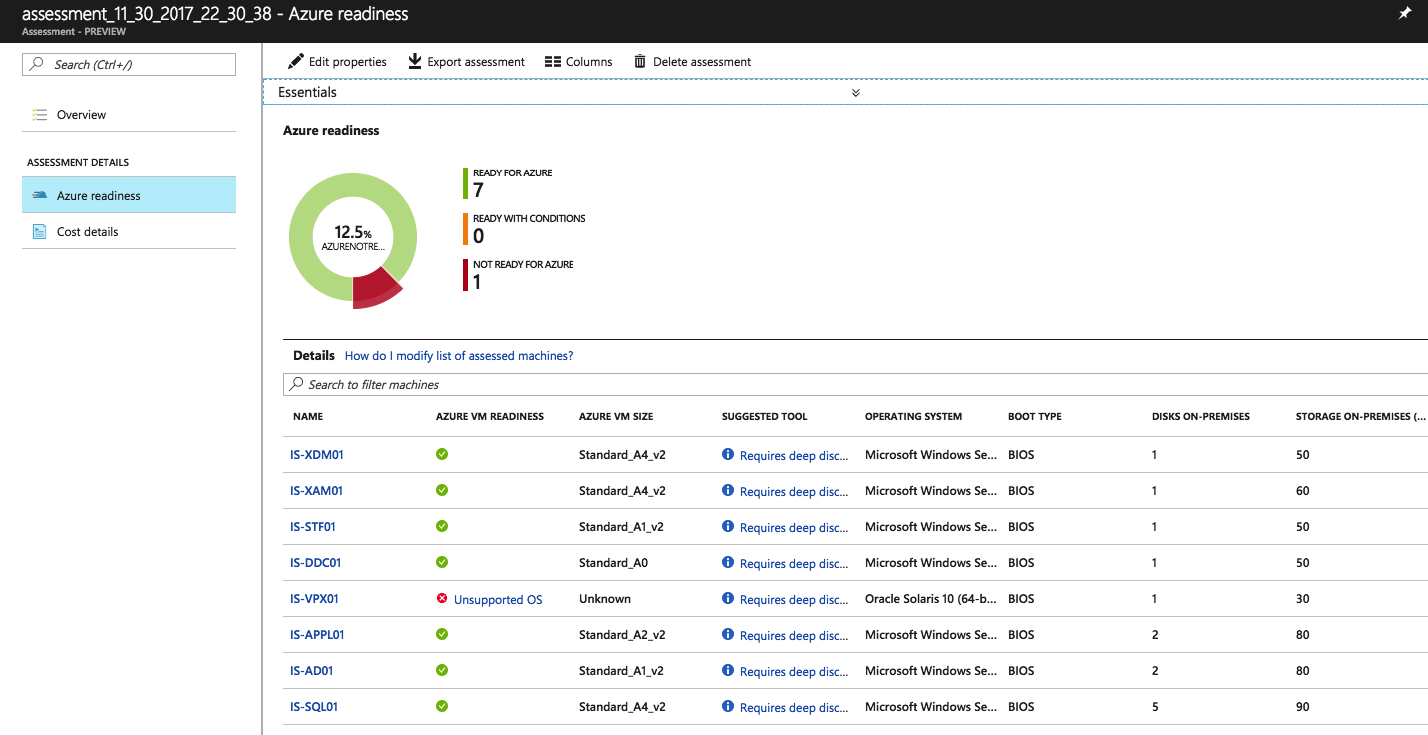
Install the Deep discovery agent on all the VMware machines to get a Suggested (Migration) tool

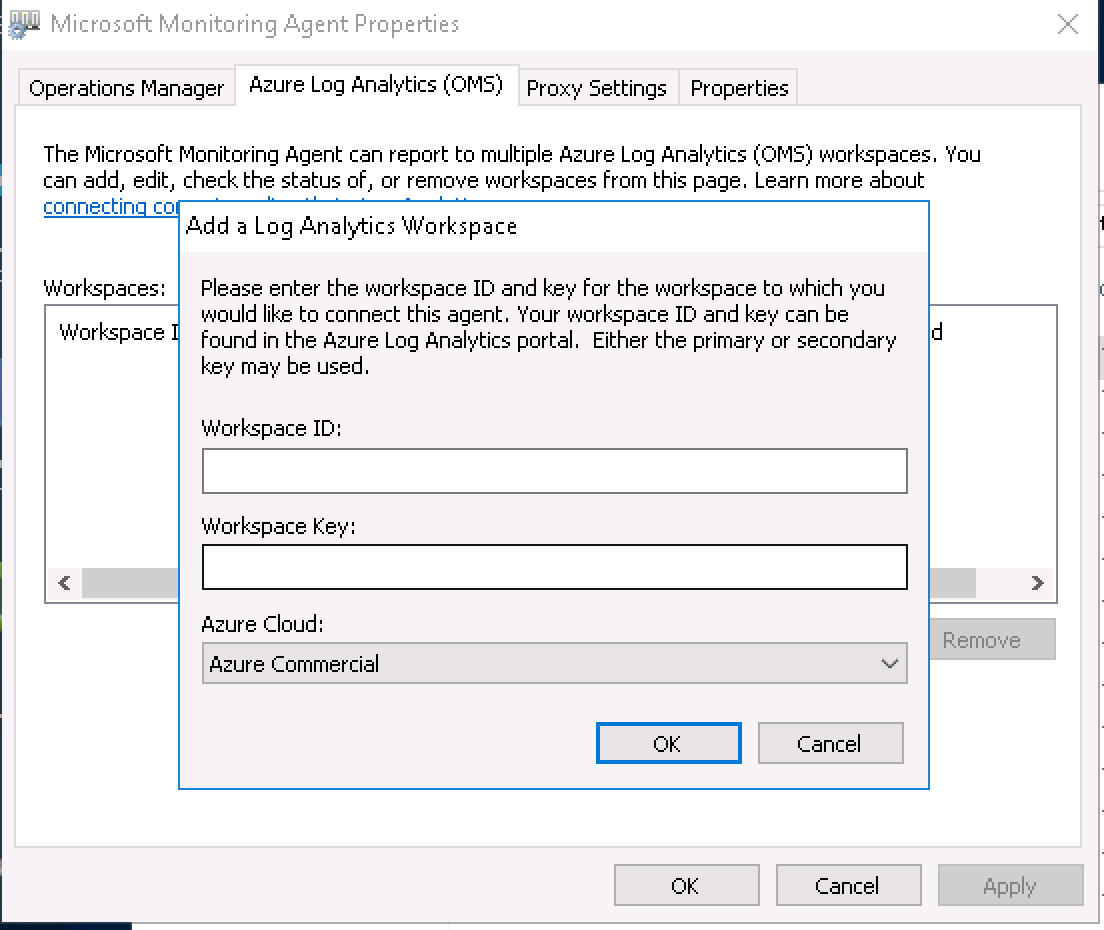
Perform the installation of the MMA Client

Install the MMA Agent on all the on-premise Virtual Machines you want to migrate / or get the best advice from.
Note: It is not required to install the agent for getting a costs calculation.
Enter in the Workspace ID and Key and click on Ok
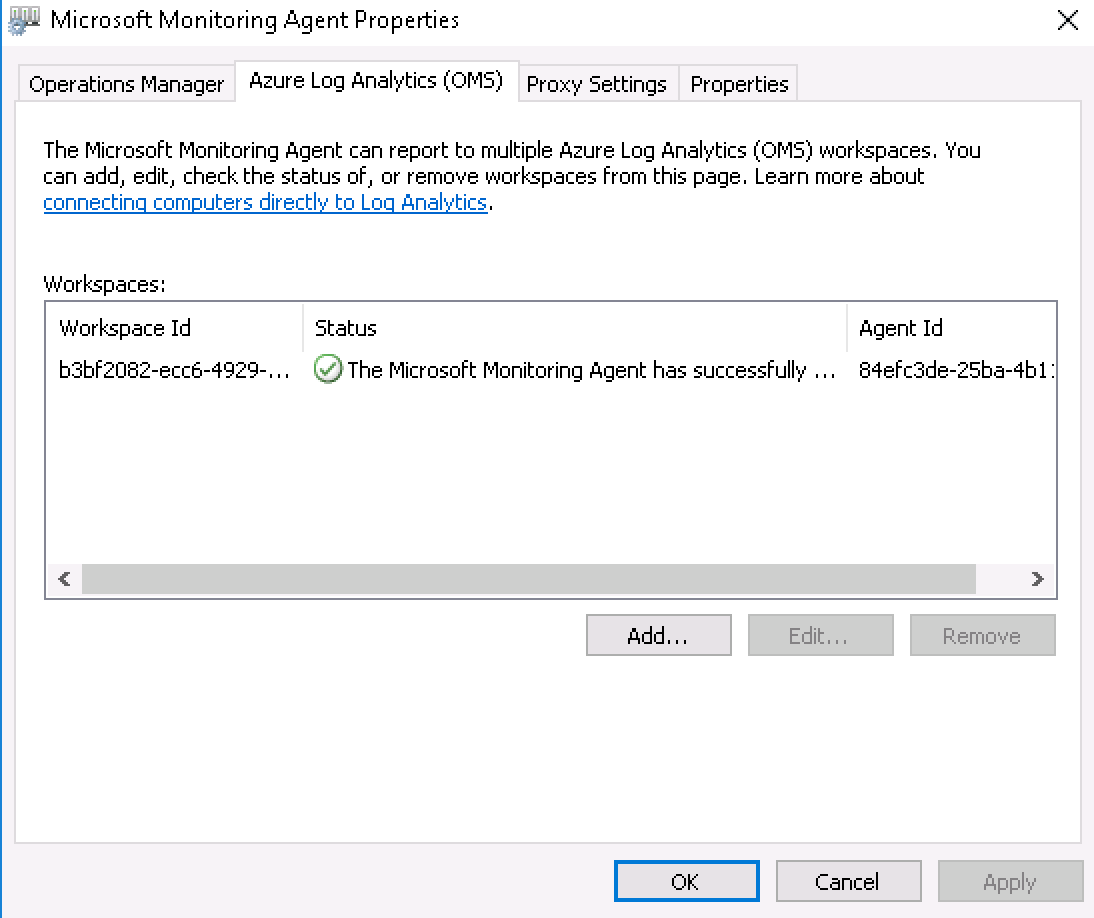
The agent is activated successfully….
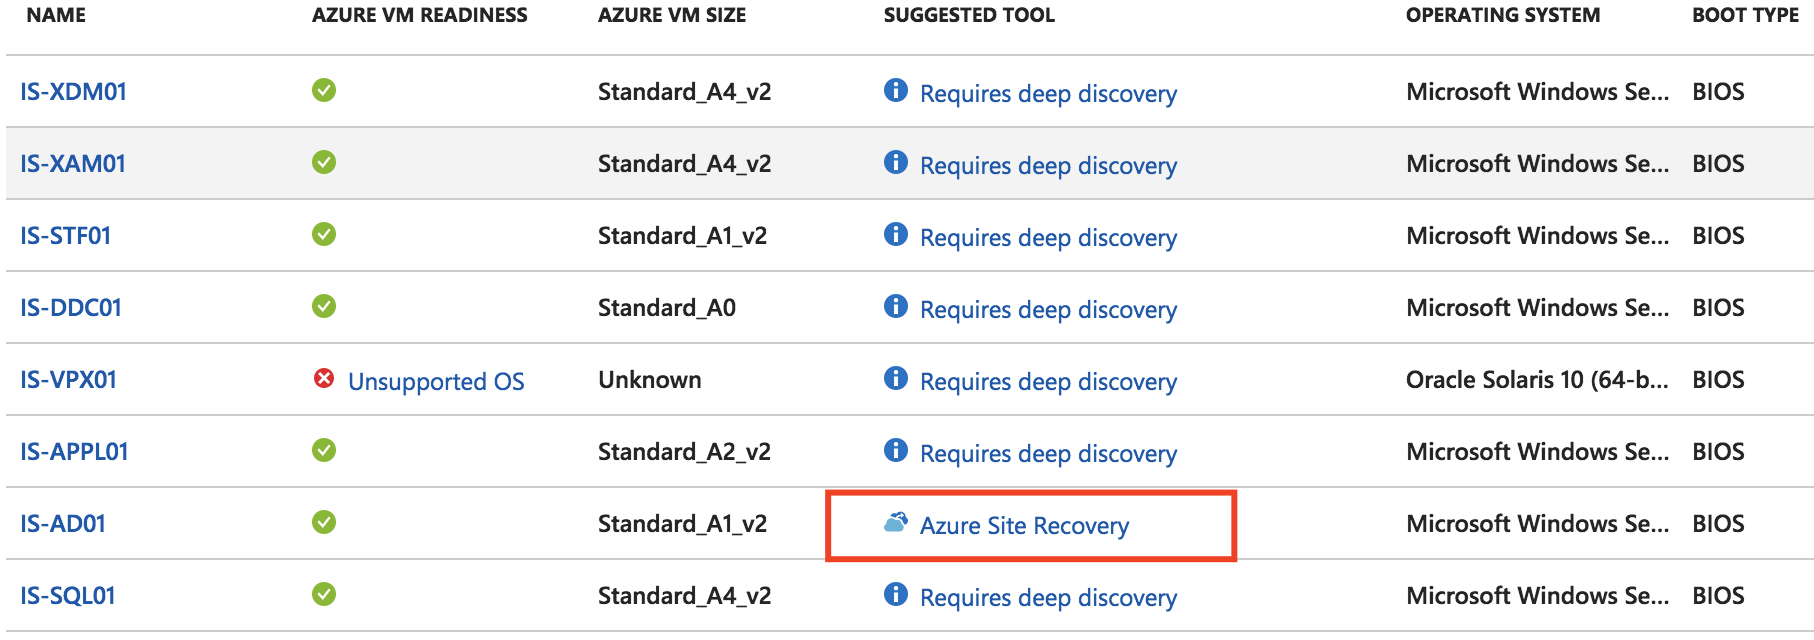
Please switch back to the Migrate Assessments dashboard.
As you can see, the Suggested Tool for the Active Directory server, on which I installed he Agent on changed from – Required deep discovery – to Azure Site Recovery.
Perform the Migration with Azure Site Recovery
The migration advice for the IS-AD01 server, after the installation of the Deep Discovery Agent is Azure Site Recovery (ASR). This means that Azure recommends ASR to migrate this machine to Azure Infrastructure-As-a-Service (IaaS).
I already wrote a complete and very comprehensive walkthrough article on the initial configuration of Azure Site Recovery not so long ago. The article is based on a Citrix XenApp migration, therefore almost all the initial configuration parts are just the same as for normal VMware workload scenarios. Skip the parts of Citrix and include the VMware workload server that you want to migrate to Microsoft Azure IaaS.
I’ve created the following How To video to experience how easy it is to migrate on-premises workloads to Microsoft Azure when using Azure Site Recovery.
Conclusion
As you can see is Azure Migrate Service just an Advisory and Cost Calculation tool for Azure Cloud migrations. The service which gives the best migration approaches back on how you can migrate you’re on-premise workloads to the Microsoft Azure Cloud.
After running the assessment service, it returns with a nice clear view how the costs will be to run servers in Azure in an as-is / lift-shift scenario. As mentioned in the beginning of this article, I’ll definitely recommend you to look further than a lift-and-lift, and replace as much as possible Windows Server features by all the different Azure platform services that are available today, such as Azure Active Directory (Domain Services), Azure OMS, Azure SQL, App Services and of course much more and more and more and more…
I hope this helps you to get more confident to perform the Digital Transformation to the Cloud.
If you have any question, or need help, please note them in the comment section.
Cheers,Christiaan Brinkhoff